Service This manual is to be used by qualified appliance technicians only. Maytag does not assume any responsibility for property damage or personal injury for improper service procedures done by an unqualified person.
Important Information Pride and workmanship go into every product to provide our customers with quality products. It is possible, however, that during its lifetime a product may require service. Products should be serviced only by a qualified service technician who is familiar with the safety procedures required in the repair and who is equipped with the proper tools, parts, testing instruments and the appropriate service information.
Table of Contents Important Information ................................................... 2 Important Safety Information Safety Practices for Servicer .................................... 4 Servicing .................................................................. 4 Electrical Requirements ........................................... 5 Extension Cord ........................................................ 5 Receiving Oven ........................................................ 5 Using the Oven ........
Important Safety Information ! Recognize this symbol as a safety precaution. ! W A R NIN G In Case of Fire ! Fires can occur as a result of over cooking or excessive grease. Though a fire is unlikely, proceed as follows: WARNING If the information in this manual is not followed exactly, a fire or explosion may result causing property damage, personal injury or death. There can be a risk of injury or electrical shock while performing services or repairs.
Important Safety Information Electrical Requirements 240-volt, 60 Hertz, 40 amp, individual circuit which is properly grounded, polarized and protected by a circuit breaker or fuse. Extension Cord Due to possible pinching during installation, extension cords should not be used on products. Receiving Oven • Authorized servicer must install the range, in accordance with the Installation Instructions. Adjustments and service should be performed only by authorized servicer.
Important Safety Information Surface Cooking Units Glass/Ceramic Cooking Surfaces 1. Use Proper Pan Size—This appliance is equipped with one or more surface units of different size. Select utensils having flat bottoms large enough to cover the surface unit heating element. The use of undersized utensils will expose a portion of the heating element to direct contact and may result in ignition of clothing. Proper relationship of utensil to burner will also improve efficiency. 1.
General Information This manual provides basic instructions and suggestions for handling, installing and servicing electric ranges. The directions, information, and warnings in this manual are developed from experience and careful testing of the product. If the unit is installed according to this manual, it will operate properly and will require minimal servicing. A unit in proper operating order ensures the consumer all the benefits provided by clean, modern electric cooking.
General Information Specifications Refer to individual Technical Sheet for specification information. Placement of the Oven This freestanding range must be placed in the kitchen or comparable room. All safety guidelines must be followed (see Chapter 2) and free air flow around the range is essential. Do Not Block Air Vents All air vents must be kept clear during cooking. If air vents are covered during operation, the oven may overheat.
Range Description • Dependability PlusSM Extended Service Plan is specially designed to supplement Maytag’s strong warranty. This plan covers parts, labor, and travel charges. Call 1-800-925-2020 for information. Extended Service Plan We offer long-term service protection for this new oven. • AsureTM Extended Service Plan is specially designed to supplement Amana’s strong warranty. This plan covers parts, labor, and travel charges. Call 1-866-232-6244 for information.
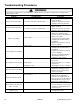
Troubleshooting Procedures ! WARNING To avoid risk of electrical shock, personal injury, or death, disconnect power to range before servicing, unless testing requires power. Problem No bake element operation No broil element operation Oven not operating Clock and timer not working Oven light does not operate Self-clean cycle not working Oven door will not unlock Oven smokes/odor first few times of usage Failure Codes 10 Possible Cause Correction Open bake element.................................
Troubleshooting Procedures ! WARNING To avoid risk of electrical shock, personal injury, or death, disconnect power to range before servicing, unless testing requires power. Problem Surface element does not heat Frequent cycling of surface element or warming zone © 2005 Maytag Services Possible Cause Correction Open element ................................................. • Check element for continuity, replace if failed. Loose wire connection or broken wire ............
Component Testing Procedures ! WARNING To avoid risk of electrical shock, personal injury or death; disconnect power to range before servicing, unless testing requires power. Illustration Component Oven light socket (select models) Manual latch assembly with switch (select models) Oven temperature sensor Measure resistance................................ Approximately 1000 Ω at room temperature 80° F.
Component Testing Procedures ! WARNING To avoid risk of electrical shock, personal injury or death; disconnect power to range before servicing, unless testing requires power. Illustration 5 4 H2 L1 3 Component Infinite switch (select models) Test Procedure Connect volt-ohms meter to H1 and H2. L2 Results Approximate Time On Time Off LO 5% 95% MED (4-5) 35% 65% HI 100% 0% Measure the following for voltages at LO, MED, HI: H1 to H2 .......................................... 240 VAC.
Component Testing Procedures ! WARNING To avoid risk of electrical shock, personal injury or death; disconnect power to range before servicing, unless testing requires power. Illustration 14 Component Coil element, 4-turn 1500 W (select models) Test Procedure Results Disconnect wire leads to element and measure resistance of terminals ............ Approximately 35.5 to 39.1 Ω. Measure voltage at coil element............. 240 VAC, see wiring diagram for terminal identification.
Control Testing Procedures ! WARNING To avoid risk of electrical shock, personal injury or death; disconnect power to range before servicing, unless testing requires power. Control M1 Feature Oven temperature adjustment M1 Temperature display M1 Clock display M1 24-hour clock M1 Factory default M1 12-hour off M1 Sabbath mode Test Procedure Press Bake pad. Enter 550 on the digit-pad. Immediately press and hold Bake pad for 3 to 5 seconds.
Control Testing Procedures ! WARNING To avoid risk of electrical shock, personal injury or death; disconnect power to range before servicing, unless testing requires power. "Quick Test" Mode for Electronic Range Control Follow the procedure below to access the quick test mode. Entries must be made within 32 seconds of each other or the control will exit the quick test mode. 1. Press and hold Cancel and Broil pads for 3 to 5 seconds. 2.
Control Testing Procedures ! WARNING To avoid risk of electrical shock, personal injury or death; disconnect power to range before servicing, unless testing requires power.
Control Testing Procedures ! WARNING To avoid risk of electrical shock, personal injury or death; disconnect power to range before servicing, unless testing requires power. NOTES: 1 2 3 4 5 "Action Taken" applies as long as the condition exists. If the condition is corrected, the control recovers. Flash rate: 0.2 seconds on, 0.1 second off. Pressing any key clears the display until the fault clears and is re-triggered. "Action Taken" applies until there is a POR (Power On Reset ["hard reset"]).
Disassembly Procedures ! To avoid risk of electrical shock, personal injury or death; disconnect power to unit before servicing. WARNING Removing and Replacing Range 1. Turn off power to the oven at the circuit breaker. 2. Pull the oven forward out of the cabinet opening. 3. Disconnect or unplug the power cord leading from unit to fuse box or junction box depending on unit. 4. Replace the oven using the installation instructions and anti-tip bracket(s). Maintop Assembly (Smoothtop Models) 1.
Disassembly Procedures ! To avoid risk of electrical shock, personal injury or death; disconnect power to unit before servicing. WARNING Ribbon Elements (select models) Convenience Outlet/Circuit Breaker (Canadian Models) 1. Remove control panel, see "Control Panel" procedure for removal. 2. Label and disconnect wire terminals from convenience outlet and/or circuit breaker. 3. Remove screws securing outlet and/or circuit breaker to backguard and push outward to release. 4 .
Disassembly Procedures ! To avoid risk of electrical shock, personal injury or death; disconnect power to unit before servicing. WARNING 5. Remove storage drawer, see "Storage Drawer Removal" procedure. 6. Remove the top and bottom screws securing oven door hinge to the front frame. 7. Remove oven door hinge from oven chassis. 8. Reverse procedures to reinstall oven door hinge. Side Panel Removal 1. Turn power off. 2. Remove oven door, see "Oven Door Removal" procedure. 3.
Disassembly Procedures ! To avoid risk of electrical shock, personal injury or death; disconnect power to unit before servicing. WARNING 8. Lift upward on the lower side of the door handle to release side alignment screws and rotate towards the top of the oven door to release and remove. 9. Remove screws securing door handle to door handle brackets. Door Disassembly (Standard and Large Windows) 1. Remove oven door, see "Oven Door Removal" procedure. 2. Place door on a protected surface. 3.
Disassembly Procedures ! To avoid risk of electrical shock, personal injury or death; disconnect power to unit before servicing. WARNING Door Disassembly (No Window) 1. Remove oven door, see "Oven Door Removal" procedure. 2. Place door on a protected surface. 3. Remove screws securing door handle to door panel. 4. Remove screws securing door panel to door lining and remove door liner. 5. Remove insulation from oven door. 6. Reverse procedures to reassemble oven door.
Disassembly Procedures ! To avoid risk of electrical shock, personal injury or death; disconnect power to unit before servicing. WARNING 2. Place door on a protected surface. 3. Remove screws front panel to storage drawer. 4. Reverse procedures to reassemble storage drawer. Storage Drawer Disassembly 1. Remove storage drawer, see "Storage Drawer Removal" procedure.
Appendix A © 2005 Maytag Services 16026784 A–1
Installation Instructions fkpq^ii^qflk ao^tfkdp fjmloq^kq mib^pb hbbm clo qeb rpb lc qeb il`^i bib`qof`^i fkpmb`qloK 4 1 2 “A” = 30 inches (76.2 cm) minimum clearance between the top of the cooking surface and the bottom of an unprotected wood or metal cabinet, or “A” = 24 inches (61 cm) minimum when bottom of wood or metal cabinet is protected by not less than 1/4-inch (6.4 mm) thick flame-retardant millboard covered with not less than No. 28 MSG sheet steel, 0.015-inch (0.
Installation Instructions ^kqfJqfm absf`b fkpq^ii^qflk fkpqor`qflkp t^okfkdW A risk of range tip-over exists if the appliance is not installed in accordance with the provided installation instructions. The proper use of this device minimizes the risk of TIP-OVER. In using this device the consumer must still observe the safety precautions as stated in the USE and CARE MANUAL and avoid using the oven door and/or lower drawer as a step stool.
Installation Instructions ^kqfJqfm absf`b fkpq^ii^qflk fkpqor`qflkp pqbm P J o~ f~~ A. A free-standing range may be installed by one person. B. Align the range to its designated location and slide it back into position. Note: A minimum clearance of 1/4² (6 mm) is required between the range and the leveling foot that will engage the ANTI-TIP bracket, see figure 4. `^rqflkW Damage to the range may occur if range is moved or lifted by grasping the main top or backguard. C.
Installation Instructions `lkkb`qfkd qeb o^kdb bib`qof` prmmiv The range must be installed in accordance with Local and National Electric Code (NEC) ANSI/NFPA No. 70-latest edition. See rating plate for total connected KW rating. bib`qof` prmmiv E`~~~F The range must be installed in accordance with Local and Canadian Electric Code CSA STD.C22.1 latest edition. See rating plate for total connected KW rating. Hence, 4-wire service MUST be provided for such installations.
Installation Instructions cfdrob S PJt p ` ` f~~ 1. Insure that the copper ground strap fp `lkkb`qba between the middle post of the main terminal connection block and the range chassis. 2. If bare copper or aluminum wiring is used, attach adapter lugs as shown in figure 6. (See Bare Wire Connection). Torque specifications are shown below. 3.
Appendix B The Use and Care information provided in this service manual is representative of a limited number of models. Reference the customer’s Use and Care literature included with the product, order a copy (if needed), or consult Maytag’s website for the specific model. www.maytag.
Use and Care Guide TM Electric Range Smoothtop Table of Contents Safety .......................................... 1-3 Surface Cooking ...................... 4-7 Surface Controls Smoothtop Surface Care & Cleaning ................... 17-20 Self-Clean Oven Cleaning Procedures Maintenance ......................... 21-22 Oven Cooking ......................... 8-16 Baking Cook & Hold Delay Bake Keep Warm Broiling Oven Racks Oven Window Oven Light Troubleshooting ...................
Use and Care Guide replace any part of your appliance unless it is specifically recommended in this guide. All other servicing should be referred to a qualified servicer. Installer: Please leave this guide with this appliance. Consumer: Please read and keep this guide for future reference. Keep sales receipt and/or canceled check as proof of purchase. Always disconnect power to appliance before servicing.
Use and Care Guide Important Safety Instructions Child Safety Cooking Safety Never heat an unopened food container in the oven. Pressure build-up may cause container to burst resulting in serious personal injury or damage to the appliance. CAUTION NEVER store items of interest to children in cabinets above an appliance. Children climbing on the appliance or on the appliance door to reach items could be seriously injured. Use dry, sturdy potholders. Damp potholders may cause burns from steam.
Use and Care Guide Important Safety Instructions Never let a pan boil dry as this could damage the utensil and the appliance. or cloth is used to wipe spills on a hot surface. Some cleaners can produce noxious fumes if applied to a hot surface. If pan is smaller than element, a portion of the element will be exposed to direct contact and could ignite clothing or potholder. Clean only parts listed in this guide.
Use and Care Guide Surface Cooking Dual Element (select models) Surface Controls Use to turn on the surface elements. An infinite choice of heat settings is available from Low to High. The knobs can be set on or between any of the settings. The cooking surface has a dual element located at the left front of the smoothtop. This allows you to change the size of the element. Setting the Controls The small element is operated on the left side of the knob control.
Use and Care Guide Surface Cooking Smoothtop Surface Warming Center Suggested Settings Setting Type of food Smoothtop Surface Notes: Low - 2 Breads/Pastries Casseroles Gravies Eggs 2 - Medium Sauces Stews Meats Soups (Cream) Vegetables Fried Foods Soups (Liquid) Hot Beverages Medium - High • Cooktop may emit light smoke and odor the first few times the cooktop is used. This is normal. • Smoothtop cooktops retain heat for a period of time after the element is turned off.
Use and Care Guide Surface Cooking To Prevent Marks and Scratches When a control is turned on, a glow can be seen through the smoothtop surface. The element will cycle on and off to maintain the preset heat setting, even on Hi. • Do not use glass pans. They may scratch the surface. • Never place a trivet or wok ring between the surface and pan. These items can mark or etch the top.
Use and Care Guide Surface Cooking Cookware Recommendations Select Avoid Flat, smooth-bottom Pans with grooved or warped bottoms. pans. Pans with uneven bottoms do not cook efficiently and sometimes may not boil liquid. Using the right cookware can prevent many problems, such as food taking longer to cook or achieving inconsistent results. Proper pans will reduce cooking times, use less energy, and cook food more evenly. Heavy-gauge pans. Very thin-gauge metal or glass pans.
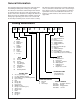
Use and Care Guide Oven Cooking Control Panel A B E F G H C D I J The control panel is designed for ease in programming. The display window on the control shows time of day, timer and oven functions. Control panel shown includes model specific features. (Styling may vary depending on model.) A Broil Use for broiling and top browning. Clock B Bake Use for baking and roasting. C More+ or Less- Enters or changes time, oven temperature. Sets HI or LO broil.
Use and Care Guide Oven Cooking Locking the Control To cancel the Clock display: If you do not want the time of day to display: The touchpad controls can be locked for safety, cleaning, or to prevent unwanted use. They will not function when locked. Press and hold the CANCEL and Clock pads for three seconds. The time of day will disappear from the display If the oven is currently in use, the controls cannot be locked. The current time of day will remain in the display when the controls are locked.
Use and Care Guide Oven Cooking Baking Baking Differences Between Your Old and New Oven To set Bake: It is normal to notice some baking time differences between a new oven and an old one. See “Adjusting the Oven Temperature” on page 13. 1. Press the Bake pad. • “BAKE” will flash. • 000 will light in the display. 2. Select the oven temperature. The oven temperature can be set from 170° to 550°. Press or press and hold the More+ or Less- pads.
Use and Care Guide Oven Cooking When the Delay time has expired: Delay Bake • “DELAY” will turn off. CAUTION • Baking time is displayed. • “BAKE” and “HOLD” are displayed. Do not use delayed baking for highly perishable foods such as dairy products, pork, poultry, or seafood. To set a Delay when Cook & Hold has already been programmed: When using Delay, the oven begins to cook later in the day. Set the amount of time that you want to delay before the oven turns on and how long you want to cook.
Use and Care Guide Oven Cooking Keep Warm Keep Warm Notes: For safely keeping foods warm or for warming breads and plates. • For optimal food quality, oven cooked foods should be kept warm for no longer than 1 to 2 hours. To set Keep Warm: • To keep foods from drying, cover loosely with foil or a lid. 1. Press the Keep Warm pad. • To warm dinner rolls: • “WARM” flashes. - cover rolls loosely with foil and place in oven. • 000 appears in the display.
Use and Care Guide Oven Cooking Automatic Shut-Off/Sabbath Mode Adjusting the Oven Temperature Oven temperatures are carefully tested for accuracy at the factory. It is normal to notice some baking or browning differences between a new oven and an old one. As ranges get older, the oven temperature can shift. The oven will automatically turn off after 12 hours if you accidentally leave it on. This safety feature can be turned off.
Use and Care Guide Oven Cooking Broiling 6. Turn meat once about halfway through cooking. To set Broil: 7. When food is cooked, press the CANCEL pad. Remove food and broiler pan from the oven. 1. Press the Broil pad. • “BROIL” flashes. • The time of day will reappear in the display. • SET is displayed. 2. Press the More+ pad to set HI broil or press the Less- pad to set LO broil. Broil Notes: • HI or LO will be displayed. • For best results when broiling, use a pan designed for broiling.
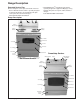
Use and Care Guide Oven Cooking Oven Racks Oven Vent When the oven is in use the area near the vent may become hot enough to cause burns. Never block the vent opening. CAUTION The oven vent is located below the backguard vent shield on your range. OVEN VENT LOCATION • Do not attempt to change the rack position when the oven is hot. • Do not use the oven for storing food or cookware. Do not place plastics near the vent opening as heat from the vent could distort or melt the plastic.
Use and Care Guide Oven Cooking Create-A-SpaceTM Half Rack EasyRackTM (select models) Select range models are equipped with a convertible half rack. The left side of the rack can be removed to accommodate a large roaster on the lower rack. The right side of the rack is still available to hold a casserole dish. Select range models are equipped with an EasyRackTM. This rack offers a convenient place to grasp bakeware when taking it out of the oven.
Use and Care Guide Care & Cleaning 6. Wipe up sugary and acidic spillovers such as sweet potatoes, tomato, or milk-based sauces. Porcelain enamel is acid-resistant, not acid-proof. The porcelain finish may discolor if acidic spills are not wiped up before a self-clean cycle. Self-Clean Oven CAUTION • It is normal for parts of the range to become hot during a self-clean cycle. To set Self-Clean: • To prevent personal injury and damage to the oven door do not attempt to open door when “LOCK” is displayed.
Use and Care Guide Care & Cleaning 3. Press the Clean pad. During the Self-Clean Cycle When LOCK shows in the display, the door cannot be opened. To prevent damage to the door, do not force the door open when LOCK is displayed. • “CLEAN” will flash. 4. Press the More+ or Less- pad. • “CL-M” (Medium Soil, 3 hours) is displayed. Smoke and Smells You may see some smoke and smell an odor the first few times the oven is cleaned. This is normal and will lessen in time. 5.
Use and Care Guide Care & Cleaning Cleaning Procedures CAUTION • Be sure appliance is off and all parts are cool before handling or cleaning. This is to avoid damage and possible burns. • To prevent staining or discoloration, clean appliance after each use. • If a part is removed, be sure it is correctly replaced. PART * Brand names are registered trademarks of the respective manufacturers. ** To order call 1-877-232-6771 USA and 1-800-688-8408 Canada.
Use and Care Guide Care & Cleaning PART PROCEDURE Oven Window and Door – Glass • Avoid using excessive amounts of water which may seep under or behind glass causing staining. • Wash with soap and water. Rinse with clear water and dry. Glass cleaner can be used if sprayed on a cloth first. • Do not use abrasive materials such as scouring pads, steel wool or powdered cleaners as they will scratch glass. Oven Interior • Follow instructions on pages 17-18 to set a self-clean cycle.
Use and Care Guide Maintenance Oven Door Leveling Legs CAUTION CAUTION • Do not place excessive weight on or stand on an open oven door. This could cause the range to tip over, break the door, or injure the user. Be sure the anti-tip bracket secures one of the rear leveling legs to the floor. This bracket prevents the range from accidentally tipping. • Do not attempt to open or close door or operate oven until door is properly replaced. The range should be leveled when installed.
Use and Care Guide Maintenance To remove: Storage Drawer 1. Empty drawer and pull out to the first stop position. CAUTION 2. Lift up the front of the drawer. 3. Pull out to the second stop position. Do not store plastic, paper products, food or flammable materials in this drawer. The drawer may become too warm for these items when the oven is in use. 4. Grasp sides and lift drawer up and out. To replace: 1. Fit the ends of the drawer glides into the rails in the range.
Use and Care Guide Troubleshooting PROBLEM SOLUTION Oven will not self-clean. • • • • Oven did not clean properly. • Longer cleaning time may be needed. • Excessive spillovers, especially sugary and/or acidic foods, were not removed prior to the self-clean cycle. Oven door will not unlock after self-clean cycle. • Oven interior is still hot. Allow about one hour for the oven to cool after the completion of a self-clean cycle. The door can be opened when the LOCK indicator word is not displayed.