
Owner manual


Page 10
Reference Manual
P.I.P.-RPA
voice-over sensitivity control fully
counterclockwise (setting 0) will turn
the circuit off.
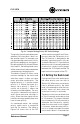
The voice-over sensitivity control has
26 dB of adjustable range. Since the
voice-over circuitry follows the input
mode switch and input level control,
the actual sensitivity level can vary
widely. To increase the relative sen-
sitivity of the voice-over circuit, turn
up the input level control and turn
down the amplifier level or the re-
mote controlled attenuator. Remem-
ber, the remote controlled attenuator
is located after the voice-over circuit
so it can be used to reduce the gain
added with the input level control. If
less relative voice-over sensitivity is
desired, do just the opposite: Turn
down the input level control and turn
up the amplifier level control or the
remote-controlled attenuator. (Refer
to Figure 3.7.)
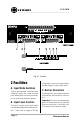
3.4 Installation
Procedures
CAUTION: Before connecting this or
any PIP to your amplifier, it is impor-
tant to turn its level controls
down, turn it off and
remove the AC powerremove the AC power
remove the AC powerremove the AC power
remove the AC power.
Don’t touch the circuitry while the
amp is plugged in. Even though the
amplifier is off, there could still be
enough energy remaining to cause
electric shock.
You may need a phillips screwdriver
to remove the existing PIP module or
panel from your amplifier.
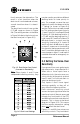
1. Turn down the level controls (full
counterclockwise), turn off the
amplifier and unplug it from the AC
power source.
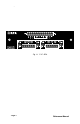
Fig. 3.8 Steps 1 & 2
Input A.
4. If you haven’t yet done so, adjust
the duck level per Section 3.2.
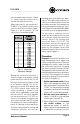
5. Turn the voice-over sensitivity
control of Input A to its middle
setting
(setting 6 in Figure 3.5).
6. Turn off the power amplifier and
unplug its power cord. Refer to
Section 3.4 and install the PIP
into the amplifier. Reconnect
power to the amplifier and turn it
on.
7. With the ambient noise level of
Input A at a maximum, check to
see if Input B has ducked.
8. Turn off the power amplifier,
unplug its power cord and remove
the PIP again.
9. Adjust the voice-over sensitiv-
ity control in the following man-
ner: If Input B has NOT yet ducked
increase the voice-over sensitivity
control one mark. If it HAS ducked,
decrease the voice-over sensitiv-
ity control one mark.
10.Repeat steps 6 through 9 until the
setting has been found where the
voice-over sensitivity control just
begins to allow Input B to duck.
Back off the sensitivity control
1
/4 turn from this point. The voice
over circuit should now trigger on
a legitimate signal and not noise.
Notice in Figure 3.7 that turning the