
Manual


Crux Interfacing Solutions • Chatsworth, CA 91311
phone: (818) 609-9299 • fax: (818) 996-8188 • www.cruxinterfacing.com
rev.0312212 of 3
WVI-H
Wi-Fi Connectivity and Smartphone Integration Interface
with HDMI Output and A/V Input
INSTALLATION INSTRUCTIONS:
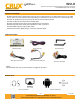
1. Connect the 18-Pin power/video cable to the Wi-Fi Interface module.
2. Connect the antennas to the module.
3. Connect the RED power lead to +12V ACC and the BLACK wire to Ground.
4. Connect the BLUE A/V Input wire to +12V to trigger the oponal A/V input feature. The video input can also be
connected to a camera source instead. A toggle switch (not included), wired between the BLUE wire and +12V
can be used to switch ON or OFF the A/V input feature.
5. An HDMI video output is available for HD video resoluon. Connect to a screen that has an HDMI input.
6. If the USB input feature will be used, you can use the virtual remote control on your smartphone to control the
USB funcons. See VIRTUAL REMOTE secon for details. Extended a USB cable to an easily accessible locaon.
7. Plug in the Composite RCA output of the WVI-H harness to the screen’s AV input.
8. Test for funconality.
SETTING YOUR DEVICE:
With the WVI-H module ON and READY:
NOTES:
1. Does not support Nelix and any DRM protected
les on iOS devices due to Restricons by Apple.
For iOS devices:
Open sengs > Select Wi-Fi > Under
‘Choose Network’ Select “Crux WiFi ***”
Aer connecng to Crux Wi, select
“SCREEN MIRRORING” from the Control
Center and tap Crux Wi ***. To access
Control Center, on iPhone X, pull down
from the upper right corner of the screen,
on other iPhone models, pull up from the
boom of the screen.
R
INTERFACING SOLUTIONS
A/V
SERIES