
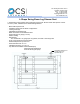
Dimensions Guide

SAFETY NOTE: Concealed In-Wall support backing is ALWAYS REQUIRED for this product (not included) – and must be
supplied and selected by a licensed installer/contractor to meet both weight bearing and local code requirements.
PRODUCT INSTALLATION SHOULD BE DONE BY A LICENSED INSTALLER/CONTRACTOR.
CAUTION: Personal injury and/or property damage may result from improper wall support or mounting, which is not
covered under warranty.
WARNING: Do NOT use this instruction sheet for wall bracket seats (See “SEA-WB” version)
SEAT INSTALLATION
1. Confirm contents of box: 1 Shower seat & 6 stainless steel Phillips head screws
2. Tools and supplies needed: Phillips screw driver, shims, pencil, drill, silicone caulk
3. Test seat up/down movement, then set in down position and carefully consider the following before installing:
4. MOUNTING LOCATIONS: Install only where there is proper structure support within the wall. Measure area on the
wall of seat in the up/collapsed position, to avoid hitting other objects. Also avoid pipe/wires/grout/etc.
5. ADJUST HEIGHT: To meet Local Building Codes and ADA requirements, height from top of seat (in lowered / in-use
position) to finished floor must be between 17” to 19”.
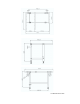
6. LEVEL THE SEAT: Seat must be flat (not angled to one side); use a level tool while adjusting each foot/leg height
7. ADJUST DISTANCE FROM THE WALL: ADA requires a minimum distance of 1-1/2” from seat rear edge to wall,
when seat is lowered to flat position.
8. After final adjustments, position mounting flanges close to shower wall and mark each hole location with pencil.
9. IMPORTANT: WALLS MUST HAVE PROPER CONCEALED IN-WALL BACKING INSTALLED BY A LICENSED
INSTALLER/CONTRACTOR BEFORE INSTALLING PRODUCT.
10. Drill pilot holes.
11. Onto the backside of each flange, where it will touch the wall - apply a bead of silicone caulk in the shape of a half
circle above all top screws and around each lower screw hole.
12. Install the seat with the manufacturer’s provided screws. After installing the seat, inspect each screw to ensure it
is tight, straight and flush with the flange. Avoid damage to wall, tile, or fasteners by not over-tightening screws.
13. Test seat by applying gradual pressure
SAFETY NOTE: Concealed In-Wall support backing is ALWAYS REQUIRED for this product (not included) – and must be
supplied and selected by a licensed installer/contractor to meet both weight bearing and local code requirements.
product installation should be done by a licensed installer/contractor.
CAUTION: Personal injury and/or property damage may result from improper wall support or mounting, which is
not covered under warranty.
Confirm contents of box: Shower seat and Phillips head screws
Test seat up/down movement, then set in down position and carefully consider the following before installing:
• ADJUST MOUNTING LOCATIONS: Install only where proper structure is provided behind the wall. Measure
area on the wall of seat in the up/collapsed position, to avoid hitting other objects. Also avoid
pipe/wires/grout/etc.
• ADJUST HEIGHT: To meet Local Building Codes and ADA requirements, height from top of seat (in lowered /
in-use position) to finished floor must be 17” to 19”.
• ADJUST TO BE LEVEL: Seat must be flat (not angled to one side); use a level tool while marking screw
locations.
• ADJUST DISTANCE FROM THE WALL: ADA requires minimum 1-1/2”distance between seat rear edge and
wall, when seat is in the lowered (in-use) position.
IMPORTANT INSTRUCTIONS