
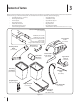
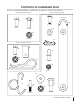
Instructions / Assembly

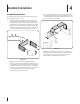


Assembly & Installation
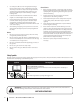
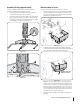
4
8
Flip over assembly and mount the hitch support bracket to 2.
the mounting assembly using four 710-3008 hex bolts and
712-04063 flange lock nuts from hardware pack 689-00087.
See Fig. 4-2 for proper orientation.
Note: When attaching the hitch support, it is best to not
fully tighten the bracket at this time. This will facilitate the
mounting process in later steps, which will then require
fully tightening of this hitch support bracket.
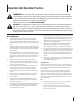
Assemble Mounting Brackets
To assemble the bagger mounting assembly, locate the hitch
bracket kit and follow these steps:
Attach the right-hand and left hand rider hitch bracket 1.
to the universal rear attachment bracket using the four
carriage bolts (710-0276) and flange lock nuts (712-04063)
packed with the mounting brackets. Position the brackets
with the hooks on the right-hand and left hand rider hitch
bracket pointing downward, and the tabs on the universal
rear attachment bracket pointing upwards. See Fig. 4-1.
Note: This universal mounting bracket assembly is
designed to work with other available attachments, such
as a weight kit used in conjunction with the snow blade or
snow thrower attachment. Utilize the contact information
on page 2, or contact the retailer in which you purchased
this equipment, to find out more about available
attachments for your specific tractor.
Side View
Figure 4-1
Figure 4-2