
Instructions / Assembly

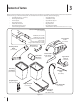


9se c t i O n 4 — as s e M b l y & in s t a l l a t i O n
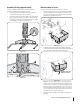
Mount Assembly on Tractor
Install the mounting assembly on the tractor as follows:
Place the hooked ends of the bagger mounting assembly 1.
over the shoulder bolts, as in Fig. 4-5, on the tractor and
line up the hitch support hole on the mounting assembly
with the hole on the tractor’s hitch.
Install the clevis pin (711-0309A) from hardware pack 689-2.
00087 into the tractor’s hitch and the assembly’s hitch support
and secure with a hairpin clip (714-0117). See Fig. 4-6.
Note: The clevis pin can be fed down through the hitch
support and secured underneath with the hairpin clip, or
it may be easier to feed the clevis pin up through the hitch
plate hole and secure with the hairpin clip on the topside.
The latter method may be preferred since it can be easier
to insert the hairpin clip. Either way will work, the decision
should be based on operator preference.
Tighten all of the hardware securing the hitch support at 3.
this time.
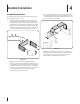
Assembling The Bag Support Assembly
Locate the upright support bracket and the bag support
assembly. Assemble it by following these steps:
Lay the bag support assembly topside down with the 1.
mounting bracket portion facing upwards.
Insert the notched end of the vertical support bracket into 2.
the bag support assembly, as in Fig. 4-3, and secure with
a carriage bolt (710-0276) and flange lock nut (712-04063)
from hardware pack 689-00081. See Fig. 4-4.
Align hole on bracket
with hole on tractor
Figure 4-3
Figure 4-5
Figure 4-6
Figure 4-4