OPERATOR'S MANUAL MANUAL DEL USUARIO NOTICE D’UTILISATION 46" SNOW BLADE CUCHILLA PARA REMOCIÓN DE NIEVE de 46" (117 cm) LAME CHASSE-NEIGE DE 46 PO. (117 CM) Model Number 19A30017OEM Modelo No. 19A30017OEM Modèles N° 19A30017OEM IMPORTANT: READ SAFETY RULES AND INSTRUCTIONS CAREFULLY IMPORTANTE: LEA CUIDADOSAMENTE LAS REGLAS E INSTRUCCIONES DE SEGURIDAD NOTE IMPORTANTE: LIRE ATTENTIVEMENT LES INSTRUCTIONS ET LES CONSIGNES DE SECURITÉ MTD PRODUCTS INC. P.O.
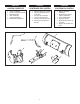
A B C D E F ENGLISH ESPAÑOL FRANÇAIS CARTON CONTENTS CONTENIDO DEL CARTÓN CONTENU DU CARTON 1 1 1 1 1 2 A 1 Mango Superior de Levante B 1 Conjunto de Mango Inferior de Levante C 1 Conjunto de la Cuchilla D 1 Conjunto de Enganche E 1 Conjunto de Viga de Canal F 2 Soporte de montaje de la cuchilla A 1 Manche supérieur d’élévation B 1 Ensemble du manche inférieur d’élévation C 1 Lame chasse-neige D 1 Chape de fixation E 1 Ensemble de la barre de poussée F 2 Support de montage de
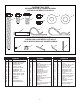
SHOWN FULL SIZE SE MUESTRAN EN SU TAMAÑO NORMAL PIÈCES ILLUSTRÉES À L'ÉCHELLE D A B F G C E I H J NOT SHOWN FULL SIZE PIÈCES NON ILLUSTRÉES À L'ÉCHELLE NO SE MUESTRAN EN SU TAMAÑO NORMAL K M L ENGLISH Key Qty Description A B C D E F G H I J K L M N O 1 2 2 1 4 1 1 1 3 2 1 1 1 1 1 Hex Bolt, 3/8" x 3-1/2" Hex Bolt, 3/8" x 3/4" Shoulder Bolt Hex Nut, 3/8-16 Hex Locknut, 3/8-16 Flat Washer, 3/8" Flat Washer, 1/2" Clevis Pin, 1/4" x 1-1/2" Hairpin Cotter, (small) Hairpin Cotter, (large) Plastic
ENGLISH RULES FOR SAFE OPERATION Any power equipment can cause injury if operated improperly or if the user does not understand how to operate the equipment. Exercise caution at all times when operating equipment. 1. Read the tractor and snow blade owners manuals and know how to operate your tractor before using tractor with snow blade attachment. 2. Never operate tractor and snow blade without wearing proper clothing suited to weather conditions and operation of controls. 3.
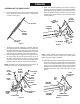
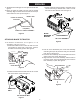
ENGLISH 9. Attach the channel assembly to the tractor by placing the end of the channel inside the pivot support bracket. Assemble the 1/2" flat washer onto the channel pivot pin and insert the pin through the holes in the pivot support bracket and the channel. Secure with a small hair cotter pin. See figure 3. ASSEMBLING THE SNOW BLADE 6. Insert the 3/8" x 3-1/2" hex bolt through the blade adjust spring. Assemble a 3/8" hex nut about 1" onto the end of the bolt. See figure 1.
ENGLISH 11. Assemble the handle grip onto the upper lift handle. See figure 5. 12. Place the upper lift handle onto the lower lift handle assembly. Align the holes and secure with the clevis pin and a small hair cotter pin. See figure 5. UPPER LIFT HANDLE c. Attach a blade mounting bracket to each side of the tractor frame using a shoulder bolt, a 3/8" x 3/4" hex bolt and two 3/8" hex lock nuts. See figure 8.
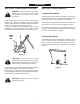
ENGLISH SECTION 2: OPERATING THE BLADE SECTION 3: ADJUSTMENTS CAUTION: Inspect the area to be worked To Adjust Blade Spring carefully before operating the snow blade. Avoid pipes, roots, curbs or other heavy obstructions. The blade adjust spring allows the blade to tilt forward to bypass solid obstructions. The normal adjustment is for the spring bolt to extend 1" through the top of the blade. The lift handle, located on the left side of the snow blade, is used to raise and lower the blade.
ESPAÑOL REGLAS DE SEGURIDAD Todo equipo mecanizado puede causar daños si se maneja inadecuadamente o si el usuario no conoce el funcionamiento del equipo. Manténgase atento y cauteloso siempre que opere el equipo. 1. Lea los manuales del usuario del tractor de prado y de la cuchilla de remoción de nieve y conozca bien como se opera su tractor antes de usarlo con la cuchilla. 2.
ESPAÑOL 7. SECCION 1: INSTRUCCIONES DE ARMADO 8. NOTA: Mano derecha y mano izquierda se determinan desde el punto de vista del operador sentado en el tractor. HERRAMIENTAS NECESARIAS PARA EL ARMADO Para fijar el conjunto de viga de canal a la cuchilla, alinee la placa de giro con las ménsulas soldadas en el respaldo de la cuchilla. Pase el eje de giro a través de las perforaciones en la placa de giro y de las ménsulas soldadas. Asegure el eje de giro con dos pasadores grandes de horquilla.
ESPAÑOL SECCIÓN 2: OPERACIÓN DE LA CUCHILLA SECCIÓN 3: AJUSTES AJUSTE DEL RESORTE DE LA CUCHILLA PRECAUCIÓN: Inspeccione cuidadosamente el área donde va a trabajar antes de comenzar a operar la cuchilla de remoción de nieve. Evite zonas de tuberías, raíces, sardineles u otras obstrucciones grandes. El resorte de ajuste de la cuchilla permite que la cuchilla se incline hacia delante para pasar sobre una obstrucción.
FRANÇAIS CONSIGNES DE SÉCURITÉ Tout appareil mécanique risque de provoquer des blessures si ce dernier n’est pas utilisé correctement ou si l’utilisateur ne sait pas comment l’utiliser. Faites preuve de prudence à tout moment lorsque vous utilisez un appareil mécanique. 1. Lisez la notice d’utilisation du tracteur et de la lame chasse-neige et veillez à bien connaître le fonctionnement du tracteur avant de l’utiliser avec la lame chasse-neige. 2.
FRANÇAIS 7. CHAPITRE 1: ASSEMBLAGE 8. REMARQUE: La gauche (LH) et la droite (RH) sont déterminés en se plaçant assis à la place du conducteur. OUTILS NÉCESSAIRES POUR L’ASSEMBLAGE (2) Clés de 7/16 po. (2) Clés de 1/2 po. (2) Clé de 9/16 po. (1) Clé de 3/4 po. ou clé à molette REMARQUE: La lame est à présent réglée sur la tension la plus faible. Pour régler la tension du ressort, reportez-vous au chapitre “Réglages”. 9.
FRANÇAIS CHAPITRE 2: UTILISATION DE LA LAME CHASSE-NEIGE CHAPITRE 3: RÉGLAGES POUR RÉGLER LA TENSION DU RESSORT Le ressort de réglage de la lame permet à la lame de se pencher en avant afin de contourner les obstacles durs. Pour un réglage normal, le boulon du ressort doit ressortir de 1 po. (2,5 cm) du dessus de la lame. ATTENTION: Inspectez attentivement la zone que vous comptez déblayer avant d’utiliser la lame chasse-neige.
40 32 29 39 16 25 23 54 42 41 27 54 53 25 47 53 16 47 28 9 9 36 C 30 52 45 46 47 49 37 17 24 B C 26 43 31 44 14 35 15 A 25 A B 11 10 12 13 50 48 33 51 34 24 19 3 35 6 21 8 18 20 38 6 4 7 REPAIR PARTS LIST FOR MODELS 19A30017OEM 46" SNOW BLADE 6 22 1 2 4 5 5
REF 1 2 3 4 5 6 7 8 9 10 11 12 13 14 15 16 17 18 19 20 21 22 23 24 25 26 27 28 PART NO 63821 24524 62980 43080 44326 47810 43081 24690 24520 24347 43262 23131 1540-118 23958 23130 44072 23122 43070 R9466R 44071 43015 44074 41-42 43343 43055 46053 63283 27352 QTY 1 1 1 6 4 10 4 2 2 1 1 1 1 1 1 8 1 1 1 1 1 1 1 2 3 2 1 1 DESCRIPTION Blade - 46" Wear Plate - 46" Reinforcement Plate Assembly Bolt, Carriage 5/16-18 x 3/4" Bolt, Carriage 5/16-18 x 1" Nylock Nut, 5/16-18 Thread Washer, 5/16" Skid Shoe Bracke
If you are having difficulty assembling this product or if you have any question regarding the controls, operation or maintenance of this unit, please call the Customer Support Department. You can reach them by calling: Si tiene dificultad armando esta unidad o si tiene preguntas en cuanto a sus controles, operación o mantenimiento, sírvase llamar al Departamento de Apoyo al Usuario.