
Use and Care Manual
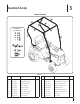


6 Section 3— ASSembly & Set-Up
NOTE: All references to LEFT, RIGHT, FRONT, and REAR indicate
the Snow Cab/Sun Shade position when sitting in the tractor seat
in the operator’s position.
CAUTION: Do not transport the tractor on a trailer
or in the bed of a truck with the snow cab or sun
shade installed.
Assembly
Before beginning installation, remove all parts from the carton to
make sure everything is present. Carton contents listed on page 5.
NOTE: Some tractors will require the use of the Snow Cab/
Sun Shade Mounting Kit (#759-05086) in order to install. The
templates to drill the required holes and instrctions are on page 10. To
order the snow cab/sun shade mounting kit see your authorized
service dealer or contact Customer Support.
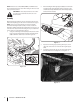
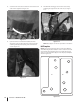
1. Using two of the flange lock nuts (Ref. part #11) and one of the
front canopy mount plates (#8), mount the front left support
(#6B) to the frame of the tractor as shown in Figure 3-2.
Figure 3-2
2. Before installing the front right support (#6A), the oil drain tube
and clip must be removed from the frame. See Figure 3-3. The
oil drain tube and clip will be fitted onto the front right support
bracket when it is installed.
Figure 3-3
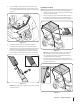
3. Repeat the mounting steps (Starting with Step 1) on the
right side of the tractor to mount the front right support
(#6A).
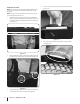
4. Install the oil drain tube clip onto the front right support
bracket (#6A) in the mounting hole. See Figure 3-4.
Figure 3-4