
Use and Care Manual
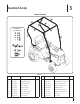


7Section 3 — ASSembly & Set-Up
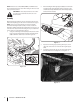
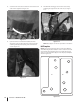
5. Use two flange lock nuts (#10), two saddle washers (#9),
two flat washers (#13) and two hex screws (#14) to mount
the rear support (#1) to the frame of the tractor as shown in
Figure 3-5.
Figure 3-5
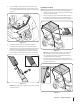
6. Assemble the frame of the Snow Cab/Sun Shade by
connecting the numbered parts as shown in Figure 3-1.
7. The frame pieces connect with a spring clip inserted into the
hole of the connecting part to secure each piece in place.
Press down on the spring clip button and slide it inside the
connecting piece until it snaps into the hole. See Figure 3-6.
Figure 3-6
NOTE: Refer to Figure 3-1 for proper location and assembly
of the frame pieces.
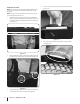
Installing the Sun Shade
NOTE: If you purchased the Snow Cab Kit (19A30022100) alone, the
Sun Shade attachment (790-00710) can be ordered separately.
1. Slide the sun shade over the top of the frame with the long
mesh flap towards the back.
2. There are eight velcro straps on the inside of the sun shade;
four in the front and four in the back. Secure the front and
back of the sun shade with these straps as shown in Figure 3-7.
Figure 3-7
NOTE: The lower velcro straps should be secured below
the clip button to help secure the sun shade in place.
The upper straps should be positioned below the front
crossbar, but above the clip button.
3. There are two longer straps on the rear mesh flap of the
sun shade. Wrap these around the rear supports and secure
as shown in Figure 3-8.
Figure 3-8