
Use and Care Manual

7
OPERATION
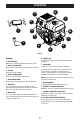
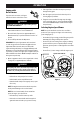
Features
A. OIL DRAIN PLUG
Removing the oil drain plug will drain the oil from the engine.
B. OIL FILL CAP & DIPSTICK
Remove the oil fill cap & dipstick to check the oil level and add oil.
C. FUEL CAP
Remove the fuel cap to add fuel.
D. RECOIL STARTER HANDLE
Pull the recoil starter handle to start the engine.
E. SPEED CONTROL KNOB
Change engine speed setting based on required performance.
F. ON/OFF KEY
Two-position key to be used to power the Electronic Fuel
Injection (EFI) system when turned to the ON position. Rotate to
“ON” position and pull recoil handle to start engine.
G. READY LIGHT
Green power indicator light (ready light) will illuminate when
power is supplied to the Electronic Fuel Injection (EFI) system and
the engine is ready to start.
I
J
D
K
E
A
C
F
H
B
G
L
M
Figure 4
H. SERVICE LIGHT
Used to determine engine system fault and provide diagnostic
information.
I. BATTERY BOX
Contains the Electronic Fuel Injection (EFI) system battery.
The battery must have enough charge to power the Electronic
Fuel Injection (EFI) system before starting the engine. If
necessary, charge battery before operation. Refer to Charging
The Battery in the Maintenance Section of this Manual.
NOTE: Battery supplies power to the EFI system only. The battery
is not used to start the engine.
J. BATTERY CHARGER
See Charging EFI Battery in the Maintenance Section.
K. FACTORY FILL & DRAIN (IF EQUIPPED)
DO NOT USE - this port is used by the manufacturing factory only.
L. ELECTRIC STARTER INLET (IF EQUIPPED)
Requires the use of a three-prong outdoor extension cord and a
120V power source/wall outlet.
M. ELECTRIC START BUTTON (IF EQUIPPED)
Pressing the button on the top of the electric starter switch
engages the engine’s electric starter when plugged into a 120V
power source.