CC-3040PS 10 cu ft POLY SWIVEL DUMP CART *PATENT PENDING READ AND FOLLOW ALL SAFETY RULES AND OPERATING INSTRUCTIONS BEFORE USING THIS EQUIPMENT 6004281 - REV A 9/18
Safety Rules This is the safety alert symbol. It is used to alert you to potential personal injury hazards. Obey all safety messages that follow this symbol to avoid possible injury or death. Read and understand all safety rules and operating instructions before using this tractor attachment. Follow all safety rules and operating instructions provided by your vehicle's manufacturer when using attachment. Never allow children or untrained persons to operate vehicle or attachment.
Warranty If this product fails due to a defect in material or workmanship within THREE YEARS from the date of purchase, we will at our option repair or replace it free of charge. This warranty excludes tires and wheels which are expendable and become worn during normal use. This warranty does not cover: • Repairs necessary because of operator abuse or negligence. • Equipment used for commercial or rental purposes. • Paint that is worn or faded due to normal use or exposure.
Carton Contents 2 (x1) 1 (x1) 5 (x1) 3 (x1) 4 (x1) 29 (x2) 28 (x2) 27 (x1) 23 (x12) 22 (x12) 24 (x12) 25 (x4) 26 (x2) TOOLS REQUIRED FOR ASSEMBLY: • • 1/2" Wrench or Socket Grease Gun • 3 Large Flat Screwdriver
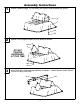
1 Assembly Instructions Attach Undercarriage to Poly Body and tighten with hardware as shown. 2 1 24 22 2 Attach Front Support loosely to Poly Body as shown. 23 3 DO NOT TIGHTEN HARDWARE AT THIS TIME 24 22 3 Insert Axle into Undercarriage halfway as shown. Center Spacer inside Swivel Clevis and align with Axle.
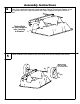
4 Assembly Instructions Slide Axle completely through Undercarriage; Swivel Clevis and Spacer must be captured by Axle. Align Drawbar with Front Support and press down to latch. Tighten Bolts on Front Support after Latching to Drawbar 5 Slide Washers and Wheels onto Axle and secure with Hairpins as shown.
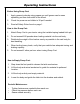
Operating Instructions Before Using Dump Cart: 1. Apply grease to wheels using grease gun until grease can be seen squeezing out from both sides of the wheel. 2. Check tire pressure and inflate to 30 psi if needed. 3. Read all Safety Rules found on page 1. How to Use Dump Cart: 1. Attach Dump Cart to your tractor using the installed spring loaded hitch pin. 2. Do not exceed 600 pounds when loading material into the cart body. 3.
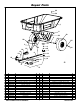
Repair Parts 22 24 1 2 29 23 4 23 10 19 25 27 3 14 28 9 8 7 23 13 6 26 12 11 20 10 17 15 16 10 21 18 5 ITEM PART NO DESCRIPTION 1 6000667 BODY, POLY, 10 CU FT 2 411061 UNDERCARRIAGE 3 6000668 FRONT SUPPORT 4 300001 AXLE 5 6002535-BY DRAWBAR ASSEMBLY (incl 10-20) 6 6000383 DRAWBAR, WELDED 7 6000548 CLEVIS, SWIVEL 8 6000368 WASHER, SPRING 9 6000369 SHOULDER BOLT, 1/2" X 3/8" 10 300061 HEX NUT, 3/8-16 C-LOCK 11 3000720 WASHER, 3/8" USS 12 300075 WASHER, 1/2" USS 13 6000305-Y FOOT PEDAL 14
Notes 10
Designed And Tested In Columbus, Ohio Manufactured In The U.S.A.