CC-4624V2 24 cu ft LAWN SWEEPER U.S. Patent No.
Safety Rules This is the safety alert symbol. It is used to alert you to potential personal injury hazards. Obey all safety messages that follow this symbol to avoid possible injury or death. Read and understand all safety rules and operating instructions before using this tractor attachment. Follow all safety rules and operating instructions provided by your tractor's manufacturer when using attachment. Never allow children or untrained persons to operate tractor or attachment.
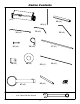
Carton Contents (x1) 40 (x1) 45 (x1) 35 (x2) 34 (x2) 41 (x2) 37 (x1) 39 (x6) 38 (x2) 44 (x2) 47 (x2) 53 (x1) 43 (x2) TOOLS REQUIRED FOR ASSEMBLY: • 36 (x2) 9/16" Open End Box Wrench 2 42 (x1) 48 (x1)
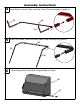
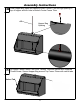
Assembly Instructions 1 Remove tethered pin and unfold hitch from storage postion. 4 2 Replace pin in desired postion along Hitch Cross Tube 3 Attach Height Adjustment Handle Using a 9/16" Open End Box Wrench and install Vinyl Grip by sliding over Handle.
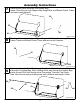
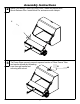
4 Assembly Instructions Insert Bottom Frame Tubes into Rear Frame Tube and snap into position. 35 34 35 5 Insert Top Frame Tubes into Rear Frame Tube and snap into position. 34 36 36 6 Slide Hopper Bar into pocket of Hopper Bag as shown.
Assembly Instructions 7 Place bottom frame assembly into Hopper Bag. Install Clevis Pins through Hopper Bag, Hopper Bar, and Bottom Frame Tubes and secure with Hairpins. 39 39 41 41 (Hardware Step 8) 8 Place top frame assembly into Hopper Bag. Install Clevis Pins through Top Frame Tubes and Bottom Frame Tubes and secure with Hairpins. 38 39 39 9 38 (Hardware Step 9) From one side, slide Pivot Rod through Top Frame Tube, Connecting Tube and pocket of Hopper Bag.
10 Assembly Instructions Hold Hopper Bag open and carefully insert Tension Tube through opening in top of hopper and into hole in Bottom Center Frame Tube. 45 11 Hopper Bag Opening Lift Upper Center Frame Tube Over Tension Tube and Secure with Supplied Thumb Screw. Secure Hopper Bag around Top Frame Tubes with velcro tabs.
Assembly Instructions 12 Insert Connecting Tubes into Short Hitch Tubes and secure with Quick-Release Pins. Install Hitch Pin and secure with Hairpin. 13 Tie Dump Rope securely around exposed section of Rear Frame Tube and secure handle by threading 51 rope through handle and 48 securing with a knot.
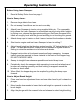
Operating Instructions Before Using Lawn Sweeper: 1. Read all Safety Rules found on page 1. How to Sweep Lawn: 1. Remove large debris from lawn. 2. Do not sweep if conditions are too wet or muddy. 3. Attach Lawn Sweeper to tractor using supplied hitch pin. The reversable hitch allows the Lawn Sweeper to accomodate varying tractor hitch heights by fliping over; choose the appropriate setting so that Lawn Sweeper hitch tubes are roughly level with the ground and Bag is not touching the ground. 4.
Operating Instructions Offset Sweeping: 1. Remove both pins from drawbar. 2. Slide drawbar on hitch cross tube to farthest holes on desired side. 3. Re-pin both pins. 4. Resume normal towing of sweeper. 5. Durring opertion be mindful of wider towpath of sweeper Storing Lawn Sweeper: 1. Empty hopper bag and thoroughly clean Lawn Sweeper before storing. 2. Store Lawn Sweeper away from excessive heat to prevent damage. 3. Brushes must not contact ground during storage to prevent damage. 4.
Warranty If this product fails due to a defect in material or workmanship within THREE YEARS from the date of purchase, we will at our option repair or replace it free of charge. This warranty excludes tires, wheels, brushes and bag, which are expendable and become worn during normal use. This warranty does not cover: • Repairs necessary because of operator abuse or negligence. • Equipment used for commercial or rental purposes. • Paint that is worn or faded due to normal use or exposure.
LAWN SWEEPER EXPLODED VIEW 1 3 9 6 26 29 31 30 33 4 8 17 10 18 19 25 20 7 28 12 5 11 13 14 3 27 53 2 15 16 32 ITEM PART N0 DESCRIPTION 1 6004212-Y SWEEPER HOUSING 2 6003957 HEIGHT ADJUSTMENT HANDLE INSERT LOCKNUT, 3/8-16 3 310061 NYLON UNC 4 6003965 HITCH WELDMENT 6004208 HITCH CROSS TUBE ASSEMBLY 5 6 307034 HITCH MOUNT TUBE 7 3000543 3/8"-16 X 2" HEX BOLT 8 3000722 CURVED WASHER, 3/8" USS 9 310073 WASHER, 3/8" USS 10 4075502 LOCKING BRACKET 11 6000222 SNAP BUTTON 12 307011 WHEEL (BUSHINGS
HOPPER BAG EXPLODED VIEW 40 50 42 34 45 49 43 48 51 47 39 36 44 39 41 ITEM 34 35 36 37 38 39 40 41 42 38 37 PART NO 6004204 6000285 6000284 6002316 3000818 307083 6004247 3000820 6002318 46 35 DESCRIPTION CENTER HOPPER FRAME BOTTOM HOPPER FRAME TOP HOPPER FRAME HOPPER STOP BAR CLEVIS PIN, 3/8" x 1/2" HAIRPIN COTTER HOPPER BAG CLEVIS PIN, 1/4" x 1-1/4" HOPPER PIVOT ROD QTY 2 2 3 1 2 6 1 2 1 ITEM 43 44 45 46 47 48 49 50 51 12 PART NO 307032 3000720 6004001 307133 3000823 307361 6000208 600
KIT REPAIR KITS KIT NUMBER PART NUMBER 6004204 6000285 6004287 CC-4624V2 FRAME KIT 6000284 307022 PINION BEARING KIT 6000828 6000731 6000730 3000820 307083 3000818 BAG ASSEMBLY HARDWARE 307133 3000720 3000823 307082 CONNECTING TUBE KIT 6004135 307034 1" SNAP BUTTON KIT 6004136 6000222 3/4" SNAP BUTTON KIT 6004137 6000208 DUST COVER KIT 6004138 6000539 46" BRUSH KIT 6004288 6002314 WHEEL BUSHING KIT 6004141 6000540 TENSION TUBE KIT 6004001 6004001 6004212-Y 6004205 CC-4624V2 HOOD KIT 6004289 4075502 600231
Designed And Tested In Columbus, Ohio Manufactured In The U.S.A.