Safe Operation Practices • Set-Up • Operation • Maintenance • Service • Troubleshooting • Warranty Operator’s Manual Model Series CS 2210 Chipper Shredder — Model Series CS 2210 & CS 3310 WARNING READ AND FOLLOW ALL SAFETY RULES AND INSTRUCTIONS IN THIS MANUAL BEFORE ATTEMPTING TO OPERATE THIS MACHINE. FAILURE TO COMPLY WITH THESE INSTRUCTIONS MAY RESULT IN PERSONAL INJURY. CUB CADET LLC, P.O. BOX 361131 CLEVELAND, OHIO 44136-0019 Printed In USA Form No.
1 To The Owner Thank You Thank you for purchasing a Chipper Shredder manufactured by Cub Cadet. It was carefully engineered to provide excellent performance when properly operated and maintained. If applicable, the power testing information used to establish the power rating of the engine equipped on this machine can be found at www.opei.org or the engine manufacturer’s web site. Please read this entire manual prior to operating the equipment.
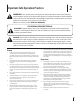
Important Safe Operation Practices 2 WARNING: This symbol points out important safety instructions which, if not followed, could endanger the personal safety and/or property of yourself and others. Read and follow all instructions in this manual before attempting to operate this machine. Failure to comply with these instructions may result in personal injury. When you see this symbol.
Safe Handling of Gasoline: 4. To avoid personal injury or property damage use extreme care in handling gasoline. Gasoline is extremely flammable and the vapors are explosive. Serious personal injury can occur when gasoline is spilled on yourself or your clothes which can ignite. Wash your skin and change clothes immediately. If it becomes necessary to push material through the shredder hopper, use a small diameter stick. Do not use your hands or feet. 5.
3. Before cleaning, repairing, or inspecting, stop the engine and make certain the impeller and all moving parts have stopped. Disconnect the spark plug wire and ground it against the engine to prevent unintended starting. 4. Do not change the engine governor settings or overspeed the engine. The governor controls the maximum safe operating speed of the engine. 5. Maintain or replace safety and instruction labels, as necessary. 6.
Safety Symbols This page depicts and describes safety symbols that may appear on this product. Read, understand, and follow all instructions on the machine before attempting to assemble and operate. Symbol Description READ THE OPERATOR’S MANUAL(S) Read, understand, and follow all instructions in the manual(s) before attempting to assemble and operate WARNING— ROTATING BLADES Keep hands out of inlet and discharge openings while machine is running.
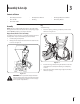
3 Assembly & Set-Up Contents of Carton • One Chipper Shredder • One Operator’s Manual • One Engine Operator’s Manual • One Tow Bar • One Bag • One Safety Glasses • One Bottle of Oil Assembly Bag NOTE: This unit is shipped without gasoline or oil in the engine. Fill up gasoline and oil as instructed in the accompanying engine manual BEFORE operating your chipper shredder. To attach the bag: 1. Place the opening of the bag completely over the chute deflector. See Figure 3-2.
Tow Bar Set-Up To attach the tow bar: Gas and Oil Fill-Up 1. Remove the spring pin and clevis pin from the end of the tow bar receiver. See Figure 3-3. Refer to the separate engine owner’s manual for additional engine information. 1. Add oil provided before starting unit for the first time out of the box. 2. Service the engine with gasoline as instructed in the separate engine owner’s manual. WARNING: Use extreme care when handling gasoline.
4 Controls and Features Hopper Handle Spring Latch Chipper Chute Recoil Starter Tow Bar Lock Rod Receiver Model Series CS 3310 Shown Figure 4-1 Chipper Chute Recoil Starter Branches up to two inches (model series CS 2210) or three inches (model series CS 3310) in diameter may be fed into the chipper chute for chipping. The recoil starter is located on the engine. Pull the recoil starter to start engine.
5 Operation WARNING: The operation of any chipper shredder can result in foreign objects being thrown into the eyes, which can damage your eyes severely. Always wear the safety glasses provided with this unit or eye shields before chipping or shredding and while performing any adjustments or repairs.
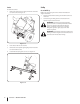
Emptying the Bag 1. Stop engine. 2. Squeeze the locking buckle to release the bag’s drawstrap before loosening it from the chute deflector. See Figure 5-2. Figure 5-2 3. Empty the bag and reattach to the chute deflector opening. Refer to the “Set-Up & Adjustments” section of this manual.
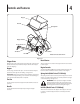
6 Maintenance & Adjustments Maintenance Equipment Care General Recommendations • Clean the chipper shredder thoroughly after each use. • Wash bag periodically with water. Allow to dry thoroughly in shade. • If the reduction chamber becomes clogged, remove and clean as instructed below. • Always observe safety rules when performing any maintenance. • The warranty on this chipper shredder does not cover items that have been subjected to operator abuse or negligence.
Cleaning The Reduction Chamber WARNING: The impeller’s shredder blade and chipper blades are sharp. Wear leather work gloves to protect your hands when cleaning out the reduction chamber. If the reduction chamber becomes clogged with debris, the shredder screen can be pivoted upward so that you can clean the surrounding area. To do so, proceed as follows: 1. Stop engine, disconnect spark plug, and make certain the chipper shredder has come to a complete stop.
7 Service Blade Care 7. Chipper Blades IMPORTANT: When sharpening the blade, protect hands by using gloves. Follow the original angle of grind and make sure to remove an equal amount from each blade. WARNING: The impeller’s chipper blades are sharp. Wear leather work gloves to protect your hands. 1. Stop engine, disconnect spark plug, and make certain the chipper shredder has come to a complete stop. 2. Pivot the shredder screen upward as instructed under the heading Cleaning the Reduction Chamber.
4. Remove six flange nuts which secure hopper inlet guide to impeller housing. See Figure 7-3A. 7. Remove the two internal hex screws, hex lock nuts, and lock washers which secure the shredder blade to the impeller. See Figure 7-3B. NOTE: Use a 3/16” hex key (Allen) wrench on the outside of the shredder blade and a 1/2” box (or socket) wrench on the inside of the shredder blade. Hold the Allen wrench stationary and rotate the box (or socket) wrench to loosen the nut. 8.
8 Troubleshooting Problem Engine Fails to start Remedy 1. Throttle lever not in correct starting position. 1. Move throttle lever to FAST or START position. 2. Spark plug wire disconnected. 2. Connect wire to spark plug. 3. Choke not in CHOKE position (if equipped). 3. Move choke lever to CHOKE position. 4. Fuel tank empty or stale fuel. 4. Fill tank with clean, fresh gasoline. 5. Engine not primed (if equipped). 5. Prime engine as instructed in Engine Manual. 6. Faulty spark plug. 6.
9 Replacement Parts Component Part Number and Description 942-04050 Shredder Blade 942-0544B Chipper Blade 719-04308 Flail Blade (3 total) 634-04627 10 x 4.0 Pneumatic Wheel Phone (800) 965-4CUB to order replacement parts or a complete Parts Manual (have your full model number and serial number ready). Parts Manual downloads are also available free of charge at www.cubcadet.com.
Notes 18 10
Section 10 — Notes 19
CUB CADET LLC MANUFACTURER’S LIMITED WARRANTY FOR SNOW THROWERS, LOG SPLITTERS CHIPPER-SHREDDERS, CHIPPER-SHREDDER VACUUMS AND JET SWEEPS The limited warranty set forth below is given by Cub Cadet LLC with respect to new merchandise purchased and used in the United States, its possessions and territories, and by MTD Products Limited with respect to new merchandise purchased and used in Canada and/or its territories and possessions. b.