Safe Operation Practices • Set-Up • Operation • Maintenance • Service • Troubleshooting • Warranty Operator’s Manual Front Tine Tiller — FT24 WARNING READ AND FOLLOW ALL SAFETY RULES AND INSTRUCTIONS IN THIS MANUAL BEFORE ATTEMPTING TO OPERATE THIS MACHINE. FAILURE TO COMPLY WITH THESE INSTRUCTIONS MAY RESULT IN PERSONAL INJURY. NOTE: This Operator’s Manual covers several models. Features may vary by model.
1 To The Owner Thank You Thank you for purchasing this product. It was carefully engineered to provide excellent performance when properly operated and maintained. If applicable, the power testing information used to establish the power rating of the engine equipped on this machine can be found at www.opei.org or the engine manufacturer’s web site. Please read this entire manual prior to operating the equipment. It instructs you how to safely and easily set up, operate and maintain your machine.
2 Important Safe Operation Practices WARNING! This symbol points out important safety instructions which, if not followed, could endanger the personal safety and/or property of yourself and others. Read and follow all instructions in this manual before attempting to operate this machine. Failure to comply with these instructions may result in personal injury. When you see this symbol. HEED ITS WARNING.
19. 20. 21. 22. 23. If the machine should start making an unusual noise or vibration, stop the engine, disconnect the spark plug wire and ground it against the engine. Inspect thoroughly for damage. Repair any damage before starting and operating. Keep all shields, guards, and safety devices in place and operating properly. Never pick up or carry machine while the engine is running. Use only attachments and accessories approved by the manufacturer. Failure to do so can result in personal injury.
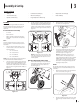
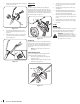
3 Assembly & Set-Up Contents of Carton • Tiller (1) • Handlebar Assembly (1) • Depth Stake Assembly (1) • Tine Assemblies (4) • Wheel Assembly (1) • Bottle of Oil (1) • Operator’s Manual (1) • Engine Operator’s Manual (1) 3. Use two clevis pins and two cotter pins from the manual bag. From the FRONT of the tiller install the outer LH tines (A2) onto the outer left side of the shaft. Install the outer RH tines (B2) onto the outer right side of the shaft. see figure 3-2. 2.
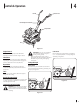
3. Remove the handle adjustment crank from the handle. See Figure 3-6. Adjustments 3. Turn the cable collar section one or two turns to increase or decrease tension on the cable. See Figure 3-9. 4. Retighten the hex nut against the cable collar. See Figure 3-9. 5. With the forward engagement handle in the neutral (released) position, pull the starter rope several times. The tines should not turn. 6.
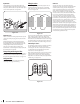
4 Controls & Operation Clutch Lever Handle Handle Adjustment Crank Depth Stake Tines Figure 4-1 Engine Controls See the separate Engine Operator’s Manual for information and functions of the engine controls. Clutch Lever The clutch lever is located on the upper left handle. Squeezing the lever against the handle engages the tine drive. Release the lever to stop the tines. WARNING! Be sure no one is standing in front of the tiller while the engine is running or being started. 1.
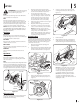
Depth Stake Tilling Procedure Other Uses The depth stake acts as a brake for the tiller and controls the depth and speed at which the machine will operate. Remove the clevis pin and hairpin clip to raise or lower depth stake. See Figure 4-4. When tilling, leave approximately eight inches of untilled soil between the first and second tilling paths, then make the third path between the first and second, Figure 4-5. The tiller has many uses other than tilling and cultivating a garden.
5 Service WARNING! Disconnect the spark plug wire and ground it against the engine before performing any repairs. Engine 1. Clean the exterior of the engine and the entire tiller thoroughly. Lubricate the tiller as described in the lubrication instructions. 2. The use of pressure washers is not recommended for cleaning your tiller. They may cause damage to electric components, spindles, pulleys, bearings or the engine. The use of pressure washers will result in shortened life and reduce serviceability.
6 Troubleshooting Problem Tines do not engage 10 Cause Remedy 1. Foreign object lodged in tines 1. Dislodge foreign object 2. Tine clevis pin(s) missing 2. Replace tine clevis pin(s) 3. Pulley and idler not in correct adjustment 3. Take tiller to authorized service dealer 4. Not shifting properly 4. Refer to the Controls & Features Section for proper shifting procedures 5. Control cable not adjusted properly 5. Adjust control cable 6. Belt worn and/or stretched 6.
Medidas importantes de seguridad • Configuración • Funcionamiento • Mantenimiento Servicio • Solución de problemas • Garantía Manual de Operación Cultivadora de dientes frontales – FT24 ADVERTENCIA LEA Y RESPETE TODAS LAS NORMAS DE SEGURIDAD E INSTRUCCIONES INCLUIDAS EN ESTE MANUAL ANTES DE PONER EN FUNCIONAMIENTO ESTA MÁQUINA. SI NO RESPETA ESTAS INSTRUCCIONES PUEDE PROVOCAR LESIONES PERSONALES. NOTA: Este manual de operación cubre distintos modelos.
1 Al propietario Gracias Gracias por comprar una cultivadora de jardín Cub Cadet. La misma ha sido diseñada cuidadosamente para brindar excelente rendimiento si se la opera y mantiene correctamente. Por favor lea todo este manual antes de operar el equipo. Le indica cómo configurar, operar y mantener la máquina con seguridad y fácilmente. Por favor asegúrese de seguir cuidadosamente y en todo momento las prácticas de seguridad recomendadas, y hacérselas seguir a cualquier otra persona que opere la máquina.
2 Medidas importantes de seguridad ¡ADVERTENCIA! La presencia de este símbolo indica que se trata de instrucciones importantes de seguridad que se deben respetar para evitar poner en peligro su seguridad personal y/o material y la de otras personas. Lea y siga todas las instrucciones de este manual antes de poner en funcionamiento esta máquina. Si no respeta estas instrucciones puede provocar lesiones personales. Cuando vea este símbolo.
18. 19. 20. 21. 22. 23. No sobrecargue la capacidad de la máquina intentando labrar el suelo a un nivel demasiado profundo o a una velocidad demasiado rápida. Si la máquina arranca haciendo un sonido o una vibración rara, detenga el motor, desconecte el cable de la bujía y conéctelo a masa contra el motor. Inspeccione la máquina minuciosamente para ver si está dañada. Repare todos los daños antes de encender y operar la máquina.
3 Montaje y Configuración Contenido de la caja de cartón • Una cultivadora • Un conjunto de barra de control • Un conjunto de calibrador de profundidad • Cuatro conjuntos de dientes • Una Asamblea de ruedas • Una botella de aceite • Un Manual de operación • Un Manual de operación del motor Montaje 3. Las referencias a la parte derecha e izquierda de la caña del timón se determinan a partir detrás del equipo en la posición de funcionamiento.
2. Coloque el manija en su posición y asegure con el hardware eliminado previamente. Vea la Figura 3-5. Ajustes 3. Retire la manivela de ajuste de la manija de la manija. Vea la Figura 3-6. El timón se entrega con las ruedas ajustadas para que la máquina esté nivelado. Las ruedas deben ajustarse para satisfacer sus necesidades de labranza antes de la operación.
4 Controles y Funcionamiento Palanca del embrague Manija Manija Ajuste Crank Estaca de profundidad Dientes Figura 4-1 Controles del motor Consulte el Manual de operación del motor, por separado, para obtener información adicional y detalles sobre las funciones de los controles del motor. Palanca del embrague La palanca de embrague está situada brazo superior derecha de la manija. Al apretar la palanca contra el mango se acopla al mando de diente. Suelte la palanca para detener los dientes.
Estaca de profundidad La estaca de profundidad funciona como un freno de la cultivadora y controla la profundidad y la velocidad a la cual funciona la máquina. Retire la chaveta de horquilla y el broche de horquilla para subir o bajar la estaca de profundidad. Vea la Figura 4-4.
5 Servicio ¡ADVERTENCIA! Desconecte el cable de la bujía y tierra contra el motor antes de realizar cualquier reparación. Mantenimiento Motor Consulte el manual del operador del motor para obtener instrucciones de mantenimiento del motor. Dientes Limpie la parte inferior del protector de dientes después de cada uso. La suciedad se lava los dientes más fácil si se enjuaga inmediatamente y no después de que se seque.
6 Solución de problemas Problema Los dientes no enganchan Causa Remedio 1. Hay un objeto extraño entre los dientes 1. Desaloje el objeto extraño. 2. Falta la o las chavetas de horquilla de los dientes. 2. Cambie la o las chavetas de horquilla de los dientes. 3. La polea y la polea loca necesitan ajuste. 3. Lleve la unidad al distribuidor autorizado de mantenimiento. 4. Dificultad en el cambio de marcha. 5. El cable de control no está ajustado correctamente. 6. Correa desgastada y/o estirada. 4.