
Product Manual


10 Section 3— ASSembly & Set-Up
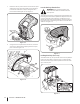
3. Rotate the seat into position and secure the seat into place
with the previously removed shoulder screws and flange
lock nuts. Be careful not to crimp or damage the wire
harness while installing the seat. See Figure 3-3.
Figure 3-3
4. Using the harness clip attached to the harness, secure the
excess wire to the fender by snapping the harness clip in
place as shown in Figure 3-4.
Figure 3-4
Lower Deck Discharge Chute Deflector
WARNING! Never operate the mower deck
without the chute deflector installed and in the
down position.
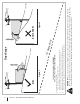
Check the mower deck for a shipping brace (with tag) that may
be holding the chute deflector upward for shipment. If a brace
is present, it must be removed before operating the tractor.
Holding the chute deflector fully upward, remove the shipping
brace by grasping it and rotating it clockwise. Lower the chute
deflector. See Figure 3-5.
Figure 3-5
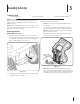
Installing the Dash Cap (If necessary)
To install the dash cap, line up the tabs on the dash cap with the
holes in the upper dash as shown in Figure 3-6. Slide the tabs
into the holes in the upper dash and push forward on the dash
cap to lock into place.
Figure 3-6