
Blower User Manual


4
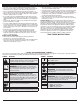
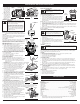
KNOW YOUR UNIT
Handle
Fuel Cap
Primer Bulb
Blue Choke
Lever
Oil Filler Cap
Muffler
Cover
Concentrator
Nozzle
Blower Tube
Spark Plug
Air Filter Cover
Starter
Rope Grip
Cruise Control
On/Off Stop Control
Throttle Control
APPLICATIONS
Cleaning yards, garages, driveways,
porches, patios, around walls,
fences and more
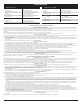
ASSEMBLY INSTRUCTIONS
ASSEMBLING UNIT
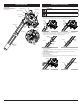
Installing Blower Tube
1. Align the bump on the end of the blower tube with the bump slot on the bottom end of the blower outlet (Fig. 1).
2. Insert the bump on the blower tube into the bump slot on the blower outlet (Fig. 1).
3. Twist the blower tube clockwise inside the blower outlet until the bump locks into place (Fig. 2).
Installing Nozzle
1. Align the bump on the end of the blower tube with the bump slot on the end of the nozzle (Fig. 3).
2. Insert the bump on the blower tube into the bump slot on the nozzle (Fig. 3).
3. Twist the nozzle clockwise over the blower tube until tight (Fig. 4).
Removing the Blower Tube
1. Hold the unit firmly.
2. Insert a flathead screwdriver into the tube lock and twist the screwdriver counterclockwise 1/4 turn and hold
it there (Fig. 5).
3. While holding the screwdriver in a counterclockwise position, grasp the blower tube and twist it
counterclockwise (Fig. 5).
4. Pull the blower tube from the blower outlet.
Removing the Nozzle
1. Hold the blower tube firmly.
2. Grasp the nozzle and twist it counterclockwise until the nozzle unlocks from the blower tube (Fig. 6).
3. Remove the nozzle from the blower tube.
Fig. 1
Blower
Outlet
Bump
Bump
Slot
Blower
Tube
Fig. 2
Blower
Outlet
Blower
Tube
Fig. 3
Blower
Outlet
Bump
Bump
Slot
Nozzle
Fig. 4
Blower
Tube
Nozzle
Fig. 5
Tube Lock
Blower
Outlet
Blower
Tube
Fig. 6
Blower
Tube
Nozzle
WARNING: To prevent serious personal injury or damage to the unit, the blower
tube must be installed while operating this unit.
WARNING:
To avoid serious personal injury and damage to the unit, shut the unit off
before removing or installing the blower tubes.