
Use and Care Manual


9
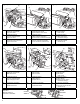
SPARK ARRESTER (if equipped)
See Figure 8, page 3.
The spark arrester may be standard or an optional part, depending on
the engine type. In some areas, it is illegal to operate an engine
without a spark arrester. Check local laws and regulations. A spark
arrester is available from authorized Honda servicing dealers.
The spark arrester must be serviced every 100 hours to keep it
functioning as designed.
If the engine has been running, the muffler will be hot. Allow it to cool
before servicing the spark arrester.
Removal
1. Remove the three 6 mm bolts [1] from the muffler protector [2], and
remove the muffler protector.
2. Remove the special screw [3] from the spark arrester [4], and
remove the spark arrester from the muffler [5].
Cleaning & Inspection
1. Use a brush to remove carbon deposits from the spark arrester
screen. Be careful not to damage the screen. Replace the spark
arrester if it has breaks or holes.
2. Install the spark arrester in the reverse order of removal.
STORING YOUR ENGINE
STORAGE PREPARATION
Proper storage preparation is essential for keeping your engine
trouble-free and looking good. The following steps will help to keep
rust and corrosion from impairing your engine’s function and
appearance, and will make the engine easier to start when you use it
again.
Cleaning
If the engine has been running, allow it to cool for at least half an hour
before cleaning. Clean all exterior surfaces, touch up any damaged
paint, and coat other areas that may rust with a light film of oil.
NOTICE
Using a garden hose or pressure washing equipment can force water
into the air cleaner or muffler opening. Water in the air cleaner will
soak the air filter, and water that passes through the air filter or muffler
can enter the cylinder, causing damage.
Fuel
See “AVOIDING FUEL-RELATED PROBLEMS” on page 13 for a list
of recommended procedures to avoid fuel related problems.
The DISTRIBUTOR’S LIMITED WARRANTY (page 12) does not
cover fuel system damage or engine performance problems resulting
from neglected storage preparation
Engine Oil
1. Change the engine oil (see page 8).
2. Remove the spark plug (see page 8).
3. Pour 1 - 2 teaspoons (5 ~ 10 cc) of clean engine oil into the
cylinder.
4. Pull the recoil starter several times to distribute the oil.
5. Reinstall the spark plug.
Storage Precautions
If your engine will be stored with gasoline in the fuel tank, it is
important to reduce the hazard of gasoline vapor ignition. Select a
well-ventilated storage area away from any appliance that operates
with a flame, such as a furnace, water heater, or clothes dryer. Also
avoid any area with a spark-producing electric motor, or where power
tools are operated.
If possible, avoid storage areas with high humidity, because that
promotes rust and corrosion.
If there is gasoline in the fuel tank, leave the fuel valve in the OFF
position.
Keep the engine level in storage. Tilting can cause fuel or oil leakage.
With the engine and exhaust system cool, cover the engine to keep
out dust. A hot engine and exhaust system can ignite or melt some
materials. Do not use sheet plastic as a dust cover. A nonporous
cover will trap moisture around the engine, promoting rust and
corrosion.
Removal From Storage
Check your engine as described in the BEFORE OPERATION
CHECKS section of this manual (see page 4).
If the fuel was drained during storage preparation, fill the tank with
fresh gasoline. If you keep a container of gasoline for refueling, be
sure it contains only fresh gasoline. Gasoline oxidizes and
deteriorates over time, causing hard starting.
If the cylinder was coated with oil during storage preparation, the
engine will smoke briefly at startup. This is normal.
TRANSPORTING
Keep the engine level when transporting to reduce the possibility of
fuel leakage. Turn the fuel valve to the OFF position.
Review the instructions provided with the equipment powered by this
engine for any procedures that should be followed for transporting.
TAKING CARE OF UNEXPECTED PROBLEMS
Engine will not start
POSSIBLE CAUSE CORRECTION
Fuel valve is OFF. Move the fuel valve lever to ON.
Choke is OFF. Unless the engine is warm, move
the choke/throttle lever, choke rod,
or choke lever to the CHOKE
position. (if equipped)
Ignition switch or engine stop
switch is OFF.
Move the flywheel brake lever to
RUN position.
Throttle lever to FAST position.
Engine stop switch to ON.
Out of fuel. Refuel.
Bad fuel; engine stored
without treating gasoline, or
refueled with bad gasoline.
Refuel with fresh gasoline.
Spark plug faulty, fouled, or
improperly gapped.
Adjust or replace the spark plug
(page 8).
Spark plug wet with fuel
(flooded engine).
Dry and reinstall the spark plug.
Start the engine with the
choke/throttle lever in the FAST
position.
Choke in the OFF position.
Fuel filter clogged, carburetor
malfunction, ignition
malfunction, valves stuck, etc.
Take the engine to an authorized
Honda servicing dealer or refer to
the shop manual to replace or
repair faulty components as
necessary.