
user manual


LINE INSTALLATION
Only use original equipment manufacturer replacement line (up to 0.080 inch (2.03
mm) diameter). Line other than the specified may make the motor overheat or fail.
There are two methods to replace the trimming line:
• Wind the inner reel with new line
• Install a prewound inner reel
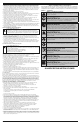
Winding the Existing Inner Reel
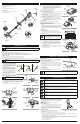
1. Remove the cutting head cover by pressing in both tabs that are visible on
either side or the cutting head (Fig. 14).
2. Remove the inner reel from the outer spool (Fig. 15).
3. Remove any old line from the inner reel and use a clean cloth to wipe the
inner surface of the outer spool.
NOTE: Use a clean cloth to clean the inner reel, spring, shaft, and inner
surface of the outer spool.
4. Take approximately 12 feet (3.6 m) of new trimming line and insert one end of
the line into the hole at the top of the inner reel (Fig. 16).
5. Wind the line, in even and tight layers, onto the reel (Fig. 16). Wind the line in
the direction indicated on the inner reel.
NOTE: Failure to wind the line in the direction indicated will cause the cutting
head to operate incorrectly.
6. Insert the end of the line into one of the holding slots (Fig. 16).
7. Insert the end of the line through the eyelet in the outer spool (Fig. 15).
8. Place the inner reel inside the outer spool.
9. Hold the inner reel in place, grasp the line end and pull firmly to release the
line from the holding slot in the inner reel.
10. Install the cutting head cover over the inner reel. Align the tabs on the cover
with the slots in the outer spool and press the cover down evenly until it
snaps into place (Fig. 15).
NOTE: Make sure the cutting head cover tabs snap into place or the inner reel
will come out during operation.
Installing a prewound reel
Always use genuine replacement line. Using larger line than specified may make
the motor overheat or fail.
1. Remove the cutting head cover by pressing in on both of the cutting head
cover tabs that are visible on either side of the outer spool (Fig. 14).
2. Remove the old inner reel from the outer spool.
3. Use a clean cloth to wipe the inner surface of the outer spool.
4. Insert the end of the line of the pre-wound reel through the eyelet in the outer spool (Fig. 15).
5. Place the inner reel inside the outer spool (Fig. 15).
6. Hold the inner reel in place, grasp the line end and pull firmly to release the line from the holding slot in the inner reel.
7. Install the cutting head cover over the inner reel. Align the tabs on the cover with the slots in the outer spool and press the cover down
evenly until it snaps into place.
NOTE: Make sure the cutting head cover tabs snap into place or the inner reel will come out during operation.
CHARGER MAINTENANCE
• Keep the charger clean and clear of debris. Do not allow foreign material into the recessed cavity or on the contacts.
• Wipe with a dry cloth. Do not use solvents, water or place in wet conditions.
• Always unplug the charger when not in use.
• The battery pack may be stored in the charger. However, it is recommended to disconnect the charger from the power source.
• To ensure safety and reliability, all repairs should be performed by a qualified service technician.
• Check that the charger contacts have not been shorted by debris or foreign material.
• Keep the charger and battery pack in an area that is between 65 and 75˚ F (18 and 24˚ C).
ENVIRONMENTALLY SAFE BATTERY DISPOSAL
To avoid damage to the environment:
• DO NOT attempt to remove or destroy any of the battery pack components.
• DO NOT attempt to open the battery pack.
• DO NOT place the battery pack in the regular household trash.
• DO NOT incinerate.
• DO NOT place them where they will become part of any waste landfill or municipal solid waste stream.
• Cover the battery terminals with heavy-duty adhesive tape.
• If a leak develops, the released electrolytes are corrosive and toxic. DO NOT get the solution in your eyes or on your skin, and do not
swallow it.
• Dispose of the battery pack in accordance with local, state and federal regulations.
CAUSE SOLUTION
The battery lacks sufficient charge Charge the battery
4
CLEANING INSTRUCTIONS
1. Stop the motor and wait for all moving parts to stop.
2. Remove the battery from the unit.
3. Wipe the unit down with a damp cloth. Do not douse the unit with water. Do not use solvents or strong detergents.
4. Scrape the guard and spool area to remove dried clippings and mud.
5. Brush or blow dust, debris and grass clippings out of the air vents. Keep them free or obstructions
STORAGE INSTRUCTIONS
1. Follow the Cleaning Instructions listed above.
2. Store the unit indoors in a dry, high and/or locked location, out of the reach of children and other unauthorized persons.
MAINTENANCE AND REPAIR INSTRUCTIONS
WARNING: Do not let brake fluids, gasoline, petroleum-based products, penetrating oils, etc., come in contact with
plastic parts. These chemicals may damage, weaken and destroy plastic, which may result in serious personal injury.
CLEANING AND STORAGE
WARNING: Before inspecting, cleaning, or servicing the
unit, stop the motor, wait for all moving parts to stop and
remove the battery. Failure to follow these instructions can
result in serious personal injury or property damage.
CAUSE SOLUTION
The cutting head is broken Replace as needed
TROUBLESHOOTING
NOTE: For maintenance beyond the minor adjustments listed above, or for replacement parts, please call the Customer Support
Department at 1-877-282-8684 (U.S.) or 1-800-668-1238 (Canada).
CAUSE SOLUTION
There is no power to the charger or battery Check the charger and charging station
The battery has failed Replace the battery
CAUSE SOLUTION
The cutting head is bound with grass Stop the motor, remove the battery and clean the cutting head
The cutting head is out of line Refill the cutting head with new line
The inner reel is bound up Replace the inner reel
The cutting head is dirty Clean the inner reel and outer spool
The line is welded Disassemble, remove the welded section and rewind the line
The line twisted when it was refilled Disassemble and rewind the line
THE CUTTING HEAD WILL NOT ADVANCE LINE
THE CUTTING HEAD ADVANCES LINE UNCONTROLLABLY
ACCESSORIES
Model #
A59 LBTY . . . . . . . . . . . . .
A59LCHGR . . . . . . . . . . . .
Description
20V Lithium-ion Battery
20V Lithium-ion Battery Charger
Part #
753-06579 . . . . . . .
753-06580 . . . . . . .
THE BATTERY WILL NOT CHARGE
THE MOTOR OPERATES SLOWLY OR WILL NOT OPERATE
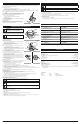
ADJUSTING THE TRIMMER LINE
The trimmer line wears down and becomes shorter with use. This unit is equipped with an Automatic Line Advancement cutting head. Line
is automatically extended each time the motor starts.
If the line becomes too short:
1. Stop the motor. See Starting and Stopping Instructions.
2. Wait two seconds and then restart the motor.
3. Repeat this process until the line length reaches the line cutting blade on the cutting head shield.
If the line does not automatically advance, the trimming line may be tangled or empty. Refer to the Maintenance section of this manual.
NOTE: DO NOT bump the cutting head; this will damage the unit and void the
warranty.
The trimming line can also be extended manually by lightly pressing the manual
line release button (Fig. 14) and pulling the trimming line. When doing so, always
make sure the motor is off and the battery is removed from the unit.
The life of your cutting line is dependent upon:
• Following the trimming techniques previously explained
• What vegetation is cut
• Where the vegetation is cut.
For example, the line will wear faster when trimming against a foundation wall as
opposed to trimming around a tree.
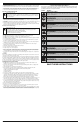
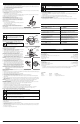
Decorative Trimming
Decorative trimming is the act of removing all vegetation from around trees,
posts, fences, etc. To accomplish it, rotate the whole unit so that the cutting
attachment is at a 30˚ angle to the ground (Fig. 13).
OPERATING INSTRUCTIONS
Fig. 13
Fig. 14
Fig. 15
Fig. 16
WARNING: Never use metal-reinforced line, wire, chain or
rope. These can break off and become dangerous projectiles.
Cutting
Head
Tabs
Cutting Head
Cover
Outer
Spool
Eyelet
Spool
The following toxic and corrosive materials are used in this units battery pack:
LITHIUM-ION, a toxic material.
WARNING: All toxic materials must be disposed of in a specified manner to prevent contamination of the environment.
Before disposing of damaged or worn out lithium-ion battery packs, contact your local waste disposal agency for information
and specific instructions. Take batteries to a local recycling and or disposal center, certified for lithium-ion battery disposal.
WARNING: Do not use the battery pack if there are cracks or if it breaks, regardless if there is leakage or not. Replace
with a new battery pack. DO NOT ATTEMPT TO REPAIR! As this may cause severe personal injury due to explosion or
electrical shock.
WARNING: To avoid risk of fire, electric shock or electrocution: DO NOT use a damp cloth or detergent on the battery
or battery charger. Wipe the outside with a dry, soft cloth.
Manual Line
Release button
SPECIFICATIONS
MOTOR*
* All specifications are based on the latest product information available at the time of printing. We reserve the right to make changes at
any time without notice.
Motor Type . . . . . . . . . . . . . . . . . . . . . . . . . . . . . . . . . . . . . . . . . . . . . . . . . . . . . . . . . . . . . . . . . . . . . . . . . . . . . . . . Cordless, Battery-powered
Motor Voltage . . . . . . . . . . . . . . . . . . . . . . . . . . . . . . . . . . . . . . . . . . . . . . . . . . . . . . . . . . . . . . . . . . . . . . . . . . . . . . . . . . . . . . . . . . . . . . . . 20 V
Motor Speed. . . . . . . . . . . . . . . . . . . . . . . . . . . . . . . . . . . . . . . . . . . . . . . . . . . . . . . . . . . . . . . . . . . . . . . . . . . . . . . . . . . . . . . . . . . . . 8500 rpm
Motor Wire Housing Tube . . . . . . . . . . . . . . . . . . . . . . . . . . . . . . . . . . . . . . . . . . . . . . . . . . . . . . . . . . . . . . . . . . . . . . . . . . . . . Aluminum Tube
Unit Weight (With battery, cutting head shield and D-handle). . . . . . . . . . . . . . . . . . . . . . . . . . . . . . . . . . . . . . . . . . . . . . . . . 8.2 lbs. (3.86 kg.)
Cutting Mechanism . . . . . . . . . . . . . . . . . . . . . . . . . . . . . . . . . . . . . . . . . . . . . . . . . . . . . . . . . . . . . . . . . . . . . . . . . . . . . . . . . . . . . . . Auto Feed
Trimming Line Diameter . . . . . . . . . . . . . . . . . . . . . . . . . . . . . . . . . . . . . . . . . . . . . . . . . . . . . . . . . . . . . . . . . . . . . . . . up to 0.080 in (2.03 mm)
Cutting Path Diameter . . . . . . . . . . . . . . . . . . . . . . . . . . . . . . . . . . . . . . . . . . . . . . . . . . . . . . . . . . . . . . . . . . . . . . . . . . . . . . . . 12 in. (30.5 cm)
BATTERY / BATTERY CHARGER*
Battery. . . . . . . . . . . . . . . . . . . . . . . . . . . . . . . . . . . . . . . . . . . . . . . . . . . . . . . . . . . . . . . . . . . . . . . . . . . . . . . . . . . . . . . . . . . . . . . . 20V Lithium
Charge Time . . . . . . . . . . . . . . . . . . . . . . . . . . . . . . . . . . . . . . . . . . . . . . . . . . . . . . . . . . . . . . . . . . . . . . . . . . . . . . . . . . . . . . . . . . . . . . 2 Hours
Battery Weight . . . . . . . . . . . . . . . . . . . . . . . . . . . . . . . . . . . . . . . . . . . . . . . . . . . . . . . . . . . . . . . . . . . . . . . . . . . . . . . . . . . . 3.24 Lbs. (1.47 kg)
Optimum Charging Temperature. . . . . . . . . . . . . . . . . . . . . . . . . . . . . . . . . . . . . . . . . . . . . . . . . . . . . . . . . . . . . . . . 32° to 104° F (0° to 40° C)
Battery Charger Input . . . . . . . . . . . . . . . . . . . . . . . . . . . . . . . . . . . . . . . . . . . . . . . . . . . . . . . . . . . . . . . . . . . . . . . . . . . . 120 V 60 Hz AC only
Battery Charger Output Maximum . . . . . . . . . . . . . . . . . . . . . . . . . . . . . . . . . . . . . . . . . . . . . . . . . . . . . . . . . . . . . . . . . . . . . . . . . . . . . . . . 21 V
Battery Charger Weight . . . . . . . . . . . . . . . . . . . . . . . . . . . . . . . . . . . . . . . . . . . . . . . . . . . . . . . . . . . . . . . . . . . . . . . . . . . . . . 1.2 Lbs. (0.54 kg)