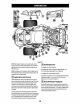
9 8 Figure 18 NOTE: This Operator's Manual covers several models, Tractor features may vary by model. Not ail features in this manual are applicable to all tractor models and the tractor depicted may differ from yours, NOTE: Ml references in this manual to the left or right side and front or back of the tractor are from the operating position nly. Exceptions, if any, will be specified.
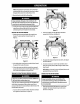
[ol Ne) Deck Lift Pedal (If Equipped) The deck lift pedal is located on the front, right corner of the platform. The pedal is used in conjunction with the deck fight knob {if equipped) to raise and lower the mowing deck. Push forward on the deck lift pedal, rotate the deck lift knob to the desired height and release the deck lift pedal.
OPERATION The LCD screen will alternate the letters “LO” followed by “OIL”, followed by the meter’s accumulated time, which Indicates the engine has low ofl pressure, This is common when starting an engine, The Indicator will remain active until the engine sufficiently builds pressure after starting. If it remains on with the engine at full speed and after a few minutes of operation, stop the tractor immediately and check the engine ofl level and add as strutted in the Engine Operator's Manual.
OPERATION Operation BEFORE OPERATING YOUR TRACTOR «Before operation, refer to the Maintenance Schedule chart located in this manual for regularly scheduled service items. + This engine is certified to operate only on clean, fresh, unleaded gasoline, Fill only with clean, fresh, unleaded gasoline with a pump sticker octane rating of 87 or higher. + Donor use gasoline left aver from the previous season, to minimize gum deposits In the fuel system.
OPERATION COLD WEATHER STARTING PRACTICE OPERATION (INITIAL USE) When starting the engine at temperatures near or below Operating a zero-turn tractor is not like operating a conventional freezing, ensure the correct viscosity motor oil is used in the type riding tractor. Although and because a zero-turn tractor is engine and the battery is fully charged. Start the engine mere maneuverable, getting used to operating the lap bar drive as follows: control fevers takes some practice, 1.
0/31 NOTE: If the haphazard drive control levers are not even in the neutral position, refer to Assembly for instructions to adjust the lap bar drive control levers so that they are even, 3, Hove the throttle to the full throttle position, A IRVING Always maintain a firm grip on the control! levers. Do HOT release the control ravels to slow or stop the tractor; move levers to neutral position using your hands.
OPERATION NOTE: The greater the distance between the two lap bar drive control levers, the sharper the tractor will tur. Neutral 3. To execute a “pivot turn’, move the turn side drive control lever to the neutral position, while moving the other drive control lever rearward. NOTE: Making a “pivot turn” on grass will greatly increase the potential for defacement of the turf, EXECUTING A ZERO TURN 1. Stop the forward or reverse motion of the tractor by moving the two foobar drive control fevers to neutral. 2.
(ora e ly 3. Use the deck lift knob/handle to raise the deck to Its highest position. 4. If dismounting the tractor, move the lap bar drive control {avers fully outward In the neutral position which also engages the parking brake, move the throttle to the FAST position, turn the key to STOP fandom remove from the ignition module. A WARNING Do not leave the seat of the tractor without disengaging the PTC and moving lap bar drive control levers fully outward into the Park Brake engaged position.
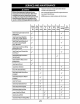
retinue Be fare performing any type of maintenance/service, disengage all controls and stop the engine, Wait until all moving parts have come to a complete stop, Disconnect spark plug wire and ground it against the engine to prevent unintended starting. Always wear safety glasses during operation or while performing any adjustments or repairs. Before Each Use After Firsts Hours Every 25 Hours Every 50 Hours Every 100 Hours Every 200 Hours Prior to Storing Follow the maintenance schedule given heft.
SERVICE AND MAINTENANCE Before | After | Every | Every | Every | Every | Every Prior to See Each | First] 10 2 50 108 200 Storing Engine Use | Hours] Hours | Hours | Hours | Hours | Hours 9] Manual Check That All Hardware s In Vv Place & Secure Check Engine Mounting Bolt Torque (Tighten to 325-450 in-ohs (37-50 N-m)) 4 v v Check Blade Mount Nut Torque {Tighten to 70-90 ft-lbs (95-122 N-m}} v 4 v Check Spark Plug Condition & Gap Vv v Iv Engine Break-In Oil Change Vv Vv Change Engine Oil Vv Vv Vv Check Fuel S
SERVICE AND MAINTENANCE {leaning the Tractor PINE If the tractor has been recently run, the engine, muffler, and surrounding metal surfaces will be very hat and can cause burns to the skin. Let the engine cool for at [east five minutes. Exercise caution ta avoid burns, Your tractor must be cleaned after each use and under certain conditions, i.e.
le FN REV I Ee Storing the Tractor « Willow the machine to cool in an open area for at feast five minutes before storing. + Da not park the tractor near any flammable materials (wood, cloth er chemicals) or any open flares or other potential source of ignition (furnace, water heater or any other type of heater), + Remove all combustible materials from the tractor before storing. Empty cargo boxes, grass catchers or containers.
RICE AND MAINTENANCE LUBRICATION A WARNING Before lubricating, repairing, or inspecting, always disengage PT0, set parking brake, stop engine, and remove key to prevent unintended starting. + Using a quality lubricating oll, lubricate all lubrication points. Refer to Maintenance Schedule chart located in this manual for proper service intervals. SPARK ARREST OR MAINTENANCE (IF EQUIPPED} Spark arrest or assemblies must be inspected and cleaned periodically (see the Maintenance Schedule chart in this manual).
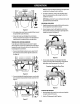
SERVICE AND MAINTENANCE Adjustments ADJUSTING DECK LIFT PEDAL 1. Set the deck to the transport position. 2, Remove the hex bolt, washer and hex nut near the center of the peat assembly. See Figure 36. es Figure 36 3. Position the pedal to the optimal position based on operator preference. See Figure 37. Figure 37 4. Re-install the hardware previously removed and torque the nutty 28-35 ft-lbs (38-47 N-m). See Figure 36.
SERVICE AND MAINTENANCE ADJUSTING THE DECK WHEELS pi Keep hands and feet away from the discharge opening of the abutting deck. NOTE: The deck wheels are an anti-scalp feature of the deck and are not designed to support the weight of the cutting deck, The deck wheels should be approximately mm} above the ground when the decks set in the desired height setting. To adjust the deck wheels, see the Assembly section for instructions.
VICE AND MAINTENANCE ¢. From beneath the rear of the tractor, side the belt off of the PTO pulley on the bottom of the engine. d. Lower the deck into the lowest mowing position, e. Skip ahead goosestep. 4. Rolling the belt off the PTO pulley: a. Raise the deck to the position that provides the most horizontal run of the belt between the deck idler pulleys and the PTO pulley on the bettor of the engine. .
SERVICE AND MAINTENANCE 5. Raise the deck to the position that provides the most horizontal run of the belt between the deck idler pulleys and the PTC pulley on the bottom of the engine, 6. Make certain the belt is in the spindle pulleys of the deck and that the backside of the belt is against both the fixed and movable idler pulleys. 7.
RICE AND MAINTENANCE Tractor Blade Care pi 7 EH TI Before performing any maintenance, disengage the PTO and move the lap bar drive control levers fully outward Into the Park Brake engaged position. if leaving the tractor unattended, turn the ignition key to the STOP position and remove key. Protect your hands by using heavy gloves when handling the blades. When servicing the tractor deck, he careful not to cut yourself on the sharpened blades. The cutting blades must be kept sharp at all times.