
Operating instructions


8 CULLIGAN SILVER SERIES
™
WATER SOFTENER
FIG. 4 FIG. 5
FIG. 6
FIG. 7
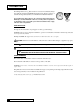
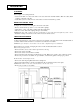
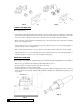
CONNECT THE BRINE LINE
Refer to Figures 6 & 7.
• Use the length of brine line included in the brine tank, or measure a length of brine line sufficient to reach from the
brine tank to the brine fitting, with no sharp bends. For easier access to the float it is recommended to add an extra
four feet (1.3 meters) of length to the brine line. Cut both ends of the brine line squarely and cleanly.
• Remove the brine valve from the brine tank and then remove the white nut and insert from the float rod. Return
float rod to its original position.
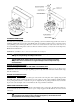
• Slip the white nut over one end of the tubing and press the plastic insert into the end of the tubing (Figure 7).
Connect to the brine valve and tighten nut.
• Remove white nut from the brine connection, and remove the plastic insert from the brine connection fitting.
• Slip the white nut over one end of the tubing and press the plastic insert into the end of the tubing (Figure 7).
Connect to the brine connection on the valve and tighten nut (Figure 6).
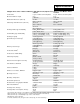
DRAIN LINE CONNECTION
Refer to Table 1, page 10 under the applicable tank size for drain line length and height limitations, and to Figure 3.
• Remove 1/2” pipe clamp from the small parts pack included with the control.
• Route a length of 1/2” drain line from the drain elbow to the drain.
• Fasten the drain line to the elbow with the clamp.
• Secure the drain line to prevent its movement during regeneration. When discharging into a sink, or open floor
drain, a loop in the end of the tube will keep it filled with water and will reduce splashing at the beginning of each
regeneration.