STEREO RADIO, CD-R/RW PLAYER WITH ALARM CLOCK OWNER'S MANUAL MODEL NO.
SAFETY INSTRUCTIONS CAUTION LASER SAFETY: This unit employs a laser. Only qualified service personnel should attempt to service this device due to possible eye injury. CAUTION: USE OF CONTROLS, ADJUSTMENTS OR PERFORMANCE PROCEDURE HEREIN MAY RESULT IN HAZARDOUS RADIATION EXPOSURE. RISK OF ELECTRIC SHOCK DO NOT OPEN CAUTION: TO REDUCE THE RISK OF ELECTRIC SHOCK, DO NOT REMOVE COVER (OR BACK). NO USER-SERVICEABLE PARTS INSIDE. REFER SERVICING TO QUALIFIED SERVICE PERSONNEL.
SAFETY INSTRUCTIONS (CONTINUED) Before using the unit, be sure to read all operating instructions carefully. Please note that these are general precautions and may not pertain to your unit. For example, this unit may not have the capability to be connected to an outdoor antenna. 1. READ INSTRUCTIONS All the safety and operating instructions should be read before the product is operated. 2. RETAIN INSTRUCTIONS The safety and operating instructions should be retained for future reference. 3.
SAFETY INSTRUCTIONS (CONTINUED) 15. OVERLOADING Do not overload wall outlets and extension cords as this can result in a risk of fire or electric shock. 16. OBJECT AND LIQUID ENTRY Never push objects of any kind into this product through openings as they may touch dangerous voltage points or short out parts that could result in fire or electric shock. Never spill or spray any type of liquid on the product. 17.
INSTALLATION Unravel the AC cord and connect it to a conveniently located AC outlet having 120V and 60Hz only. The Clock Display will illuminate and "12:00" will appear in the window. AC Outlet NOTE: If the AC plug does not fit into a nonpolarized outlet, do not file or cut the wide blade. it is the user's responsibility to have an electrician replace the obsolete AC Plug outlet.
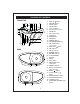
LOCATION OF CONTROLS FRONT/TOP 2 3 22 6 9 8 10 12 13 14 4 5 7 1 11 18 15 27 26 16 17 19 20 24 21 23 1. 2. 3. 4. 5. 6. 7. 8. 9. 10. 11. 12. 13. 14. 25 15. 16. 17. 18. 19. 20. SIDE 21. 22. 23. 28 24. 25. 29 26. 27. 28. 29. 30. 31. 30 31 5 SKIP Up Button VOLUME Button SLEEP Button HOUR Button Clock Set Button AC Cord (rear of unit) MIN Button CD Compartment ALM button RAND Button REP Button DIMMER Button CD OPEN/CLOSE Area FM Antenna Wire (rear of unit) SKIP Down Button PM Indicator FM ST.
RADIO OPERATION TO PLAY THE RADIO 1 2 Slide the AUTO/OFF/ON switch to the ON position to turn the unit on; the POWER indicator will light. Slide the FUNCTION switch 2 to the desired band (AM or FM). 3 4 Tune a station by turning the TUNING control. If you tune a station broadcasting in stereo, the FM STEREO indication will light. Adjust the VOLUME control as desired. Antennas FM: Extend the FM antenna wire for better FM reception. AM: Turn the unit for better AM reception.
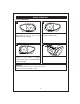
CD OPERATION TO PLAY A CD 1 2 Slide the AUTO/OFF/ON switch to the ON position to turn the unit on; the POWER indicator will light. Slide the FUNCTION switch to the CD position. 3 4 Open the CD compartment door by pressing the OPEN/CLOSE area. Insert a disc, label side up, onto the spindle and close the CD compartment door. To play a disc from the beginning, press the PLAY/PAUSE ( / ) button; the PLAY/RAND indicator will light.
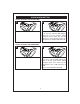
CD OPERATION (CONTINUED) TO SKIP/SEARCH 1 2 1 2 Press the Skip Up 1 or Skip Down 2 button to select a desired track. Press and hold the Skip Up 1 or Skip Down 2 button to quickly search for a musical passage. Turn on the unit, insert a CD and press the PLAY/PAUSE ( / )button to begin playback. RANDOM PLAYBACK NOTES: • If a disc is inserted incorrectly, dirty or damaged, it will not play. • To prevent damage to the disc, never open the CD door while the disc is rotating.
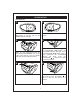
CLOCK/ALARM SETTING TO SET OR RESET THE ACTUAL TIME 1 2 3 1 2 Press and hold the HR (Hour) 1 button to set the hour and the MIN (Minute) button 2 to set the minutes. When setting the hours, make sure the PM indicator is lit if it is PM and not lit if it is AM. Release the CLOCK SET button 3. Press and hold the CLOCK SET button. TO SET OR RESET THE ALARM TIME 1 2 1 2 3 Press the HR (Hour) 1 button to set the alarm hour and the MIN (Minute) 2 button to set the alarm minutes.
CLOCK/ALARM SETTING (CONTINUED) TO SET THE ALARM TO WAKE TO RADIO 1 2 2 2 1 1 Slide the AUTO/OFF/ON 1 switch to the AUTO position and the BUZZER/MUSIC switch 2 to the MUSIC position. Slide the FUNCTION switch (other side of unit) to the AM or FM ST. position as desired. With the power off, when the actual time matches the selected preset alarm time(s), the radio automatically turns on for 120 minutes and then shuts off. To shut off the alarm, see TO SHUT ALARM OFF section on the next page.
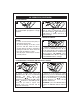
CLOCK/ALARM SETTING (CONTINUED) TO SET THE ALARM TO WAKE TO BUZZER 1 2 2 1 Slide the AUTO/OFF/ON 1 switch to the AUTO position and the BUZZER/MUSIC switch 2 to the BUZZER position. With the power off, when the actual time matches the selected preset alarm time(s), the buzzer automatically turns on for 60 minutes and then shuts off. To shut off the alarm, see TO SHUT ALARM OFF section below. Set the alarm time as previously instructed. Slide the BUZZER/MUSIC switch to the BUZZER position.
CLOCK/ALARM SETTING (CONTINUED) TO ACTIVATE THE SLEEP FUNCTION 1 2 Slide the AUTO/OFF/ON switch to the AUTO position. Press the SLEEP button to turn the unit on and select a 59 minutes sleep period; "59" will appear in the display and the SLEEP indicator will light. 3 4 1 2 3 Hold the SLEEP button 1, then press and hold the HR (Hour) button 2 to set the hour and/or the MIN (Minute) button 3 to set the minutes. Maximum sleep time is 1:59. To cancel Sleep SNOOZE button.
CARE AND MAINTENANCE Caring for Compact Discs • Treat the disc carefully. Handle the disc only by its edges. Never allow your fingers to come in contact with the shiny, unprinted side of the disc. • Do not attach adhesive tape, stickers, etc. to the disc label. • Clean the disc periodically with a soft, lint-free, dry cloth. Never use detergents or abrasive cleaners to clean the disc. If necessary, use a CD cleaning kit.
TROUBLESHOOTING GUIDE If you experience a problem with this unit, check the chart below before calling for service. SYMPTOM Unit will not turn on. Disc will not play. No sound. Erratic playback. Time reset to "12:00" Alarm does not turn on. AM or FM, no sound. CAUSE AC cord not connected. CD compartment door not closed. Disc inserted incorrectly. Dirty or defective CD. Moisture condensation on disc. VOLUME control set to minimum. Defective disc. Dirty or defective disc.
SPECIFICATIONS General: Power Source Battery Audio Power Output 120VAC, 60Hz 9V DC (for back up of the clock) 1 Watt/Ch. Radio Section: Frequency Range (FM) Frequency Range (AM) 88 - 108 MHz 530 - 1710 KHz CD Section: Disc Diameter 4.72" (120mm) 3.15" (80mm) Single CD Semiconductor Laser 780nm Optical Source Wavelength Specifications are subject to change without notice.