
Service manual
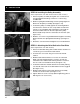
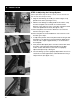


there is no tension on the pedal.
5. Flip the hiker up onto the rear legs so the front of the unit is
facing up to gain access to the underside of the shroud.
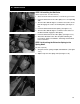
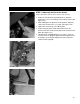
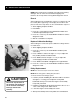
6. Remove the tension spring by grasping the tension spring and
pulling downward until the Spring can be removed from the
spring shaft. See figure 5-1.
7. Using a 9/16" wrench and socket, loosen and remove the nut
and bolt that fasten the pulley to the bracket. Remove the pulley
from the bracket.
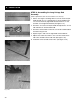
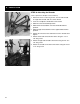
8. Orient the new pulley so that the raised text on the pulley hub is
facing upward (in the current position of the machine). Install the
pulley hardware and tighten.
9. Using the TFL spray lube supplied with the kit, spray the toothed
pulleys (2) being sure to cover the entire toothed area all the way
around the pulley.
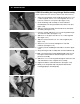
10. Grasp the tension spring and stretch and connect the loose end
over the shaft it was removed from.
11. Return the Hiker to its normal operating position.
12. Slowly push the unconnected step toward the rear of the
machine. Grasp the linkage arm and push the pedal to meet the
linkage arm end. Insert the bolt and tighten to 50 ft-lb.
13. Before operating the unit, make sure the belt has maintained its
position on the pulley. The hiker is now ready for use.
4 / RETRO-KIT INSTALLATION
27