
Service manual


28
5 / DIAGNOSTICS
Enter Diagnostic Mode
To enter diagnostic mode, get on the Hiker and begin stepping.
Press the START button and the display will light up. On the
window labeled INTENSITY press the + and - keys at the same
time. The display will briefly show the EPROM revision level and
then go to Display LED testing mode.
Display LED Test
Press FAT BURN 1 to enter this test mode. Watch for any
missing segments and verify that all digits and lights have
uniform brightness. This is also the default test mode when
entering diagnostics.
Battery Test
Press FAT BURN 2 to enter this test mode. The display will show
"bat" "6.5". This is the current voltage (DC) of the internal
battery. Please note "6.5" is an example, the actual voltage will
vary on each machine. The battery needs to be a minimum of 5.5
volts DC for the Hiker to operate properly.
Production Calibration Test
Press CARDIO 1 to enter this test mode.
NOTE: The Hiker cannot execute this calibration manually, the
calibration numbers need to be entered from current data. Refer
to the calibration procedure outlined in the Hiker Retro Kit
section 4.
To get back to the Display LED testing mode press FAT BURN 1.
To exit the Calibration testing mode press the + and - key in the
window labeled DURATION.
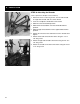
DVM Test
This test is to check the charging of the battery. If the battery is low
it is likely because the Hiker is not being used for long periods of
time. If that is the case, more frequent use of the Hiker will keep the
battery charged. Or you could charge the battery using an external
charger.
(Tools required–A digital voltmeter (DVM) clipped to the battery
connections.)
1. Connect a DVM between the positive battery terminal (red
wire) and negative terminal (black wire). (If the black wire is
difficult to connect, the chassis of the alternator may also be
used for the negative terminal.)
2. Start and run the Hiker normally (Level 1, 50 to 60 RPM
usage is fine) and monitor the DVM voltage. The voltage may