
Operating instructions


Cyrus Pre XPd, Cyrus Pre XPd Qx User Instructions
2
Welcome to the world of Cyrus!
Congratulations on your choice of Cyrus Hi-fi products. Our state-of-the-art
design technology and outstanding quality of manufacture has won countless
awards around the world. We are confident that you will derive great pleasure
from owning a product from one of the most recognised and respected
manufacturers of hi-fi equipment.
Now is a good time to register your new Cyrus product. Registration takes
only a few minutes, brings the added benefit of a full two year factory warranty
and adds you to our mailing list for future product updates and upgrades. To
register, visit www.cyrusaudio.com and click the ‘Login/Register’ link.
Please read these instructions carefully before commencing installation. They
provide full guidance to help you install your amplifier safely and correctly.
Preparations for Installation
Before installing your Cyrus pre-amplifier check that the following items are
included in the accessory box.
• Power Cable
• Remote Handset
• 2 x cables for MC-BUS connection
After removing these items, please retain the packaging.
Install the amplifier in a well ventilated location away from sources of high
temperature, dust or humidity. Never stand the amplifier under another unit or
on any surface likely to obstruct its cooling or ventilation.
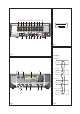
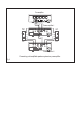
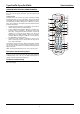
INSTALLATION (Refer to Fig 1):
Key to the rear panel drawings:
1. MC-BUS System Connection
2. Pre-Amplifier Output
3. Pre-Amplifier Output
4. Zone 2 (& tape) Output
5. Analogue Input 6
6. Analogue Input 5
7. Analogue Input 4
8. Analogue Input 3
9. Analogue Input 2
10. Analogue Input 1
11. PSX-R Connection
12. Digital Input 11 (USB)
13. Digital Input 10
14. Digital Input 9
15. Digital Input 8
16. Digital Input 7
17. Headphone Socket
18. Power Inlet
Connecting to the AC Mains Supply
Connect the socket on the AC Power cable to the Power inlet 1* on the rear panel
of the amplifier. Now connect the cable to a suitable AC power point.
NOTE: The means to disconnect this product from the mains supply is the
mains plug. Ensure that the mains plug is accessible at all times.
IMPORTANT NOTE – READ BEFORE MAKING ANY
AUDIO CONNECTIONS
To avoid possible damage to your amplifier, it is essential to disconnect all
system components from the mains supply before connecting or
disconnecting audio interconnects.
Connecting Analogue Audio Sources
Analogue Inputs 1-6 are available for the connection of stereo analogue audio
sources including -
• Analogue output from CD/DVD Players
• Analogue output from DAB or FM Radio tuners
• Phono pre-amplifier for a turntable
• Televisions
• Analogue Satellite Receivers
• Analogue Tape/Disc recorders
• Cyrus surround decoder
The factory set input names for some of the inputs are pre-set as follows -
Input 1 – CD
Input 2 – Tuner
Input 3 – Cyrus AV (for a Cyrus AV surround processor)
Input 6 – Tape
All inputs may be re-named, but for convenience you may prefer to connect
these sources to the pre-named inputs.
Analogue Input 6 is recommended for connection of Tape Recorders. This
input is not selectable for recording purposes to avoid howl-round with Tape
Recorders, nor is it available to play in a Zone 2 system.
To connect an Analogue Audio source to your amplifier, connect a stereo
audio interconnect cable between each component and the sockets as
marked on the rear panel. Ensure left and right channels are correctly
connected. Make a note of the input number used for each source as the
inputs can be re-named at the set-up stage.
Connecting a Turntable
To play a turntable through your unit an external phono pre-amplifier is
required. This may then be connected to one of the Analogue inputs.