
Operating instructions


Cyrus Pre XPd, Cyrus Pre XPd Qx User Instructions
3
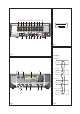
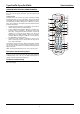
Digital Audio Inputs
Connecting digital audio sources
The digital audio inputs are compatible with a number of different digital audio
sources. These include-
• PC or MAC computer via a USB cable
• Digital Audio output from a CD player
• Digital Radio
• DVD players (for replay of 2 channel PCM programs only)
• Digital Satellite receivers (for replay of 2 channel PCM programs only)
• Digital tape/disc recorders
Using a suitable Toslink optical or Digital phono interconnect, connect each
digital audio source to one of the inputs 7-10. Make a note of the input
number used for each source as the inputs can be re-named at the set-up
stage.
Connecting USB audio sources
The USB audio input 11 may be used to connect the audio feed from a
computer. Using a suitable USB cable, connect the USB output from the
computer to the USB input
1@.
NOTE: The USB Audio input is configured for USB slave operation and is not
suitable for connection of USB drives or other flash media.
The Qx Digital Input Upgrade
The Cyrus Qx high-end DAC module may also be fitted internally to
significantly improve the sound quality performance of digital sources
connected to your system.
Amplifiers with a Qx module fitted will have a Qx badge on the front fascia
and a Qx logo will be displayed briefly after the product name, when switching
on.
If your amplifier has the Qx upgrade fitted, digital input connections are made
in exactly the same way as described above.
Connecting a Power Amplifier/Speakers
The Cyrus Pre XPd requires an external power amplifier to drive the system
loudspeakers. To connect the power amplifier, connect a phono interconnect
from one set of the dual Pre Out sockets (b or c) to the Inputs of the power
amplifier. Ensure left and right channels are correctly connected. The
speakers connect to the power amplifier. The power amplifier handbook will
include instructions for connection of the speakers.
Using the Zone 2 output
Your product includes a Zone 2 pre-amp output that can be used by a
system in a second room. You can then extend the sound from the sources in
your main system to a second zone. To use the Zone 2 output you will need a
set of long interconnects and an amplifier with loudspeakers in the second
zone that has its own volume control. Typically the second zone system
would be the auxiliary input of an MP3 player dock or could even be another
integrated amplifier with full size separate loudspeakers.
Setting up Zone 2 with powered speakers
To set up Zone 2, connect the long phono cables to the Zone 2 output d
and route them to the line inputs of the powered speakers in Zone 2.
Setting up Zone 2 with a second amplifier
To set up Zone 2 with a separate amplifier, connect the long phono cables to
the Zone 2 output d and route them to one of the line inputs of the amplifier in
Zone 2. Connect the Zone 2 speakers to the Zone 2 amplifier.
NOTE: Amplifiers for Zone 2 use must include a volume control.
Connecting a Tape/Disc recorder for recording
When not in use for a Zone 2 system, the dual-purpose output Zone 2/Tape
may be used to connect a tape recorder for recording purposes. To set up a
tape recording loop, connect a phono cable from the ‘Input’ or ‘Record’
sockets of the tape deck to the Zone 2 Output
d sockets.
NOTE: This section assumes that the ‘Play’ or ‘Line Out’ sockets of the
tape/disc recorder have already been connected to Input 6 for playback
purposes.
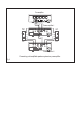
Bi-amping
The twin pre-amplifier outputs may be used in conjunction with added power
amplifier(s) to significantly upgrade your loudspeaker system through Bi-
amping. The Cyrus range of power amplifiers is recommended for this
application.
NOTE: A bi-amp system can only be set up with speakers that have bi-wire
connections (separate bass and treble connections).
Connecting power amplifiers:
Two power amplifiers will be required to partner a Cyrus Pre XPd pre-
amplifier in a bi-amplified system.
Both stereo and high power monobloc Cyrus power amplifiers are available to
partner your amplifier.
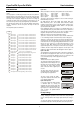
NOTE:- Refer to Fig. 5 for the wiring plans of a bi-amplified system. Take care
to connect each of the amplifier output channels to the correct power amplifier
and loudspeaker.
Connecting Headphones
The headphones socket 1& is a standard 3.5mm stereo jack socket for
connection to a pair of headphones. Headphones may be permanently
connected to the amplifier and selected when required with the front panel
switch.