
Operating instructions


Cyrus Pre XPd, Cyrus Pre XPd Qx User Instructions
5
CONFIGURATION
Through the setup menu you can customise your amplifier to best match your
system.
The setup sequence is activated by pressing the front panel set up button f.
Repeated pressing of the setup button will step down the list through each
available setup option until ‘Storing settings’ is shown on the display. When
each setup screen is displayed, changes may be made to the settings by
rotating the front panel rotary knob e. During the setup sequence, you can
move to the next or previous step by pressing the Input up or down buttons.
Note that the setup sequence will exit, saving any changed settings after 5
seconds of inactivity or after the last option ‘Trim input 11’ has been
completed.
The setup menu options are shown here –
Name Input 1 Choose a name for input 1 from the name list
Choose a name for input 2 from the name list
Choose a name for input 3 from the name list
Choose a name for input 4 from the name list
Choose a name for input 5 from the name list
Choose a name for input 6 from the name list
Choose a name for input 7 from the name list
Choose a name for input 8 from the name list
Choose a name for input 9 from the name list
Choose a name for input 10 from the name lis
t
Choose a name for input 11 from the name lis
t
Choose on or off (default is off)
Set the sensitivity offset for input 1
Set the sensitivity offset for input 2
Set the sensitivity offset for input 3
Set the sensitivity offset for input 4
Set the sensitivity offset for input 5
Set the sensitivity offset for input 6
Set the sensitivity offset for input 7
Set the sensitivity offset for input 8
Set the sensitivity offset for input 9
Set the sensitivity offset for input 10
Set the sensitivity offset for input 11
Name Input 2
Name Input 3
Name Input 4
Name Input 5
Name Input 6
Name Input 7
Name Input 8
Name Input 9
Name Input 10
Name Input 11
Input 11 auto-hide
Trim Input 1
Trim input 2
Trim input 3
Trim input 4
Trim input 5
Trim input 6
Trim input 7
Trim input 8
Trim input 9
Trim input 10
Trim input 11
The display will show ‘Storing Settings’, then exit setup.
Setup
Display Mode
Select large input, small input or large volum
e
Input names
When your amplifier left the factory, the input names are set as shown below
Input 1 – CD Input 5 – Input 5 Input 9 – Input 9
Input 2 – Tuner Input 6 – Tape Input 10 – Input 10
Input 3 – Cyrus AV Input 7 – Input 7 Input 11 – Input 11
Input 4 – Input 4 Input 8 – Input 8
The name of any input may be changed to a choice from the following list.
Each name may be used once -
CD, DAB, Cyrus AV*, Phono, Tape 3-Head, Tape, Satellite, Cable, iPod,
MP3, DVD, Blu-ray, CD 1, CD 2, SACD, CD-R, Linkserver, Jukebox,
LaserDisc, Tuner, AV Direct*, TV, TV 1, AV, USB, Satellite 1, Cable 1, Video,
VCR, PVR, Cassette, DAT, MiniDisc, Games, Games 1, PC, Laptop, Mac,
Special, Keyboard, Aux, Stream X.
Before changing the names of the inputs, we recommend making a list of
each input number with your preferred name from the choices above before
setting the names. Each name may only be used once. When a name is
assigned to an input it will be removed from the list for other inputs.
NOTE:- There are two special function input names marked *.
‘Cyrus AV’ is reserved for the connection of Cyrus surround sound decoders
to one of the analogue Inputs 1-6 and should only be used for this purpose.
‘AV Direct’ is reserved for the connection of non-Cyrus surround decoders to
an analogue input. This input name must only be used for this purpose as the
volume level will lock to a very high setting (-6dB) when AV Direct is selected.
Choose ‘No source’ from the list to name inputs which have no source
connected to them. When named ‘No Source’, an input number will not
appear in the input selector scroll sequence or in the Zone 2 select sequence.
In addition, the name ‘Tape 3-Head’ will appear as an extra option in the
naming list for Input 6, and the name ‘USB’ will appear in the list for Input 11.
Input 11 auto-hide
The USB input has a special ‘auto-hide’ feature. If this feature is switched on,
the USB input will only appear in the input selector scroll sequence when a
valid source is connected to the USB input. If no source is connected or if the
source is switched off, Input 11 will not appear in the sequence.
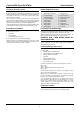
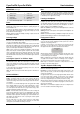
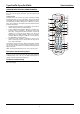
Display mode
There are three modes of display operation.
The ‘small input’ setting will show a three line
display with the volume reading at the top of
the display, the selected input in the display
centre and the current sample rate/lock
status at the bottom when a digital input is
selected.
The ‘large input’ setting will show a two
line display with the volume reading at the
top and a larger input legend below.
The ‘large volume’ setting will display
large volume characters at the bottom of the
screen with the bargraph above.
Input sensitivity offset
It is possible to adjust the relative sensitivity
of individual inputs by selecting the
appropriate trim option from the menu. This
enables the volume level when playing low or
high output source components such as tape
decks or tuners to be equalized between
system sources.
Factory Settings
You can restore the configuration of your amplifier to the factory original
settings, changing the input names to those listed above, setting the display
mode to ‘small input names’ and setting all input sensitivity trim settings to
0dB.
To restore the settings, first disconnect the power cord from the amplifier.
Hold down the setup key on the front panel and re-connect the power cord.
-27
CD
Sample rate 44.1kHz
-27
CD
-27
-27dB
Offset
Input 7
+4dB