
Operating instructions


Cyrus Pre XPd, Cyrus Pre XPd Qx User Instructions
6
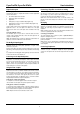
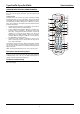
OPERATION (Refer to fig 2)
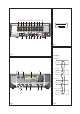
Key to the front panel drawing:
1. Standby Switch
2. Standby Light
3. Remote Eye
4. Display Window
5. Level control and setup adjust
6. Setup select
7. Zone 2 select
8. Headphones select
9. Mute select
10. Input select
Power
When power is applied, the STANDBY key a is used for power control. The
Standby light
b shows green when the amplifier is operating and glows red
when in standby mode.
In regular use the amplifier should be connected permanently to the mains
power supply. When left unattended for a long period (holidays etc) it should
be disconnected from the AC supply.
When the amplifier is switched to Standby, all settings for input selection and
Volume/Balance are retained.
Selecting an Input
Inputs may be selected from the front panel INPUT SELECT keys 1) or with
the remote control INPUT SELECT keys. Press the up or down button to
scroll up or down through the inputs available.
In addition, the remote control CD key can be used to directly select an input
named CD, the TU/DAB key will select inputs named Tuner or DAB and the
AV key will select inputs named AV, Cyrus AV, AV Direct or DVD. As a new
input is selected the input name/number are displayed briefly.
NOTE: A choice of three styles is available for appearance of the front panel
display. These may be selected through the setup menu. The factory default
setting - ‘small input’ display will also identify the sample rate of the selected
source (digital inputs only) and indicate ‘Invalid Audio Format’ for program
material which cannot be decoded (such as multi-channel digital sound from
DVD players).
Selecting the ‘Cyrus AV’ or ‘AV Direct’ Inputs
The ‘Cyrus AV’ and ‘AV Direct’ input names are reserved only for use with
surround-sound decoders. When one of these inputs is selected, the volume
control on the amplifier will lock and the surround decoder input select and
volume controls are used to select a multi-channel source and set the volume
level for the system.
To unlock the volume control and return to playing a stereo source, select the
input you want to play at the amplifier.
NOTE:- The Zone 2 select key will function when ‘Cyrus AV’ or ‘AV Direct’ are
selected.
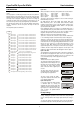
Volume and Balance
The level control e performs the dual functions of volume and balance.
Volume: In normal mode the level control sets the volume in 1dB steps. A
bargraph and a numeric scale at the top of the display window show the
current volume setting. The last used volume setting is stored when the unit is
set to standby.
If the volume is set to an abnormally high volume level (greater than –15dB)
before entering standby, the level will be reduced automatically to a safer
level of –15dB for next use. Similarly, the volume will be reduced to a safer
level if the amplifier was muted while set to a high volume setting, or after
listening to headphones at a high volume setting.
Balance: Press the balance control key on the remote control to change the
mode of the front panel rotary control e to set Left/Right Balance. The volume
display will change to show a graphic display of the balance setting (Fig. 3).
The balance may be adjusted in 1 dB steps by up to 4dB toward the left or
right channels by turning the level control or pressing the volume up/down
keys on the remote control.
After the 4dB setting, one further step will swing the sound balance
completely to the left or right speaker. This setting may be useful when
checking if the system channels are working correctly etc.
Mute
Pressing the MUTE Key i will mute the volume to minimum level without
disturbing the existing volume setting. When muted the display will show that
the volume is muted. Press the MUTE key again or move the volume knob up
to fade back up to the original volume setting.
Listening to headphones
To listen to headphones, first connect your headphones to the 3.5mm
headphone jack on the back panel of the amplifier. Press the PHONES key
h. The display will briefly show the legend ‘Headphones On’, the sound will
fade down in the speakers, and fade up in the headphones. To return to
speaker operation, press the PHONES key
h again.
NOTE: The PHONES key
h only operates when headphones are connected
to the rear panel socket.
Warning: Excessive sound pressure from earphones and headphones can
cause hearing loss.
Caution: If you have been listening to headphones at high volume, be sure to
turn the level down before you switch to normal loudspeaker operation.
Playing music in Zone 2
As supplied from the factory, the Zone 2 system will always play the same
source as the main system. Changing the main system source will also
change the source playing in Zone 2.
If required, it is also possible to select a different source for Zone 2 from the
main system. To select a different source, press the front panel Zone 2 key,
the display will show the input source currently selected for Zone 2.
Zone 2 Ouput
CD
While the Zone 2 indication is showing on the display, turn the rotary control
to select a different source for Zone 2. Press the Zone 2 key again to confirm
selection of the input source displayed.
NOTE: If a digital input is selected for the main system, then this will be the
only digital source selectable for Zone 2. If an analogue source is playing in
the main system, then all digital sources will be selectable for Zone 2.
NOTE: Input 6 is reserved for connection to a Tape Recorder, so is not
selectable for Zone 2/Recording purposes.
Tape/Disc Playback and Recording
Playback: You can play back a recording by selecting the Analogue Input to
which you connected your tape recorder.
Recording: If you have connected the Zone 2/Tape output sockets to the
input of your tape recorder, you can make recordings from the input sources
connected to your amplifier.
As supplied from the factory, the recording signal will always track the same
source as the main system is playing. You can however, select a different
source for recording if required. To change the source, press the front panel
Zone 2 key to display the input source currently selected for recording.
While the Zone 2 indication is showing on the display, turn the rotary control
to select a different source. Press the Zone 2 key again to confirm selection of
the input source displayed.
NOTE: Input 6 is recommended for playback connection of a Tape Recorder
as it is not selectable for Zone 2/Recording purposes.