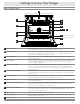
Use and C are Manual Distinctive ® Range Models: DR30D, DR30DH, DR30DI, DR30DIH, DR30D-C, DR30DH-C, DR30DI-C and DR30DIH-C Style varies. Model DR30DI with optional black knobs shown. Ta b l e o f C o n t e n t s Important Safety Instructions................................................. 1 Getting to Know Your Range................................................ 4 Setting Up Your Range......................................................... 7 Operating the Cooktop......................................
© 2010 Dacor, all rights reserved
Important Safety Instructions Installer: Leave these instructions with the appliance. For service and warranty information, see page 30. Consumer: Read this use and care manual completely before using this appliance. Save it for future reference. It contains important use and care information. Keep your sales receipt or canceled check. Proof of original purchase date is required for warranty service.
Important Safety Instructions General Safety Precautions To reduce the risk of fire, electric shock, serious injury or death when using your range, follow basic safety precautions, including the following: DANGER WARNING IMPORTANT: If you smell gas: • Do not use or light any appliance. • Do not touch any electrical switch or use any electrical devices including the telephone in your building. • From a neighbors phone, immediately call the gas supplier. Follow the gas supplier’s instructions.
Important Safety Instructions WARNING • WARNING TO REDUCE THE RISK OF INJURY TO PERSONS IN THE EVENT OF A RANGE TOP GREASE FIRE: Select cookware carefully. Use utensils of the proper size, material and construction for the particular type of cooking being done. Utensils need to be large enough to contain the desired quantity of food without boil-overs or spill-overs. Choose pans with easy to hold handles that will stay cool while cooking. Do not use utensils with loose handles.
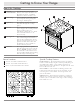
Getting to Know Your Range Parts of the Oven A J B C K 6 D 5 4 3 E 2 F G L M 1 H (below oven floor) J (at bottom of door) N J A Control panel The control panel consists of keys and a display. Use the control panel to control all the oven’s features (sometimes called modes). B Self clean latch The self clean latch automatically locks the oven door during the self clean cycle. The door latches for your safety. There are very high temperatures inside the oven during the self clean cycle.
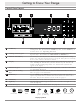
Getting to Know Your Range Control Panel Layout P R S T V W X U W Y Z P START key When you use the various features (or modes) on your oven, select the cooking mode first, then touch the START key. Also, use the START key to start the timers. See Operating the Oven. R Cooking mode keypad Select the type of cooking you want to perform by touching one of the cooking mode keys. Also includes the SELF CLEAN and PROBE keys. S CANCEL · SECURE key Use this key to turn off your oven.
Getting to Know Your Range About the Cooktop A Burner Use the knobs to turn on the control knobs burners and adjust the flame size. The indicator above each knob illuminates when a burner is on. B Trim rings Located behind each knob. They prevent liquids from getting into the range’s internal parts. C Spill tray The spill tray catches any food that falls through the cooktop grates. D Grates The porcelain coated cast iron grates support the cooking utensils during cooking.
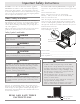
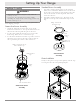
Setting Up Your Range Standard Burner Assembly Cooktop Assembly 1. Install the standard burner rings on the standard burner bases. Match the different sizes. Put the hole on the edge of each ring over the igniter. Center the tabs on the bottom of each ring in the hole in the center of each base. 2. Install the standard burner caps. The ridge on the bottom of each cap must surround the top of each ring. WARNING • Assemble the burners and grates only when the cooktop is cool.
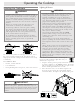
Operating the Cooktop Lighting A Burner Selecting the Cookware WARNING WARNING • Utensil handles should be turned inward and not extend over adjacent burners. To reduce the risk of burns, ignition of flammable materials and spillage due to unintentional contact with the utensil, the handle of a utensil should be positioned so that it is turned inward and does not extend over adjacent burners. • Always set utensils gently onto the grates and center them so that they are well-balanced.
Operating the Cooktop Cooktop Tips IMPORTANT • The flame should burn evenly around the perimeter of the burner, except underneath each grate support finger, where the flame height is reduced by Dacor’s Smart-Flame feature. A normal flame is steady and blue in color. Foreign material in the gas line, especially in new construction, may cause an orange flame during initial operation. The orange color will disappear with further use. Small yellow tips on the ends of the flames are normal when using LP gas.
Operating the Oven Control Panel Settings Setting the Clock 1. Touch the CLOCK key. The colon between the minutes and seconds on the time display will begin to flash. 2. Enter the current time on the number keypad before the colon stops flashing. For example: For 12:08, touch 1-2-0-8 on the keypad. Touch the # key to change the AM-PM indicator. 3. Touch START. IMPORTANT • The clock cannot be set during delay timed cooking, if one of the timers is in use or if self clean or Sabbath mode is active.
Operating the Oven To insert a GlideRack™ oven rack: Oven Racks When you use the GlideRack oven rack, you can effortlessly slide heavy pots, pans or other items out of the oven to check, stir or add ingredients quickly and safely. You may use either rack type on any level. WARNING To reduce the chance of burns, position the oven racks when the oven is cool. If you must reposition a rack when the oven is hot, use potholders. To insert the standard oven racks: 1.
Operating the Oven Starting Your Oven Turning Off Your Oven 1. Adjust the racks to the appropriate level. To turn the oven off, touch the CANCEL · SECURE key. 2. Determine the best cooking mode for the type of food to be cooked. Select from the following: • CONVECTION BAKE - A combination of the convection fan and a bottom heat source. Good for single rack items in a deep pan. • CONVECTION BROIL - A combination of the convection fan and a top heat source.
Operating the Oven 12 Hour Timer Feature Understanding the Various Oven Cooking Modes The oven’s 12 hour timer feature automatically turns it off after 12 hours of continuous use. The 12 hour timer resets if you change the cooking temperature or cooking mode. This feature does not apply to the cooktop. The three basic styles of cooking in an oven: • BAKING - The gentle cooking of dry goods such as cookies, cakes, soufflés, etc. • ROASTING - The cooking of meats or vegetables over a period of time.
Operating the Oven Understanding the Various Oven Cooking Modes (cont.) Your range offers three convection cooking modes: • Pure Convection • Convection Bake • Convection Roast Multiple Rack Baking in Pure Convection Mode • Typically, when baking on two racks, use rack positions #1 and #3 or #2 and #4 (counting from the bottom up) for best results. When cooking a full meal, use rack positions #1, #3 and #5 for best results.
Operating the Oven Convection Roast Your range offers two broil modes: Your range’s convection roast mode uses a combination of the convection fan and heat sources above and below the food. It is best for rib roasts, turkeys, 1 2 chickens, 1 2 etc. • Broil • Convection Broil Broiling is a quick and flavorful way to prepare many foods, including steaks, chicken, chops, hamburgers and fish. Roasting Tips • • All baking modes can be used to successfully roast in your oven.
Operating the Oven Timers Delay Timed Cooking Features WARNING The timers on your range do not turn the oven on or off. They are only for timing purposes. When you want to turn the oven off automatically, use the Delay Timed Cooking Features. If you want to set the oven to automatically turn itself on or off at a later time, you can use the delay timed features. WARNING Food safety is an important consideration when using the delay timed features.
Operating the Oven How to Use Delay Timed Cooking Other Things to Know About Delayed Timed Cooking NOTE When the oven is in delay timed mode: Delay-timed cooking cannot be used in Sabbath mode. 1. Adjust the racks to the appropriate level. 2. Put the food in the oven. 3. Touch the key for the desired cooking mode (except broil or convection broil). 4. Enter the desired cooking temperature on the number keypad. 5.
Operating the Oven Using the Meat Probe When you cook foods like roasts and poultry, the internal temperature is the best way to tell when the food is properly cooked. Your oven’s meat probe is an easy way to take the guesswork out of roasting. You can use it to cook food to the exact temperature you desire. The probe can be set from 100°F to 200°F. WARNING • To avoid the possibility of burns, use hot pads to handle, connect, and unplug the meat probe when the oven is hot.
Operating the Oven Important Details About Meat Probe Use • You must select the specific cooking mode (BAKE, CONV BAKE, PURE CONV or CONV ROAST) before you touch the PROBE key. • When you touch the PROBE key the preheat cycle is disabled and the amount of time required to heat the oven is extended. For best results, select the cooking mode and allow the oven to preheat prior to touching the PROBE key and putting the meat in the oven.
Operating the Oven Dehydrating/Defrosting (cont.) • Thick, frozen casseroles such as lasagna will not defrost well in your oven. Instead, defrost according to the food manufacturer’s suggestions. You may also defrost casseroles in the refrigerator overnight. You should leave the food in its original container and keep it covered. • You can bake some foods from frozen. Some examples are: pizza, frozen pastries, croissants, cookies, etc. Before baking frozen food, allow the oven to preheat.
Operating the Oven Setting Up the Sabbath Feature 1. Touch the # key. 2. Touch the BAKE or PURE CONV key. Repeat steps 3 to 5 above for any other cooking modes you need to offset. 7. Touch CANCEL · SECURE to exit offset mode. Parts and Accessories 3. Touch the 0 or 2 keys repeatedly if you want to change the pre-selected cooking temperature shown on the display. 4. 6. Description Touch (only) the START key. The oven will go into Sabbath mode and cook using the mode selected in step 2.
Cooking Tips Food Placement • Use the pan size and type recommended by the recipe for best results. NOTE: The rack positions mentioned below are counting from the bottom up. • For roasting, Dacor’s optional “V” shaped rack and broil/roast pan works best to allow air circulation around the food. Dacor’s roasting pan works particularly well and two of them will fit side by side in a 30-inch oven. The kit also comes with a grill that fits inside the pan to cook flat cuts of meat.
Care and Cleaning WARNING • Clean only the parts of the range listed in this manual. Clean them only in the manner specified. • To avoid dangerous fumes or damage to your range’s surfaces and accessories, use only the types of cleaning solutions specified in this manual. • To avoid burns, make sure that all parts are cool before cleaning.
Care and Cleaning After the self clean cycle is complete: • The door latch will release when the inside has cooled down. The clean icon, lock icon and “ON” will disappear from the display. Exercise caution because the oven will still be hot (about 400°F) at the time the door lock is released. • Reinstall the convection filter and oven racks before using your oven. • You may notice a powder ash residue in the bottom of the oven after self cleaning. This is normal.
Care and Cleaning Cleaning the Burner Components and Igniters Cleaning the Cooktop To keep the cooktop looking and operating its best, clean it after every use. Also, quickly wipe up spills that occur while cooking. Be careful not to touch any hot areas. Spills that remain on hot burner parts will be very difficult to clean, especially if allowed to burn on.
Care and Cleaning Cleaning the Cooktop (cont.) Cleaning Stainless Steel Surfaces Grates, Spill Trays and Optional WOK Ring CAUTION Always wipe stainless steel (silver colored) surfaces with the grain. To prevent scratching, do not use abrasive cleaners or scrubbers on stainless steel surfaces. CAUTION Do not clean the cooktop grates, burner parts or WOK ring in a dishwasher. They will be damaged. The grates, the spill tray and optional WOK ring are coated with a porcelain finish.
Care and Cleaning Convection Filter Optional Broil Pan The broil pan has a porcelain enamel finish. When you clean it, use a solution of detergent and hot water. If the broil pan is heavily soiled, use a scouring pad with plenty of water. Rinse it well after cleaning. WARNING For your safety and proper oven performance, re-install the filter before using the oven to cook. If you don’t, the spinning fan blades inside will be exposed. The convection filter is located in the back of each oven chamber.
Care and Cleaning Cleaning the Oven Interior (cont.) IMPORTANT Cleaning the Optional Dacor Griddle and Grill Clean the griddle/grill after each use. Wash it thoroughly in hot soapy water to avoid stains from grease build-up. The griddle/grill is coated with a non-stick coating for easy cleaning. Warm water and liquid detergent are all that are needed for cleaning. Remove stubborn spots with a nonabrasive plastic mesh pad. To prevent scratching, do not use abrasives or abrasive cleaners.
Before You Call for Service Problem Flame is distorted, yellow or very large. Igniter continues to spark (click) after flame ignites. May Be Caused By What to Do Burner ring or burner cap is dirty or clogged. Clean and dry according to Care and Cleaning section. Burner parts not properly positioned. Make sure burner is assembled according to the Setting Up Your Range section. Range set up to use a different type of gas (Natural or LP) or set up for different altitude.
Before You Call for Service Problem Solution Guide - Oven (cont.) NOTE: See Common Problems When Using Bake Mode on page 13 for problems with baking. Problem May Be Caused By What to Do Cannot set clock. Oven in use. Clock cannot be set while oven is in use. Turn off oven to set clock. Oven does not self clean. Door not shut tightly. Check for obstructions. Close door tightly. Oven set for delay timed cleaning. Oven will start to self clean at preset time.
Warranty and Service What Is Not Covered Warranty • Slight color variations may be noticed because of differences in painted parts, kitchen lighting, product placement, and other factors; this warranty does not apply to color variation. • Service calls to educate the customer on proper use and care of the product. • Service fees for travel to islands and remote areas, which include but not limited to, ferries, toll roads or other travel expenses.
Notes 32
NO POSTAGE NECESSARY IF MAILED IN THE BUSINESS REPLY MAIL FIRST-CLASS MAIL PERMIT NO 1600 CITY OF INDUSTRY CA POSTAGE WILL BE PAID BY ADDRESSEE DACOR ATTN WARRANTY PROCESSING DEPT PO BOX 90070 CITY OF INDUSTRY CA 91715-9907
Please visit www.dacor.com to activate your warranty online. WARRANTY INFORMATION IMPORTANT:� Your warranty will not be activated until you activate it online or return this form to Daco r. If you have purchased more � than one Dacor product, please return all forms in one envelope or activate the warranty for each product online. Please rest assured that under no conditions will Dacor sell your name or any of the information on this form for mailing list purposes.