Use & Care Wall Ovens SAFETY IS EVERYONE’S RESPONSIBILITY. ALL DACOR APPLIANCES ARE DESIGNED AND CONSTRUCTED TO GIVE YOU MANY YEARS OF SAFE OPERATION. THE OPERATION WILL BE FURTHER ENHANCED IF PROPER CARE AND JUDGEMENT ARE EXERCISED IN THE USE AND MAINTENANCE OF THIS APPLIANCE. IMPORTANT INFORMATION • Operating Instructions • Care and Cleaning Instructions • Safety Tips WARNINGS: ven O l l a rW u o Y g sin U e r o ef B d a e R Please Must be followed carefully to avoid personal injury or damage.
Dear DAC ACOR p o ur ne w D Y . s e c n pplia umer, OR Cons ers feature roduct off s, kitchen a ry latest in e v e th d e has have purc T pliance. PORTAN y other ap tions! You n la a tu in ra d g n n ad the IM u re is Co fo u t o o y n t e a anc tential of th ve th d perform the full po is imperati d It n .
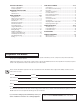
TABLE OF CONTENTS....................................................... 1 CARE AND CLEANING................................................11-14 Purpose of this Manual ............................................................... 1 Product Registration ................................................................... 1 Control Panel ............................................................................ 11 Door Handle & Control Housing................................................
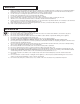
What to Do 1. 2. 3. 4. 5. 6. 7. 8. 9. 10. Begin by ensuring proper installation and grounding of the appliance by a qualified technician according to the accompanying Installation Instructions. Have the installer show you where the fuse or junction box is located so that you know how and where to turn off power. Ensure that the oven is used only by those individuals who are able to operate it properly. Use the oven only for cooking tasks expected of a home oven as outlined in this manual.
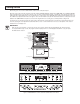
Getting Started Before using your oven, become familiar with the features and control panel layout. Below the oven mode touch pads are three touch pads labeled “CANCEL•SECURE,” “LIGHT” and “COOK TIME”. The “CANCEL•SECURE” touch pad enables the user to cancel the selection of an oven mode or Delay Timed program, or disable the control panel by pressing and holding the pad for approximately three (3) seconds. Once the control panel is in the “SECURE” mode, “OFF” will be displayed on the clock.
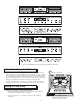
Figure 5: EPICURE™ ECS227 and ECS230 Wall Oven Control Panel Figure 6: MILLENNIA™ MCS227 and MCS230 Wall Oven Control Panel Figure 7: PREFERENCE™ PCS227 and PCS230 Wall Oven Control Panel Figure 8: EPICURE™ ECS127, ECS130 and ECS 136 Wall Oven Control Panel Figure 9: MILLENNIA™ MCS127 and MCS130 Wall Oven Control Panel Figure 10: PREFERENCE™ PCS127 and PCS130 Wall Oven Control Panel What is Pure Convection™? Your new oven has the best cooking system available today, “Pure Convection™”.
Oven Modes All oven modes are described below: 1. STANDARD BAKE – In Standard Bake mode, the bottom heating element provides conventional radiant heat. Temperatures may be set from 135˚ to 555˚F in 5˚F increments. Use Standard Bake for single rack baking and roasting. 2. STANDARD BROIL – The high wattage, top heating element supplies the heat in Broil mode. The broil temperature is adjustable from 135˚F, to the “HI” setting (equivalent to 555˚F) for greater cooking flexibility.
Preheating the Oven The oven features an automatic Preheat cycle that rapidly brings the oven chamber up to temperature. Simply by choosing a cooking mode and setting a temperature, the oven will automatically perform the Preheat function. The Preheat cycle operates in Standard Bake, Pure Convection™ and Convection Bake modes. There is no Preheat cycle for the Broil or Convection Broil modes.
Baking/Roasting 5. 6. 7. 8. (Continued) Wait until the shortest recommended baking time before checking food. For baked goods, a wooden pick placed in the center should come clean when the food is done. Bakeware Tips: Cakes, quick breads, muffins and cookies should be baked in shiny, reflective pans for light, golden crusts. Medium gauge aluminum sheets with low sides should be used when preparing cookies, biscuits and cream puffs.
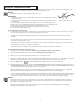
Using the Temperature Probe For many foods, especially roasts and poultry, internal food temperature is the best test for properly cooked food. The Temperature Probe takes the guesswork out of roasting by cooking food to the exact temperature you desire. NOTES: Cable Double Oven models have a Temperature in the upper oven only. Plug IMPORTANT Probe 1. Use of probes other than the one provide with your wall oven may result in damage to the probe Handles and/or the wall oven.
Using the Temperature Probe (Continued) Minimum Safe Internal Temperatures For Various Foods Type & Cut Internal Temp. (F) Pork, ham, sausage and bacon 180 All foods previously served and cooled that are reheated 165 within two hours All poultry and game birds (turkey, chicken, cornish game hen, duck, etc.
Timed/Delayed Timed Cooking DELAYED TIMED COOKING TIPS 1. 2. 3. Do not use foods containing baking powder or yeast in Delay Timed Cooking. These foods will not rise properly. Remember that “COOK TIME” refers to the length of the cooking cycle. It does not refer to the start time! The time required to preheat the oven must be included in the “COOK TIME.” Thus, the “COOK TIME” should be increased by about 8 to 12 minutes depending upon the temperature setting.
WARNING 1. 2. To avoid electrical shock or burns, turn off all controls and ensure the oven is cool before cleaning. Do not use harsh or abrasive cleaning agents, waxes, polishes, or commercial oven cleaners to clean the oven. Read and follow the CARE AND CLEANING INSTRUCTIONS to ensure that proper oven operation and appearance will be maintained throughout the lifetime of the product. Several materials and finishes are used in the oven.
Convection Fan Filter WARNING Remove the filter only when it is cool. The convection fan filter is made of stainless steel. Remove the filter regularly for cleaning, as a clogged filter will reduce the effectiveness of convection cooking modes. Soak the filter in hot soapy water. Dry the filter completely before re-installing. Remove the filter during Self-Cleaning. If the filter is left in the oven during Self-Cleaning it will permanently discolor. Re-install the filter before cooking in the oven again.
Self-Cleaning (Continued) Follow these steps to Self-Clean the oven: 1. Complete all steps listed above for preparing the oven for Self-Cleaning. 2. Close the oven door completely. 3. Press the “SELF-CLEAN” touch pad. The oven will beep once, “CLEAN” will flash, and “– –:– –” will be displayed. 4. Press the “TIME•TEMP” “+” pad and the default time of “2:00” hours will be displayed. 5.
CARE AND CLEANING Adjusting the Oven Temperature (Continued) IMPORTANT The user may find the temperature in their new oven to be different from that of their previously-owned appliance. Familiarity with the old appliance sometimes makes it difficult to get used to a new oven. If you feel that the oven temperature is consistently high or low, the temperature of the new oven can be adjusted. The adjustment needs to be done only once.
Troubleshooting Unnecessary service calls may be expensive, frustrating and time-consuming. Before you call for service, please review the potential problems, possible causes and remedies shown in Table 5 below. Also, refer to Table 6 on page 31 to view various oven failure codes that can be displayed by the clock. Failure Codes will appear where the temperature is normally displayed.
Troubleshooting Problem 9. Oven will not heat after Self Cleaning (Continued) Possible Cause Remedy Time of day is not set due to power failure. Press “CLOCK” touch pad, then press “TIME•TEMP” pad to set correct time of day. Oven settings are not correct. Follow mode selection and clock settings as specified in the OVEN OPERATION section. Oven will turn on automatically at preset time. If desired, press “CANCEL•SECURE” touch pad to cancel out of Delay Timed mode.
Accessories For accessories call your Dacor dealer. Accessory Cookiesheets (3 in a carton) These Full sized cookie sheets maximunize oven rack baking capabilities by utilizing the total useable rack space. 27” Oven Model No. ACS273 30” Oven Model No. ACS303\ 36” Oven Model No. ACS363 Replacement Oven Light Bulb IOW Halogen Part No. 86364 Stainless Steel Cleaner Elco Cleaner Part No.
What is Covered CERTIFICATE OF WARRANTIES DACOR WALL OVENS WITHIN THE FIFTY STATES OF THE U.S.A., THE DISTRICT OF COLUMBIA AND CANADA*: FULL TWO YEAR WARRANTY If your DACOR product fails to function within two years of the original date of purchase, due to a defect in material or workmanship, DACOR will remedy the defect without charge to you or subsequent users. The owner must provide proof of purchase upon request and have the appliance accessible for service.
cut here fold here NO POSTAGE NECESSARY IF MAILED IN THE UNITED STATES BUSINES REPLY MAIL FIRST-CLASS MAIL PERMIT NO.
Please visit www.dacor.com to activate your warranty online. WARRANTY INFORMATION IMPORTANT: Please rest assured that under no conditions will Dacor sell your name or any of the information on this form for mailing list purposes.