
Refrigerator Installation Instructions


4
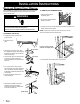
do o R a n d dR a w e R fR o n T Re m o v a l
Some installations require door and drawer front removal before
transporting the refrigerator through doorways to the location
where it will be used.
WARNING
Electric Shock Hazard
Disconnect power before removing doors.
Failure to do so can result in death or electrical shock.
in s T a l l a T i o n in s T R u C T i o n s
1. Unplug the power cord from the
power source.
7. Remove the Phillips screws that
hold the center hinge in place.
Remove the hinge and retain it and
all screws for later use.
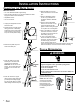
TO REMOVE THE DRAWER FRONT:
1. Pull the freezer drawer
completely open.
2. Tilt the lower basket forward
and lift to remove.
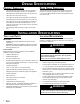
2. Remove the toe
grille.
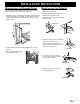
3. Remove the top hinge cover from
the refrigerator door by removing the
Phillips screw. Retain the screw and
cover for later use.
4. Unscrew the 5/16” hex head screws
from the top hinge. Remove the
hinge and retain it and all screws for
later use.
4. Lift the drawer front upward and off the screws.
3. Loosen the four (4) screws attaching the drawer brackets to the
drawer front as shown below.
NOTE: Loosen the screws only three to four turns. Do not
remove the screws from the drawer front.
Loosen screws on both
sides of the drawer front.
Hinge Cover
Top Hinge
TO REMOVE THE DOOR:
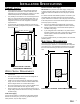
5. On 3 door (french door) models,
disconnect the wiring plug located on
top of the left top hinge by wedging
a flat-blade screwdriver between the
two sections.
6. Lift the refrigerator door(s) from
center hinge pin.
Wiring Plug
Center Hinge