Installation Instructions Discover y Outdoor Grill ™ Models: OB36, OB52, OBS36 and OBS52 Tested in accordance with the latest edition of ANSI Z21.58 2012 ● cSa 1.6-2012 Standard for outdoor cooking gas appliances. IN CANADA: INSTALLATIONS MUST BE IN ACCORDANCE WITH THE CURRENT CAN/CG A-B149.1. NATURAL GAS INSTALLATION CODE CAN/CG A-B149.2. PROPANE INSTALLATION CODE AND/OR LOCAL CODE. Part No. 102032 Rev.
Table of Contents Important Safety Instructions........................................... 1 Important Information About Safety Instructions............... 1 General Safety Precautions.............................................. 2 Planning the Installation.................................................... 4 Product Dimensions.......................................................... 4 Location Planning - General............................................. 5 Location Planning - Enclosed Cabinets........
Important Safety Instructions Important Information About Safety Instructions • • The Important Safety Instructions and warnings in these instructions are not meant to cover all possible problems and conditions that can occur. Use common sense and caution when installing, maintaining or operating this or any other appliance. DANGER If you smell gas: 1. Shut off gas to the appliance. 2. Extinguish any open flame. 3. Open lid. 4.
Important Safety Instructions General Safety Precautions To reduce the risk of fire, electric shock, serious injury or death when using your appliance, follow basic safety precautions, including the following: warning warning • Read the use and care manual completely before using this appliance. • To avoid the possibility of fire, do not leave the appliance unattended when in use. • Use this appliance only for its intended use as described in the use and care manual. Use it only to cook food.
Important Safety Instructions warning • Do not leave children alone or unattended in the area around the appliance. Do not allow children to operate it, play with the controls, pull on the handle or touch other parts. • Do not store items of interest to children on top of or above the appliance. Children could be burned or injured while climbing on it. • Keep the ventilation openings for the LP cylinder free and clear from debris. • Non-stick coatings, when heated, can be harmful to birds.
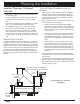
Planning the Installation Product Dimensions Product tolerances: ±1/16 (±1.6 mm) unless other wise specified 25 1/8" (63.8 cm) 9 1/8" (23.2 cm) 23 3/4" (60.3 cm) 36" (91.4 cm) 26 1/2" (67.3 cm) 27” * (68.6 cm) OB36 and OBS36 25 1/8" (63.8 cm) 9 1/8" (23.2 cm) 23 3/4" (60.3 cm) 26 1/2" (67.3 cm) 27" * (68.6 cm) 52" (132.1 cm) OB52 and OBS52 * Total depth from back to front of handles is 30” (76.
Planning the Installation warning • • • This installation must conform to local codes or, in the absence of local codes, with either the National Fuel Gas Code, ANSI Z223.1/NFPA 54, Natural Gas and Propane Installation Code, CSA B149.1, or Propane Storage and Handling Code, B149.2. Gas and Electric Power Requirements • Prior to installation, the gas supply for natural gas or whole house LP installations must meet the specifications below.
Planning the Installation Location Planning - Enclosed Cabinets Enclosed Cabinet Installations with a LP Cylinder • Maintain all minimum clearances specified below and on the facing page. • For proper outdoor grill operation, provide a flat, level mounting surface with minimum 3/4” (1.9 cm) thickness. • All models are designed to allow installation in combustible or non-combustible base material structures.
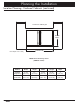
Planning the Installation Cutout tolerances: +1/16 (+1.6 mm), -0 unless other wise specified Coutertop depth 25" (63.5 cm) 6" x 7" (15.2 cm x 17.8 cm) utility cutout Cabinet depth 24" (61.0 cm) 12 1/4" (31.1 cm) 3/8" (1.0 cm) ø both sides OB[S]36 - 33 1/2" (85.1 cm) OB[S]52 - 49 1/2" (125.7 cm) Outdoor grill placement 1 1/2" (3.8 cm) Cutout Dimensions - Top View OB[S]36 - 36 1/2" (92.7 cm) OB[S]52 - 52 1/2" (133.4 cm) 9" (22.8 cm) max. 36" (91.4 cm) 3/4" (1.9 cm) min.
Planning the Installation Location Planning - Enclosed Cabinets (continued) Cut-out for outdoor grill Overall height Overall width Door depth: 1/4” 6 mm) OBAD Series Accessory Doors (OBAD36 shown) 8 Model Number Overall Width Overall Height Cutout Width Cutout Height Cutout Depth OBAD20 (Single door) 19 1/2” (49.5 cm) 21” (53.3 cm) 16 3/4” (42.5 cm) 18 3/4” (47.6 cm) 3” (7.6 cm) OBAD36 (Dual door) 35 7/8” (91.1 cm) 21” (53.3 cm) 33 1/8” (84.1 cm) 18 3/4” (47.6 cm) 3” (7.
Planning the Installation Location Planning - Cart Installations • Maintain all minimum clearances shown between the appliance and all surfaces behind and to the side of the appliance. • Allow 26 inches minimum in front to open and close the cabinet drawers. Above surface, both bothsides: sides: Above the the cooking cooking surface, 111/4” 1/4” (32mm) (3.2 cm) Min. min. to to non-combustibles non-combustibles 10” 10” (254mm) (25.4 cm) Min. min.
Installation Instructions warning • • • • Before installing the appliance, make sure the electrical and gas (on tank-less installations) service meets the requirements specified in the Planning the Installation section of this manual. This appliance must be installed by a licensed plumber or gas fitter when installed within the Commonwealth of Massachusetts. Excessive weight warning: Since the appliance and grill cart are heavy, install the appliance with the help of at least one other person.
Installation Instructions D D D LP cylinder regulator OB36 and OBS36 (PN 72310) LP cylinder regulator OB52 and OBS52 (PN 101578) Fixed piping natural gas or LP regulator* E PN 101163 PN 36628 F PN 36661 PN 101164 G Rod: PN 101179 Fork (2): PN 72162 L K H PN 700482 M N PN 72436SB P PN 72231 PN 72232 Q PN 13548 PN 700614 PN 72801 * A regulator for use with fixed pipe natural gas installations comes standard with natural gas models (Dacor PN 700597NG).
Installation Instructions Cabinet Installation Cart Installation - OB[S]36 Only warning warning To avoid an explosion hazard, do not connect the cart or appliance(s) to electrical power until after the gas supply system has been checked for leaks. important To prevent damage to the gas regulator, install the regulator only after the appliance is mounted in its permanent position in the enclosure. • With at least one person on each side of the unit, lift it up and lower it into the cabinet cutout.
Installation Instructions Optional Side Shelf Installation 1. Install the front mounting bracket for the right side shelf. Use two (2) of the provided button head fasteners and two (2) lock washers. Tighten into place using a 5/32” Allen wrench. 2. Slide the slot on the inside of the shelf over the pin on the mounting bracket. Pin 3. While holding the shelf in place, insert the pin on the back mounting bracket into the slot on the back side of the shelf. 4.
Installation Instructions Connecting the Gas 3. Connect the nipple to the gas shut off valve using rigid gas piping. Gas Connection - Natural Gas note • Units equipped for use with natural gas ship with a regulator assembly with 3/4” pipe attached and an additional 3/4” nipple. • The regulator assembly is also equipped with a 3/4” to 1/2” reducer on the inlet side. LP Fixed Gas Pipe Connection 1.
Installation Instructions Final Assembly and Test Assemble the Side Burner - 52 Inch Models Assemble the Grill 1. Open the canopy on the unit. 2. Insert the drip tray completely into the slot on the front of the unit. 3. Put the flame spreaders on the floor of the appliance, inside the canopy. The large holes go toward the front of the unit. The holes are used to light the burners in case of power failure.
Installation Instructions Final Assembly and Test (cont.) 1. For units that will use a LP cylinder, start by making sure the tank shut-off valve is completely closed. LP Cylinder Installation - Some Models 2. Place the tank into the final position within the cabinet or cart. warning • The largest recommended LP cylinder size for the rollout tank shelf on the cart is five gallons. A five gallon portable liquid propane cylinder should be approximately 12 inches (30.5 cm) in diameter and 18 inches (45.
Installation Instructions 2. With the tank shelf open, connect the power cord from the outdoor grill and the warming oven (if equipped with one) to the electrical outlet on the back panel inside the cart. 3. Connect the rotisserie motor power cord to the electrical outlet on the back side of the cart. 6. If the second or third attempt to ignite the burner is not successful then turn all burner controls to the OFF position. 7.
Wiring Diagrams Wiring Diagram - OB(S)36 18
Wiring Diagram - OB(S)52 Wiring Diagrams 19
Notes 20
21
Dacor ● 14425 Clark Avenue, City of Industry, CA 91745 ● Phone: (800) 793-0093 ● Fax: (626) 403-3130 ● www.dacor.