Place Serial Number Label Here DISHWASHER USE AND CARE MANUAL Covers Models: ED24, ID24, MDH24, MDV24, PD24AG, PD24BK, PD24BU, PD24GN, PD24SG, PD24TS Appearance varies with model number. Model ED24 shown. Please read this manual completely before operating your dishwasher. Keep it for future reference. Part No. 101895 Rev.
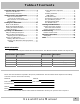
Table of Contents Table of Contents Important Safety Instructions..............................4 Symbols in this Manual ...........................................4 General Safety Precautions .....................................4 Getting to Know Your Dishwasher .......................6 Parts of Your Dishwasher ....................................6 Parts of the Control Panel ................................8 Other Features on Your Dishwasher .....................9 Specifications ...........................
Important Safety Instructions Important Safety Instructions Safety is everyone’s responsibility. All Dacor appliances are designed and constructed to give you many years of safe operation. Operation is further enhanced if proper care and judgment are exercised in the use and maintenance of this appliance. Symbols in this Manual ! WARNING Alerts you to a hazardous situation, that if not avoided, may cause death or injury to you or others.
Important Safety Instructions • ! WARNING: ! CAUTION: During loading, insert all sharp or pointed objects with the handles up. Locate these items where they will not damage the door seal or cause personal injury. • • Do not tamper with the controls. • • Under certain conditions hydrogen gas may be produced in a hot water system that has not been used for two weeks or more. Hydrogen gas is explosive.
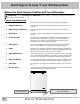
Getting to Know Your Dishwasher Getting to Know Your Dishwasher Before You Start, Become Familiar with Your Dishwasher IMPORTANT: See the Operating Your Dishwasher section, starting on page 14 for complete instructions on how to use your dishwasher. Parts of Your Dishwasher Control Panel: Located on top of the door. The buttons control your dishwasher. Detergent Dispenser: Automatically releases the soap during the wash part of the cycle (see page 14).
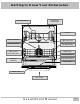
Getting to Know Your Dishwasher Dishwashing Compartment Tine Adjustments Top Rack Silverware Basket Upper Spray Arm Tine Adjustments Tine Adjustments Filter System (under spray arm) Bottom Rack Lower Spray Arm Rinse Aid Dispenser Detergent Dispenser Door Switch START STOP NORMAL HEAVY CRYSTAL RINSE DELAY SANI RINSE CANCEL SECURE Control Panel Door Handle Use and Care Manual 7
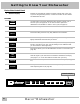
Getting to Know Your Dishwasher Parts of the Control Panel Numeric Display: Displays the approximate number of minutes until the end of the cycle. If you are using the delay feature, it shows the number of hours before the dishwasher will start. BUTTONS Use this button to start the dishwasher after selecting a wash cycle or the rinse cycle (see page 16). It can also be used to pause the dishwasher in the middle of a wash or rinse cycle (see page 17).
Getting to Know Your Dishwasher Other Features on Your Dishwasher Turbidity Sensor: Automatically decreases or increases the wash and rinse time, as well as water usage, for more consistent cleaning and energy savings. Pressure Sensor System: Senses the water level for consistent and complete draining of the dishwashing compartment. Digital Temperature Sensor: Continuously monitors and controls water temperature.
Loading Your Dishwasher Loading Your Dishwasher ! WARNING: Load all sharp or pointed objects with the handles up. IMPORTANT: If the load will sit for a while before washing, run the rinse cycle to reduce the chance of food hardening. Doing so will also reduce the risk of acidic foods damaging metal surfaces.
Loading Your Dishwasher Loading the Silverware Basket IMPORTANT: • For the best results do not nest utensils in the silverware basket. • Do not load silver next to stainless steel. Damage to the silver may result. • Make sure the tines around the silverware basket are in the up position to prevent it from falling over. X To prevent small, light items from falling out of the rack when sprayed with water: 1. Put small items into a compartment with a hinged cover. 2. Snap the cover shut.
Loading Your Dishwasher Loading the Racks Loading the Racks IMPORTANT: • It is best to place sharp objects in the silverware basket to prevent damage to the rack coating. • The spray arms must spin freely. Do not allow items sticking out of the racks to block them. Raise the top rack to prevent objects on the bottom rack from blocking the upper spray arm (see Adjusting the Top Rack, below). • Do not load cookie sheets and large platters in the front of the bottom rack.
Loading Your Dishwasher Loading the Racks ¾ Always use the top rack for delicate items. ¾ Scrape off leftover food items and non-food items, like toothpicks and napkins, before loading. ¾ Always load large or heavy items (such as pots, pans, and large dishware) in the bottom rack. ¾ Do not stack dishes, glasses or pots and pans. Stacking will prevent water from getting to soiled surfaces. ¾ Load all items so that the open ends face down as much as possible. Good drainage provides the best drying.
Operating Your Dishwasher Operating Your Dishwasher Filling the Detergent Dispenser IMPORTANT: • Do not use hand dishwashing detergents. They will create excessive foaming that interferes with proper operation. • To make sure the detergent dissolves properly, fill the detergent dispenser just prior to starting your dishwasher. Detergent will harden if it sits too long. • Store dry detergent in a cool dry place to prevent caking. • Use a liquid rinse aid for best results (See page 15).
Operating Your Dishwasher Filling the Rinse Aid Dispenser IMPORTANT: • Rinse aid is important to the drying process of the dishware. It also reduces spotting. Dacor recommends that you keep the rinse aid dispenser full at all times. • The rinse aid indicator on the dispenser turns “clear” when it is empty. ¾ The rinse aid dispenser must be properly adjusted. Too little rinse aid will allow spotting and drying problems. Too much rinse aid will cause foaming and streaking.
Operating Your Dishwasher Starting Your Dishwasher IMPORTANT: • See the Getting to Know Your Dishwasher section for a description of the various wash settings. • If the dishwasher drain line is connected to a garbage disposal, run the disposal before operating the dishwasher for proper drainage. START STOP NORMAL HEAVY CRYSTAL RINSE DELAY SANI RINSE CANCEL SECURE To wash or rinse the dishes: 1. For best performance, turn on the hot water at a nearby faucet until the running water is hot.
Operating Your Dishwasher Stopping Your Dishwasher During Operation CANCEL To stop the current cycle and drain your dishwasher: 1. Open the door. The dishwasher will stop operating. 2. Press CANCEL. CANCEL 3. Close the door. After a short pause, you will hear the water in the dishwasher begin to drain. Once the water is drained, the dishwasher will stop. IMPORTANT: If you press the CANCEL button twice, the dishwasher will stop completely. The water inside the dishwasher will not drain.
Operating Your Dishwasher START STOP NORMAL HEAVY CRYSTAL RINSE DELAY SANI RINSE CANCEL SECURE The DELAY Feature To set your dishwasher to start automatically at a later time: 1. Press one of the wash cycle buttons or the rinse button. NORMAL HEAVY CRYSTAL RINSE CRYSTAL RINSE 2. If you have selected NORMAL, you may press the SANI-RINSE button for maximum sanitization. 3. Repeatedly press the DELAY button until the number of hours you want to delay operation appears on the numeric display.
Operating Your Dishwasher The Cycle Memory Feature Your dishwasher remembers the settings for the last cycle it ran. If you want your dishwasher to run the same cycle as it ran the previous time: 1. Press the START/STOP button once. The START/STOP button light will flash and the lights on the buttons for the last cycle and options run will be lit. 2.
Cleaning and Maintenance Cleaning and Maintenance ! CAUTION: Exercise caution when cleaning around the control panel area and the exterior indicator light on the front of the door. Do not use spray cleaners of any kind on these areas. Cleaning the Interior Surfaces ¾ The dishwashing compartment of your Dacor dishwasher is constructed of high quality stainless steel. It remains clean during normal use. ¾ The control panel and the racks may be wiped clean, if necessary, with a soft damp rag.
Cleaning and Maintenance Strainer Small Particle Filter Medium Particle Filter Removing the Strainer and Filters Use and Care Manual 21
Problem Solving Problem Solving Unnecessary service calls may be expensive, frustrating, and time-consuming. Before you call for service, please review the Problem Solution Guide below. Problem Solution Guide Problem: May be caused by: What to do: Spotting and filming Hard water Use maximum recommended amount of dishwasher detergent. You may need a home water softener. To remove hard water spots, try a vinegar rinse: • Wash and rinse load as usual. • Remove all metal items from dishwasher.
Problem Solving Problem: May be caused by: What to do: Spotting and filming (cont.) Spray arms do not rotate properly Make sure that both spray arms rotate freely. Make sure that items do not obstruct movement of spray arms. If necessary, clear any obstructions. Make sure holes in spray arms are not blocked. If necessary, clear holes with a pointed object and rinse under water. Check strainer. Clean if necessary. Use only “dishwasher” detergent. Too much rinse aid in final rinse cycle.
Problem Solving Problem Solution Guide (continued) Problem: May be caused by: What to do: Chipping or breaking of glassware Improper loading Unusual noise Improper loading Water left in bottom of dishwasher near filters Dishwashing cycle not complete CANCEL button pressed twice in middle of cycle. Some water is normal Air gap plugged Do not overload. Load between rack prongs, not over them. Glasses loaded over prongs will not be supported and may chip or break.
Problem Solving Problem: May be caused by: What to do: Yellow or brown marks (cont.) Washing copper with sterling silver Yellow film on sterling silver results when you wash copper utensils in same load. Silver polish will usually remove this type of stain. Remove tea or coffee stains by hand using a solution of ½ cup bleach and 3 cups warm water. (Do not use on sterling silver or silver plate.) Rinse flatware that is to stand several hours before washing.
Problem Solving Problem Solution Guide (continued) Problem: May be caused by: What to do: Dishes not dry No rinse aid Fill rinse aid dispenser. Rinse aid helps dishes to dry faster. Certain plastic materials are difficult to dry. Plastics may need to be towel dried. Do not overload or nest items. Make sure dishwasher is loaded according to instructions starting on page 10. Dishes washed with the sani-rinse setting will dry the fastest. Door opened too soon.
Warranty Information Warranty Information Getting Help Before obtaining service, please review the Problem Solution Guide starting on page 22. If you have performed the checks in the Problem Solution Guide and the problem has not yet been remedied, please visit our website or contact our Customer Service Team for a listing of Dacor authorized service agents. Prior to requesting service, it is helpful to be familiar with the warranty terms and conditions listed on the next page.
Warranty Information What is Covered: CERTIFICATE OF WARRANTIES: DACOR DISHWASHERS DACOR DISHWASHERS WITHIN THE FIFTY STATES OF THE U.S.A., THE DISTRICT OF COLUMBIA AND CANADA*: FULL ONE-YEAR WARRANTY If your DACOR product fails to function within one year of the original date of purchase, due to a defect in material or workman-ship, DACOR will remedy the defect without charge to you or subsequent users. The owner must provide proof of purchase upon request and have the appliance accessible for service.
Notes Notes Use and Care Manual 29
Notes 30 Dacor Dishwasher ®
NO POSTAGE NECESSARY IF MAILED IN THE UNITED STATES FIRST-CLASS MAIL PERMIT NO.
Please visit www.Dacor.com to activate your warranty online. WARRANTY INFORMATION IMPORTANT: Your warranty will not be activated until you activate it online or return this form to Daco r. If you have purchased more than one Dacor product, please return all forms in one envelope or activate the warranty for each product online. Please rest assured that under no conditions will Dacor sell your name or any of the information on this form for mailing list purposes.