LCD TELEVISION INSTRUCTION MANUAL DLP-2612 DLP-3212 PAL B/G , D/K, I/I, SECAM B/G , D/K, L/L’, NTSC(AV) TELETEXT SCART/VIDEO/S-VIDEO/COMPONENT/PC/DVI-D MULTI-LANGUAGE OSD Help line Number: 0870 100 2525
Caution CAUTION RISK OF ELECTRIC SHOCK DO NOT OPEN CAUTION : TO REDUCE THE RISK OF ELECTRIC SHOCK, DO NOT REMOVE COVER (OR BACK). NO USER-SERVICEABLE PARTS INSIDE. REFER SERVICING TO QUALIFIED SERVICE PERSONNEL. The lightning flash with arrowhead symbol, within an equilateral triangle, is intended to alert the user to the presence of uninsulated “dangerous voltage” within the product’s enclosure that may be of sufficient magnitude to constitute a risk electric shock.
Safety Precautions 1. CLEANING Unplug this TV equipment from the AC power outlet before cleaning. Do not use liquid cleaner or aerosol cleaners. Use a soft and damp cloth for cleaning. 2. ATTACHMENTS Do not use attachments not recommended by the TV equipment manufacturer as they may result in the risk of fire, electric shock or other injury. 3.
Contents Important Safeguards . . . . . . . . . . . . . . . . . . . . . . . . . . . . . . . . . . . . . . . . . . . . . . . . . . . . . . . . 5 Supplied Accessories . . . . . . . . . . . . . . . . . . . . . . . . . . . . . . . . . . . . . . . . . . . . . . . . . . . . . . . . . 6 Functional Overview . . . . . . . . . . . . . . . . . . . . . . . . . . . . . . . . . . . . . . . . . . . . . . . . . . . . . . . . . 7 Front(Control Panel) . . . . . . . . . . . . . . . . . . . . . . . . . . . . . . . . . . . . .
Important Safeguards Location Heat, Moisture, Dust, Vibration Position your set so that bright light or sunlight doesn’t fall directly onto the screen. Care should be taken not to expose the set to any unnecessary vibration, moisture, dust or heat. Do not expose the set to dripping or splashing. Ventilation Also ensure that the set is placed in a position to allow a free flow of air. Do not cover the ventilation openings on the back cover. Leave at least 10 cm around each side of the TV set.
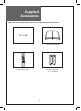
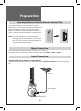
Supplied Accessories Make sure that the following accessories are provided with the product. AC cord Instruction manual POWER STILL RECALL EDIT SOUND MODE LOCK SLEEP PICTURE ASPECT PREV PR MU LT IM ED IA MENU G M I N.
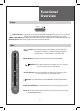
Functional Overview Front TIMER : Lights up red in Stand-By mode and Lights up green in TV on mode. When TV is Child Lock mode, LED will cycle through red / green. TIMER : When On time/Off time in time setting mode is selected, the LED is red. Remote Sensor : Receives signals from the remote controller.
Functional Overview Remote Controller 1. POWER STILL RECALL EDIT SOUND MODE LOCK SLEEP PICTURE ASPECT PREV PR MU LT IM E DI A MENU G M I D PIP N. R POSTION SWAP INPUT (MUTE) : Press this button, and the sound goes off. Press again, and the sound returns. 2. (POWER) : TV on/off button in Stand-By mode. Note: When the current state is ST-BY, you turn on the TV using the digit key 3. STILL : Press this button to freeze the picture. 4.
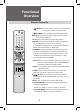
Functional Overview Remote Controller POWER STILL RECALL EDIT SOUND MODE LOCK SLEEP PICTURE ASPECT PREV PR MU LT IM E DI A MENU G M I D PIP N. R POSTION SWAP INPUT 12. ASPECT : Select screen aspect ratio : 16:9 / Zoom1 / Zoom2 / Panorama / Auto / 4:3 13. PREV PR : Previous PROGRAMME button. 14. MENU : Menu display button. 15. : Each time you press this button, the TV will cycle through: TV / Video1 / Video2 / Video3(S-Video) 16.
Preparation Inserting Batteries into the Remote Control Unit To load the batteries, turn the remote control handset over and open the battery compartment. Insert the batteries (Two 1.5v, type R03 or AA). Make sure that the polarity matches with the (+) and (-) marks inside of the battery compartment. Note: To avoid damage from possible battery leakage, remove the batteries if you do not plan to use the remote control handset for an extended period of time. Mains Connection 1.
Preparation Aerial Connection with VCR Connect your ① aerial cable to the RF(aerial) IN terminal on the VCR. Connect the RF OUT terminal of the VCR to the Aerial terminal on the TV set with ② RF cable. NOTE: If you wish to use only the Aerial (RF) connection to match the VCR, then you should store the VCR channel on the TV to programme number “ZERO” using the “Manual tuning” function (See page 20). Now you can watch the VCR in TV mode by selecting the programme number “PR00”.
Preparation Connecting PC(15Pin D-SUB) 1. Prepare the PC cable (D-sub 15pin) and the PC audio cable(Sold separately). 2. Connect the PC(Output) to the LCD(Input) as shown below. 3. Turn on the LCD and PC. 4. INPUT SELECT : Select [PC] by pressing the “MULTIMEDIA” button of the Remote Control or LCD unit. PC INPUT Audio cable AUDIO INPUT Each time you press the “MULTIMEDIA” button, a different input mode appears.
Preparation Connecting DVI 1. Prepare the DVI cable and the PC audio cable(Sold separately). 2. Connect the PC(Output) to the LCD(Input) as shown below. 3. Turn on the LCD and PC. 4. INPUT SELECT : Select [DVI] by pressing the “MULTIMEDIA” button of the Remote Control or LCD unit. DVI cable Audio cable PC AUDIO INPUT DVI-D INPUT Each time you press the “MULTIMEDIA” button, a different input mode appears.
Preparation Connecting Component or VIDEO or S-VIDEO from a DVD 1. Prepare the AV cable. 2. Connect the DVD(Output) to the LCD(Component or Video Input) as shown below. 3. When connecting to an external AV source, be sure to match the colors. 4. Turn the LCD and the DVD ON. 5. Select [Component 1 or Component 2, Video1, Video2, Video3] by pressing the “MULTIMEDIA” or button of the Remote Control or the „INPUT SELECT” Key in KeyPad of the LCD set. 6.
Preparation NOTES: 1) Y/Cb/Cr, which stands for DVD Player’s Output Terminal, can also be written as Y/B-Y/R-Y, Y/Pb/Pr depending on the kinds of DVD devices. 2) The way of connecting the DVD to the LCD is as follows: Y <---> Y Cb <---> Pb, B-Y, Cr <---> Pr, R-Y 3) The DVD output can be Video, S-Video and/or Component Video depending on the DVD devices. There are various output modes, so be sure to check when you purchase it.
Preparation Source Mode Selection Press the AV button on the TV control panel repeatedly to select the source. You can also select the source using AV button or Multimedia button on the remote controller.
DVD or DTV Set-Top Box Input Jack (Component1, Component2) These jacks have Y/Pb(Cb)/Pr(Cr) inputs and Audio inputs. These jacks are used to connect a DVD player, DTV Set-Top Box. (Available input mode : 480i, 480p, 576i, 576p, 720p 60Hz, 720p 50Hz, 1080i 50Hz, 1080i 60Hz) Headphone Input Jack Insert the headphone plug (3.5 mm ) into this jack. The sound from the speaker will be automatically cut off. You can control the headphone sound with the Volume Up/Down button.
Installation Language Menu 1. When you turn on the TV set for the first time, the Language menu appears as the on-screen display. If not, (1) Press the MENU button to call up the menu. (2) Move the selection bar to the Feature menu with ▼PR▲buttons. (3) Press the VOL► button. (4) Move the selection bar to the Language with ▼PR▲buttons. 2. Press the ◄VOL► buttons to choose the language you want . 3. Press the MENU button to escape from menu.
Installation Channel Edit Select the Channel Edit menu from the Install menu. Moving the programme 1. Select the programme to move with the ▼PR▲ buttons. 2. Press GREEN button and the selected programme is highlited. 3. Using the ▼PR▲ buttons, select programme you want to change. 4. Press Green button and the programme will be moved. Skipping the programme 1. Select the programme to skip with the ▼PR▲ buttons. 2. Select Skip “Yes” or “No” with the RED button. 3.
Installation Manual Tune 1. Press the ▼PR▲ buttons to select a programme number you want. 2. Select the Manual from the Install menu. 3. Press the VOL► button and the manual tuning window appears. 4. Press the ◄VOL► buttons to search up or down. 5. Searching will be stopped automatically after finding the next channel. 6. When a new channel is found, a channel memorizing window will appear. 7. Select save(Using the menu button) or cancel (Using the blue button).
Basic Operation Switching On and Off SWITCHING ON 1. If the Indicator is not lit, then the TV set is powered off. You must press the On/OFF button on the TV set. The set will switch to stand-by mode and then the Indicator will illuminate in Red. 2. Press the POWER button on the remote controller or the POWER button on the TV set when the indicator is red. The TV set will be switched on and the indicator will be changed to green. SWITCHING OFF 1.
Basic Operation Programme Selection The set has 99 programme numbers, PR01..PR99. The Number buttons are used for direct programme selection. To select a two-digit programme, press the second numbered button within 2 seconds. (EX. When you want to select PR10, you should press down “1” and “0” within 2second. If you only press down “1”, after 2second, PR1 will be selected.) ▼PR▲ SELECTION You can also select a programme by pressing step by step the▼PR▲ buttons.
Menu Operation Picture Control 1. Press the MENU button to call up the menu. 2. Move the selection bar to the Picture menu with the ▼PR▲ buttons. 3. Press the VOL► button. 4. Select the item to adjust with the ▼PR▲ buttons. 5. Press the ◄VOL► buttons. Picture Mode Sound Brightness 48 Contrast 63 Colour 50 Screen CH Install Features The level adjust mode of each function appears : “Brightness”,“Contrast”,“Colour”,“Sharpness”,“Tint”.
Menu Operation Screen Control Aspect Ratio Control 1. Press the MENU button to call up the menu. 2. Move the selection bar to the Screen menu with the ▼PR▲ buttons. 3. Press the VOL► button. 4. Select the Mode menu with ▼PR▲ buttons. 5. Using ◄VOL► buttons, Select the desired aspect ratio. Six mode ; 16:9 > Zoom1 > Zoom2 > Panorama > Auto > 4:3 Note : You can select the desired aspect ratio with the ASPECT button on the remote controller.
Menu Operation PC 1. Select the PC from the Screen menu. 2. Press the VOL► button and the PC mode appears. PC/DVI Picture Sound H Size 1. Move to H Size by pressing the ▼PR▲ buttons. 2. Press the ◄VOL► buttons to adjust the horizontal size of displayed image. Screen CH Install Features H Size V Size H Position V Position Phase Frequency Auto Adjust Move Adjust V Size 1. Move to V Size by pressing the ▼PR▲ buttons. 2. Press the ◄VOL► buttons to adjust the vertical size of displayed image.
Menu Operation PC/DVi Mode input format If the signal from the PC system equals one of the standard signal modes, the screen will automatically adjust and display image. If the signal from the PC system doesn’t equal any of the modes, adjust the Video card setting on the computer. For the display modes listed below, the screen image has been optimized during manufacture. The message “Out Of Range” will appear when the PC signal does not correspond to any of the below standard settings.
Menu Operation PIP/POP 1. Select the PIP/POP from the Screen menu. 2. Press the VOL► button and the PIP/POP mode appears. Mode 1. Use the ◄VOL► buttons to select either on or off. Sub Input 1. Select the Sub Input menu with ▼PR▲ button. 2. Using the ◄VOL► buttons, Select the desired sub input. Sub input mode : TV > Video1 > Video2 > Video3(S-Video) > Component1 > Component2 Note: PC, DVi Mode; TV > Video1 > Video2 > Video3(S-Video) PIP Size 1. Move to the PIP Size menu with ▼PR▲ button. 2.
Menu Operation PIP : Along with the main window program, you can have another small sub window simultaneously. POP : Main window moves to the left side of the screen and sub window appears on the right side at the same time.( When main mode is PC & DVI , this function cannot operates.) PIP Sub/Main TV Video1 Video2 Video3 (S-Video) Comp.1 Comp.2 PC RGB DVI TV × ○ ○ ○ ○ ○ ○ ○ Video1 ○ × ○ ○ ○ ○ ○ ○ Video2 ○ ○ × ○ ○ ○ ○ ○ Video3 (S-Video) ○ ○ ○ × ○ ○ ○ ○ Comp.
Menu Operation Colour Temp 1. Move to the Colour Temp menu with ▼PR▲ buttons. 2. Using the ◄VOL► buttons, Select the desired Colour Temperature. Note : Through Colour Temperature Control you can change the tone of colour. Normal: Normal white Warm: Reddish white Cool: Bluish white CH Picture Mode Sound PC/DVI Screen PIP/POP Install Colour Temp Features NR Move 16:9 Normal Off Select Menu:Save Note: Colour Temp are operated only in PC/DVI mode. NR 1. Move to the NR menu with ▼PR▲ button. 2.
Menu Operation Sound Mode 1. Press the MENU button to call up the menu. 2. Move the selection bar to the Sound menu with ▼PR▲ buttons 3. Press the VOL► button. 4. Select the Mode menu with ▼PR▲ buttons. 5. Using the ◄VOL► buttons, Select the desired sound mode.
Menu Operation MPX 1. Move to the MPX menu with ▼PR▲ buttons. 2. Press the ◄VOL► buttons to select one of the Stereo, Mono, Dual 1, Daul 2. Note: MPX only works in RF mode. Spatial 1. Move to the Spatial menu with ▼PR▲ buttons. 2. Press the ◄VOL► buttons to select either on or off. Note : Using this function, you are able to enjoy the special sound effect. Super Bass 1. Move to the Super Bass menu with ▼PR▲ buttons. 2. Press the ◄VOL► buttons to select either on or off.
Menu Operation Features Background 1. Press the MENU button to call up the menu. 2. Move the selection bar to the Features menu with ▼PR▲ buttons. 3. Press the VOL► button. 4. Select the Background menu with ▼PR▲ buttons. 5. Press the ◄VOL► buttons to select either Trans or Opaque.
Menu Operation Time Setting 1. Select the Time Setting from the Feature menu. 2. Press the VOL► button and the Time Setting mode appears. Setup the Clock, Wake up Time and Off Time. 1. Start to set up by pressing the VOL► button. 2. AM/PM, Hour and minute is set up if pressing PR and ◄VOL► buttons in the - - - -:- - status. 3. For Wake up Time and Off Time, select either function on or off. 4. Press the MENU button for exit.
Menu Operation Teletext SWITCHING TELETEXT ON/OFF Press the TELETEXT button ( ). The index page or the page viewed last will appear. Press the TELETEXT button again to return to the TV mode. NOTE: Teletext works only in TV/AV mode. COLOUR BUTTONS IN TOP/FLOF TELETEXT A red, green, yellow and blue field is shown at the bottom of the screen.
Menu Operation CALLING UP SUBPAGE DIRECTLY Pressing the SUBPAGE button ( ) , “ - - - - ” appears. Enter the subpage number that you want to call up with the NUMBER button, for example, the 2nd page, sequence 0002. The desired subpage will eventually be displayed on the screen and holds it there.
Trouble Shooting Please check the following items before asking for repair service. Symptom Check items Neither picture nor sound - Check the contact of sockets is all right. - Check the TV main power is on. Picture is OK but no sound - Check the Volume control is set to minimum or mute. Sound is OK, but no color. - Check the colour control and adjust it properly. - Check the program is in colour and not in black & white. The picture is overlapped image.
Trouble Shooting IN PC/DVI MODE Symptom “OUT OF RANGE” appears on the screen “NO SIGNAL” appears on the screen. Check items OUT OF RANGE - Check the resolution and frequency of your PC. Then, adjust them to optimum condition for LCD TV. - Refer to the table of PC mode input format (If registered resolution and frequency on the table no listed then no picture will be displayed.) - Ensure that the signal cable is firmly connected to PC and TV. NO SIGNAL Image is not clear. - Adjust the PHASE control.
Product Specifications Specifications DLP-2612 LCD Panel TV System INPUT Connector OUTPUT Connector Screen Size 32” Aspect Ratio 16:9 16:9 Resolution 1366 x 768 (WXGA) 1366 x 768 (WXGA) Pixel Pitch 0.4215 mm 0.