
Installation manual

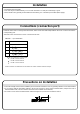
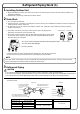
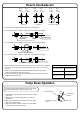

How to Use Reducers
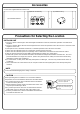
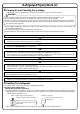
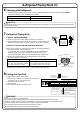
Pump Down Operation
● When using the reducer packing shown above, be careful not to overtighten
the nut, or the smaller pipe may be damaged. (about 2/3 ~ 1 the normal
torque)
● Apply a coat of refrigeration oil to the threaded connection port of the
outdoor unit where the flare nut comes in.
● Use an appropriate wrench to avoid damaging the connection thread by
overtightening the flare nut.
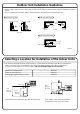
Use the reducers supplied with the unit as described below.
(1) Connecting a pipe of φ1/2” to a gas pipe connection port for φ5/8”:
(2) Connecting a pipe of φ3/8” to a gas pipe connection port for φ5/8”:
(3) Connecting a pipe of φ3/8” to a gas pipe connection port for φ1/2”:
Flare nut tightening torque
Flare nut for φ3/8” 24.1~29.4 ft-lbf
Flare nut for φ1/2” 36.5~44.5 ft-lbf
Flare nut for φ5/8” 45.6~55.6 ft-lbf
No.1
φ5/8”
→ φ1/2”
No.2
φ1/2”
→ φ3/8”
No.3
φ5/8”
→ φ1/2”
No.4
φ1/2”
→ φ3/8”
No.5
φ5/8”
→ φ3/8”
No.6
φ5/8”
→ φ3/8”
Gasket (1) Gasket (2) Reduce and gasket
No. 1
No. 3
Flare nut (for φ5/8”)
Inter-unit piping
Connection port of outdoor unit
Be sure to attach
the gasket.
No. 5
No. 6
Flare nut (for φ3/8”)
Be sure to attach the gasket.
No. 4
No. 2
Flare nut (for φ1/2”)
Be sure to attach the gasket.
1) Remove the valve cap from liquid stop valve and gas
stop valve.
2) Carry out forced cooling operation. See “Forced
Operation”.
3) After five to ten minutes, close the liquid stop valve
with a hexagonal wrench.
4) After two to three minutes, close the gas stop valve
and stop forced cooling operation.
In order to protect the environment, be sure to pump
down when relocating or disposing of the unit.
Gas stop valve
Close
Hexagonal
wrench
Liquid stop
valve
Valve cap