
Clock Specification Sheet

ION-16 DIGITAL CLOCK
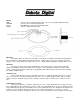
Wiring:
RED - connect to fused, switched 12 volt power. (An accessory terminal will work for this.)
ORANGE - connect to fused, constant battery power.
BLUE - Night Dimming: connect to the head light switch.
BLACK - connect to a main ground location
Mounting:
The gauge requires an oval hole 1-7/16” high x 3-1/16” wide. It should be inserted into the opening from
the front and the 2 L-clamps will be installed from the back. Tighten a nut on each of the L-clamps so that the
gauge is secure. Gauge depth to the back of the case is 1”. Gauge depth including the mounting studs is 1-7/8”.
Operation:
The gauge needs the red, orange, and black wires connected to operate. The red wire should have
switched 12 volt power from an ACC. point on the fuse panel. The orange wire should have constant 12 volt
power. The black wire should be connected to a good ground point. When the blue wire has 12 volts, it will dim
the display for night viewing.
Setting the time:
Using a small, thin object such as a toothpick or pin, press “set” buttons through front lens access holes.
The access holes are on the left and right sides of the lens. Left “set” button advances hours, right “set” button
advances minutes. Each time that you make a change to either the hours or minutes, the seconds are reset to
zero.
Adjusting the accuracy:
The clock is accurate to +/-2 minutes a month as it is sent. It can be tuned for better accuracy if desired.
Press and hold both of the set buttons for several seconds. The clock will display “C 0”. The “C” indicates that it is
in the calibration mode and the second number is the current calibration value. The calibration value indicates the
number of seconds to add or subtract each day. The clock can be adjusted from +7 sec/day to -7 sec/day.
Press the minute set button to change the cal value. Press the hour set button to return to normal clock operation.
MAN# 650142