
Installation Guide

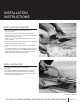

• Install tiles in the center, one grid at a time. Finish each grid before
moving to the next. Start with the rst tile in the corner of the grid and
work outward. Set tiles one at a time using a slight twisting motion.
NOTE: Don’t slide tiles into place.
• Insert tile spacers, as each tile is set, or leave equal joints between tiles.
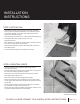
• Fit perimeter tiles in each grid last, leaving 1/4 in. gap
between tile and wall.
• When nished, tap in all tiles with a rubber mallet or hammer and wood
block, to ensure a good bond and level plane.
• Remove excess adhesive from joints with a putty knife, and from tile
with a damp sponge.
• Do not walk on tiles until they are set (usually in 24 hours).
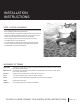
• Using the instructions on the package, make enough grout to
use in about 30 minutes.
• Remove tile spacers and spread grout on the tile surface, forcing down
into joints with a rubber grout oat or squeegee.
• Tilt the oat at a 45° angle and remove excess grout from surface
immediately with the edge of oat.
• Tilt it at a 90° angle and scrape it diagonally across tiles.
• Wait 15–20 minutes for grout to set slightly, then use a damp sponge
to clean grout residue from surface and smooth the grout joints, rinsing
sponge often.
• Let dry until grout is hard and haze forms on tile surface, then polish
with a soft cloth and wait 72 hours for heavy use.
NOTE: Don’t apply sealers or polishes for three weeks, and then only in
accordance with manufacturer’s recommendations.
STEP 6: GROUTING JOINTS
STEP 5: SETTING TILE
INSTALLATION
INSTRUCTIONS
Continued on next page
FLOOR & LARGE FORMAT TILE INSTALLATION INSTRUCTIONS PAGE 3 OF 4