
Install Instructions


General Installation Guidelines
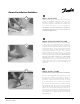
Draw an outline of the layout on the room floor including
a foot print of all furnishings that are not yet
installed. Unroll the first few feet of the LX cable. The
starting point of the cable must be placed within 10 ft.
from the thermostat. Using your floor plan determine
your desired spacing of cable (standard 3” c-c) and
strapping (recommended 2’-3’ apart). Note: minimum
distance between the cables must be 1” or greater.
Mark the position of the connection point between the
power lead and the red LX heating cable. This connection
must be concealed in thinset or self-leveling
cement. When using a floor temperature sensing
thermostat, mark the sensor position in the middle of 2
heating cables, about 10 in. (25cm) away from the wall
(within the heated area), as close as possible to the
thermostat.
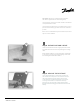
(recommended in conduit, part#19809099- not included)
If using a floor temperature sensing thermostat, install
the sensor now, either in conduit tube, or directly to
the subfloor. It is recommended that the sensor be
installed in conduit tube. This will allow the sensor
to be easily replaced in the unlikely event of failure.
The sensor and/or tube needs to be installed between
the thermostat wall box and the sensor position.
The conduit tube must be partially countersunk into the
subfloor. Cut a channel approximately 5/16” deep x 5/16”
wide in the floor and wall up to the thermostat for the
sensor conduit. The conduit has to go from the thermostat
and minimum of 10 “ away from the wall towards the
middle of the floor.
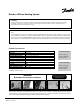
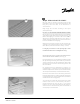
Make a sketch layout or a floor plan of the room;
include all permanent furnishings such as toilets,
bathtubs, appliances, cabinetry, etc. Indicate all
dimensions required to determine the available floor
area and the position of the LX thermostat.
TIP: Danfoss recommends that the installation is
documented with photos to note the location of
connections and the sensor.
4
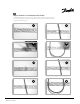
Step 1. PLAN LAYOUT
Step 2. TRANSFER LAYOUT TO FLOOR
Step 3. INSTALL SENSOR
1
2
3A
088L3390 - 06/2009