
Install Instructions


3
Caution!
Ÿ Read the instructions carefully before installing
LX cable.
Ÿ Do not install LX cable in walls or ceilings;
Ÿ The cable must be embedded in mortar,
thinset, concrete or similar material;
Ÿ The minimum installation temperature is
Ÿ 50°F (10°C);
Ÿ Never cut the red heating wire;
Ÿ It is recommended to use copper wire only;
Ÿ Never install the LX cable such that two red
heating wires touch, cross or overlap;
Ÿ Also, measure the resistance between the blue,
black and shielding/ground wire. Both should
read infinity.
Ÿ Remember to always measure, verify and
record the actual resistance throughout the
installation process (out of the box, after
installation, before thin set cement or self-leveler
application and after installation of floor tiles) and
compare all reading to the ratings on the product
label.
Ÿ Remember to check that the supply voltage
matches the voltage of the LX cable;
Ÿ Remember to place the labels as written in
this instruction;
Ÿ Only for indoor installation;
Ÿ Metal structures or materials used for the
support of or on which the Danfoss LX cable is
installed must be grounded in accordance
with CSA Standard C22.1, section 10 and
the NEC.
Please consult the factory for any other questions
or advice.
Warning:
Consult the manufacturer for information on special
installation requirements for wood, laminate and
vinyl or linoleum flooring.
Alternative method: self-leveling cement is
recommended for large surfaces and the
following floor materials: engineered wood,
laminate, floating floors, vinyl, linoleum and carpet.
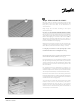
Ce
r
amic tiles
fanD oss LX
Thermostat sensor
Thinset cement adhesive
Plywood on joists
Joists
Insulation (optional)
Ceramic tiles
Danfoss LX
Thin set cement adhesive
T
he
r
most
a
t sensor
Concrete
Directly on plywood:
Danfoss LX typical installations and applications
Directly on concrete.
088L3390 - 06/2009