
Install Instructions


6
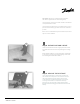
Step 6. BEGIN LAYING THE LX CABLE
Place the cable so that the connection point and the
temperature sensor are in their intended positions and
bring the power lead cable to the thermostat or
connection box.
Begin laying the LX cable according to the layout
developed in Step 1.
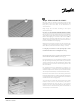
DO NOT CUT OR SHORTEN THE RED HEATING CABLE!
Do not expose it to any mechanical stress. Avoid walking
on the heating cable. Wear only shoes with soft soles. Use
Danfoss LX strapping to secure the cable to the subfloor.
Attach the LX strapping with adhesive, nails, staples, or
double-sided tape. Please refer to pg. 7 for instructions on
how to use the Danfoss LX strapping.
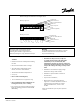
Measure and record the resistance on the warranty card.
Compare to the nominal resistance value on the product
label. (Due to product tolerance this can vary -5/+10%).
It is highly recommend to take photographs of the
installed LX cable before installing the flooring.
ENSURE THAT THE SENSOR CONDUIT HAS BEEN PROPERLY
INSTALLED BEFORE PROCEEDING (refer to pg. 5).
For tiling applications, proceed with the installation of the
tiles by covering the heating cables with a layer of thinset
cement as directed by the tile manufacturer. Ensure that
the thinset mortar covers the entire heating cable as the
tiles are installed.
For engineered wood or laminate floor coverings, it is
recommended to consult the flooring manufacturer for
maximum temperature allowance (use a thermostat with
a floor temperature limiter (i.e. LX thermostat 088L3032).
Ensure that all moisture in the self-leveling cement has
been fully eliminated in accordance with the drying times
recommended by the cement manufacturer (consult the
manufacturer for exact drying time).
Once the thin-set cement has dried, measure the cable
resistance and record it on the warranty card (due to
product tolerances the size can vary +/- 2% and the
resistance -5/+10%.). The system must not be turned on
until the thinset cement has fully dried. A minimum of
seven (7) days is recommended.
6
088L3390 - 06/2009