
User Manual


SpyderCHECKR Setup and Workflow
Mounting Options
The Classic SpyderCHECKR has a standard tripod mount (1/4 inch 20 UNC
thread) on the base. This allows flexible mounting at any height or angle
desired. However it's also possible to place the target on a table or shelf; it will
stand upright in stable locations. There is also a standard tripod stud at the
top of the SpyderCHECKR spine. This can be used to mount a SpyderCUBE,
but also offers further mounting options.
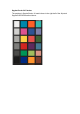
The SpyderCHECKR 24 is a card target, and can be placed as needed, using
any type of support desired. A Joby Gorrilapod, or even a plastic business
card holder can be used for placing the SpyderCHECKR 24 into a scene.
Uses
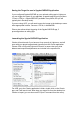
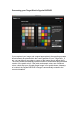
There are numerous uses for a color target, and SpyderCHECKR targets can
be used for both visual and digital capture functions. A number of software
products, which utilize color targets, can be adapted to work with the
SpyderCHECKR.
Lighting the SpyderCHECKR for photography
Mount the SpyderCHECKR or place in a stable location. Light it from a 45-
degree angle. The ideal way to light a target is to use a single lightsource,
with no reflector or diffuser, from an extended distance. Generally, you would
want the sweet spot in the center of the light field to completely overlap the
edges of the SpyderCHECKR.
This assures that all portions of the target will have the same amount and
color of light, reducing fall-off and color variation across the width of a target.
A good fluorescent proofing lamp placed in front of the target, with the bulb
along the length of the target, shining down from above at 45 degrees, will
offer even light.
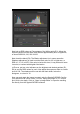
The gray side of the SpyderCHECKR provides an excellent tool for checking
lighting consistency. Once the target and lighting are configured, shoot the
gray target, and sample the 50% gray area at different locations to check that
light quantity, and color, is even.