Warnings and Precautions 1. If you have purchased PPT100 software with an optional Blackmagic Design Video Card please observe the precautions supplied when installing it. 2. It is also advisable to read any precautionary notes supplied with your PC when installing new hardware and software.
Table of Contents What’s in the box?..................................................................... 2 Introduction................................................................................ 2 Features...................................................................................... 3 System Requirement ................................................................. 3 Installation..................................................................................
What’s in the box? 1. PPT100 software CD 2. User Manual 3. BNC to BNC 2m cable x 1 4. IEEE1394 4pin to 6pin 1.8m cable x 1 5. IEEE 1394 6pin to 6pin 1.8m cable x 1 6. DeckLink card (Optional) Introduction Thank you for using the PPT100 software. This software is the world first software that can direct transfer a PC’s screen to high quality DV or SDI signal.
Features Real time VGA to DV IEEE1394 or SDI NTSC and PAL Standards More than 8 frames/sec capture rate (Performance is only achieved with Intel Graphics Media Accelerator 900 chip at resolution 1024 x 768 pixels) Direct transfer of VGA video to DV or SDI high quality video output for long distance transmission and lossless video quality. Full Screen Capture and Application Window Screen Capture enabled For live presentation via a digital video switcher.
Installation Blackmagic DeckLink Card Installation (For SDI or YUV solution only) PPT-100 software Installation 1. Double click on PPT100 software. (In Windows XP) 2.
3. Read thru the License Agreement, and then click on “Yes” 4. The program will list recommend system configuration. Please confirm if your system has fulfilled the requirement. Then, click on “Next”. 5. Please enter the serial number (found on the rear of the CD box). Then, click on “Next”. If you don’t have the serial number, the default setting is “DEMO”. Then, it will install this software as a demo version. It will show “DATAVIDEO PPT100” logo on screen. 6.
. PPT100 should be successfully installed into the computer. The program will ask you to restart the computer now or restart it later, make your choice, and then click on “Finish”. 8. Now you can use the PPT100 software. Note 1: There will be a semitransparent “DataVideoCG and PPT100” logo on the TV screen if you did not activate and register the software. This logo will always be on if a demo version is being used. The logo will not be present when you have activated the software.
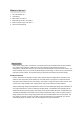
PPT100 Interface Resolution 1024x768 Screen color 32 bits Res tar t PPT10 0 to confirm the setting of changing NTSC / PAL To crop PC screen’s edges Video margins for preventing bleeding effect Converting buttons Capture rate Cursors on the video These are all the basic function descriptions. For more detailed information and application, please read through the rest of this PPT100 user manual. Set Up Click [Setup] in the PPT100 main dialog box, the following dialog box will be launched.
TV System Select either NTSC or PAL Standards Output Before selecting [DV], please make sure the PC contains an IEEE1394 interface, and a DV Output Device, such as a DAC or DV Deck has to be activated when executing the output function of PPT100. Before selecting [SDI(DeckLink)], a DeckLink card has to be installed in the PC. Zoom in /2X/4X PPT100 can zoom in either 2X or 4X. Click [F11] key on the keyboard to zoom in 2X; click [F12] to zoom in 4X. Click [F10] to set back the default size.
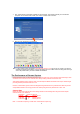
Click [Select Application Window] button to popup the following window: You can see the available applications listed on the above window. Click mouse left button to select a window. Click [OK] button to finish the setting. The above picture shows “Microsoft PowerPoint – [PPT100.ppt]” is highlighted and selected The [Full Application Window] button on the bottom left side is depressed. This means the whole “Microsoft PowerPoint – [PPT100.ppt]” is filling the cropping area.
Flicker Free Select [Flicker Free] to eliminate all flicker that is caused by television interlacing. However if the television equipment connected has a flickerfree function, for best results do not select [Flicker Free] as the resolution will be reduced. Cursor Displaying PPT100 can’t capture the real cursor from the PC, but it can detect the position of the cursor. So users can select one of 10 provided cursors. If [None] is chosen, no cursor will be displayed.
Accessories For long distance transmission up to 200 meters, you could use Datavideo DV cables and DV Repeaters. With Datavideo DV converter DAC6, you could convert DV25 digital video signal to analog video signal (Component, Y/C, and Composite) for monitoring DV25 video in your existing monitor.
Sample connection diagrams Example 1: Long distance transmission Example 2: With DV Switcher Example 3: With SDI Switcher 12
Product registration Go on line www.datavideo.info/product_reg.htm for product registration See the warranty card for warranty period Software Protection (A) While installing PPT100 software, the default setting for serial number is set as “DEMO”. If you press directly at the time of installation, it will install this software as a demo version. Type in the correct serial number, it will complete the installation. Otherwise, it will exit the installation window.
Service & Support It is our goal to make your products ownership a satisfying experience. Our supporting staff is available to assist you in setting up and operating your system. Please refer to our web site www.datavideotek.com for answers to common questions, support requests or contact your local office below. Datavideo Technologies Co., LTD. 10F, No. 176, JianYi Rd, Chung Ho City, Taipei Hsien 235, Taiwan R.O.C. Tel: 886282272888 Email: info@datavideo.com.