
Installation manual


13
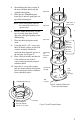
Re-Install the ISS
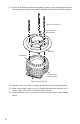
1. Install the rain collector cone and turn the ISS upside down.
2. Open the SIM cover and connect the TEMP/HUM and RAIN sensor cables.
3. If installed on your station, connect cable for the UV and SUN sensors.
4. Wireless ISS Only: Connect the power cable.
5. Close the SIM cover.
6. Re-install the ISS in its previous location.
7. Open the SIM cover and connect the WIND (anemometer) cable.
8. Cabled ISS Only: Connect the console cable.
9. Close the SIM cover and fasten the cover using two #6 x 1/2” (3.5mm x 12mm)
self-threading screws. Without the screws the SIM cover can be blown off the
housing in extremely windy conditions.
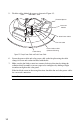
10. Use cable ties to secure cables.
Guidelines for Securing Cables
• Secure cables so they will not whip about in the wind.
• Secure cables to metal poles by using a cable tie or by wrap-
ping electrical tape around them both.
• Place clips or ties approximately every 3 to 5 feet (1 to
1.6 m).
• If needed, additional cable ties, cable tie mounts, and other hardware can be
obtained at a hardware or electronics store.
Note: Do not use metal staples or a staple gun to secure cables. Metal staples—especially when
installed with a staple gun—have a tendency to cut the cables.
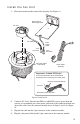
Cable Routing Channels
(press cables fully into channel)
DIP Switches
(Wireless ISS Only)
Console Cable
(Cabled ISS Only)
Power Cable
(Wireless ISS Only)
AC Power (optional)
3-Volt Lithium Battery
(Wireless ISS Only)
Optional
UV
SUN
RAIN
WIND
TEMP HUM
Figure 19. SIM Cable Connections
Cable Clip
Cable Tie
Figure 20. Securing Ca