
Installation manual


4
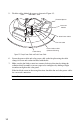
Disassemble the Standard Radiation Shield
Note: We recommend using a workbench or table to perform the following procedures.
1.
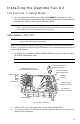
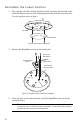
Turn the ISS upside down with the rain collector cone
on the bottom.
2. Disconnect the RAIN cable and, if present, disconnect
the SUN and UV cables from the SIM.
3. Wireless ISS Only: Disconnect the solar power
cable.
4. Turn the ISS right-side up with the cone on top.
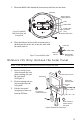
5. Remove the rain collector cone from the ISS base by
rotating the cone counter-clockwise. When the cone’s
latches line up with openings in the base, you can lift
the cone off. The cone fits in the base tightly and may
require extra pressure to remove the first few times.
See Figure 4.
Tip: Steady the ISS base between your knees when removing the cone.
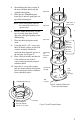
6.
Remove the three 8-32 x 4”
screws holding the radiation
shield plates together. Save
these three screws for use in the
next procedure, “Assembling
the Lower Shield.”
Twist to Open
Figure 4. Remove Rain
Collector Cone
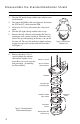
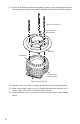
#8-32 x 4" Screw
Top Plate with
Insulating Disk
ISS Base
Temp/Hum
Sensor
#8 Lock Washer
#8 Flat Washer
Bottom Plate with
SIM Housing
Radiation Shield
Open Plates
Temp/Hum
Cable
Figure 5. Standard Radiation
Shield Assembly Diagram