
Installation manual


5
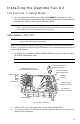
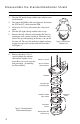
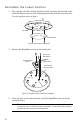
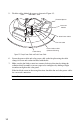
7. Route the RAIN cable behind the drain and out the hole near the drain.
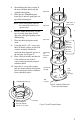
8. Place the adhesive-backed cable tie mount next to
the hole near the drain, and secure the cable with
the small cable tie.
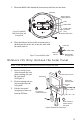
Wireless ISS Only: Remove the Solar Panel
Note: A new solar panel included with the kit replaces the original solar panel.
1.
Insert a slot-tip screw-
driver between the solar
panel retaining tabs and
the solar panel.
See Figure 8. .
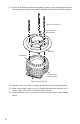
2. Pry the retaining tabs out
just enough to free the
solar panel.
3. Lift the solar panel
straight up to remove it
from the ISS base.
ISS Base
RAIN Cable
Drain
Install Cable
Tie Mount
Here
Route Cable Here
Rain Collector
Tipping Bucket
Figure 6. Route RAIN
Cable Around Drain and
through Hole
RAIN Cable
Route Cable
Through Hole
Cable Tie
Mount
Cable Tie
Figure 7. Secure the RAIN Cable
Lift solar panel to remove.
3
Pry tab out to
release solar panel.
2
Insert screwdriver
between tab and
solar panel.
1
Solar Panel
Retaining Tabs
Solar Panel
Figure 8. Remove the Solar Panel