
Installation manual


7
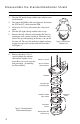
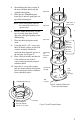
4. Start building the lower section of
the new radiation shield with the
original bottom plate.
5. Place the new Temp/Hum plate
from Step 3 and two open plates on
top of the bottom plate.
Note: When stacking plates, make sure
the screw bosses (holes) line up
with each other.
6.
Run the TEMP HUM cable over the
top of second open plate directly
above the cable port openings in the
SIM housing.
7. Place the third open plate on the
stack.
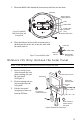
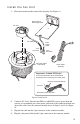
8. Using the #8-32 x 1/2” screws and
three of the #8 washers and #8 lock
washers included with the kit,
attach the three threaded spacers to
the fan plate. See Figure 11.
9. Place a #8 lock washer and then a #
8 flat washer on one of the 4”
screws removed from the original
radiation shield.
10. Insert the 4” screw with washers
into one of the radiation shield plate
holes located just counter-clockwise
from a threaded spacer.
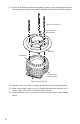
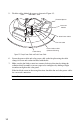
Open Plate
Open Plate
Open Plate
Closed Plate
with
Temp/Hum
Sensor
Closed Plate
with SIM
TEMP HUM
Sensor Cable
SIM
Cable
Port
Openings
SIM
Housing
Note:
Route TEMP
HUM Sensor
Cable out on
the Cable Port
Side of the
SIM Housing
Figure 11. Radiation Shield Lower
Section Assembly Diagram
Fan Plate
#8 Flat Washer
#8 Lock Washer
#8-32 x 1/2" Screw
Threaded Spacers (3)
Figure 12. Install Threaded Spacers