
user manual


dCS Verona User Manual Manual for Software Issue 1.0x
dCS Ltd September 2004
Manual filename: Verona Manual v1.0x.doc Page 8 email: more@dcsltd.co.uk
English version web-site: www.dcsltd.co.uk
STEP-BY-STEP GUIDE
This section guides you through setting up the unit for basic operation. You may
find this useful if you have not used the Verona for a while.
Preliminaries
The Control Summary sheet details the menu structure and outlines the use of
the front panel controls. For more information, see the Menu section on page
14.
For digital interfaces, use with cables designed for digital audio:
• for Word Clock interfaces, use 75Ω coax cables fitted with BNC plugs.
• for SPDIF RCA interfaces, use 75Ω coax cables fitted with RCA Phono
plugs.
do this: Connect the power cable supplied to the Power inlet on the Verona rear panel,
plug the other end into a convenient power outlet. Set the power switch beside
the power inlet to the on position (I).
IMPORTANT! Please do not use an excessively thick power cable as this may damage the
power inlet connector. Such damage is not covered by the warranty.
do this: Press the Power button and wait about 5 seconds while Verona configures
itself.
The display will show in sequence: Verona, Testing and either 44.1kHz or
48kHz.
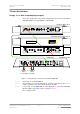
If the unit is likely to be set in an unfamiliar state, you can reset it as follows:
do this: Press the
Menu button once, then press the Step Back button so the display
shows Factory. Press the
Select button and wait a second.
The unit will display Defaults. The PWR indicator and perhaps the OK indicator
will be lit, the others should be off.