GRIDDLE GDE1-30 models USER GUIDE US CA
! DANGER IF YOU SMELL GAS • Shut off gas to the appliance. • Extinguish any open flame. • Open lid. • If odor continues, keep away from the appliance and immediately call your gas supplier or your fire department. ! WARNING • Do not store or use gasoline or other flammable liquids or vapors in the vicinity of this or any other appliance. • An LP cylinder not connected for use shall not be stored in the vicinity of this or any other appliance.
CONTENTS Introduction 3 Safety and warnings 4 Before you begin 9 Lighting instructions 10 Burner adjustment 14 Care and cleaning 15 Troubleshooting 16 Warranty and service 17 1
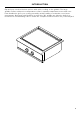
INTRODUCTION Expand your outdoor kitchen options with quick cooking on the griddle. The large griddle surface with precise temperature control, separate temperature zones and even heat distribution gives you cooking versatility and the ability to maintain a consistent temperature. Designed with flexibility in mind, this 30" griddle can either be built-in or mounted on a freestanding cart to create the complete outdoor kitchen for your backyard.
SAFETY AND WARNINGS ! WARNING! Electric Shock Hazard Failure to follow this advice may result in electric shock or death. • This appliance is equipped with a three-prong or four-prong grounding plug for your protection against shock hazard and should be plugged directly into a properly grounded power outlet. • Never remove the grounding plug or use with a 2 prong adapter.
SAFETY AND WARNINGS ! WARNING! Hot Surface Hazard Failure to follow this advice may result in fire, burns, scalds or personal injury. • Accessible parts may become hot during use. • When in use, do not touch the burner, grate, or immediate surrounding area as these areas become extremely hot. Clean the with caution. • Never let clothing or other flammable materials come in contact with or get too close to any grate, burner or hot surface until it has cooled. • Never lean over an open unit.
SAFETY AND WARNINGS ! WARNING! Explosion Hazard Failure to follow this advice may result in injury or death • If you smell gas, do not use the appliance. • Do not use water on grease fires, a violent steam explosion may result. Turn all burners off, then smother fire or flame or use dry chemical or foam-type extinguisher. • Do not heat unopened food containers such as cans – build up of pressure may cause container to burst and result in injury.
SAFETY AND WARNINGS z z Do not store a full LP tank in direct sunlight. After a period of storage or non-use, the appliance should be checked for gas leaks, deterioration, proper assembly, and burner obstructions before use. General Use z z z z z z z z z z z z z z z z z z z z z z z z z This appliance is not intended to be installed in or on recreational vehicles, trailers or boats. After lighting burners, ensure they are operating correctly.
SAFETY AND WARNINGS Gas requirements z z z z z z z z z z z z z z 8 This appliance can be used with any brand of 20lb LP gas tank provided it is compatible with a proper retention device (not supplied). The LP gas cylinder must be: z Designed for use with a Type 1 system only. z Constructed and marked in accordance with the Specifications for LP gas Cylinders of the U.S. Department of Transportation (D.O.T.
BEFORE YOU BEGIN z z z Ensure the installer has completed the final checklist in the installation instructions. Read this guide, taking special note of the Safety and warnings section. Remove all packaging and dispose of it responsibly. Recycle items that you can. Griddle Features 3 3 1 Griddle control dial 2 Drip pan 3 Flash tube 4 Griddle plate 4 5 Grease cup 6 Griddle vent 5 Not shown: lid Dial halos When a dial is in use, an orange halo around that dial will illuminate.
LIGHTING INSTRUCTIONS The griddle is equipped with a thermocouple and safety valve system which monitors the burner. This will turn the gas off if the burner isn’t lit. Before use, ensure the desired burner and heat setting is preheated for 15 minutes 1 Remove the cover and any cooking utensils. Ensure the drip pan is in place. 2 Push in and hold the selected dial for 2 seconds before turning to HI. Hold for 10 seconds to light the griddle.
LIGHTING INSTRUCTIONS Manual lighting If the burner will not light after several attempts, the burner can be manually lit. If you have attempted to light the burner with the ignition, allow 5 minutes for any accumulated gas to dissipate. 1 Remove the cover and any cooking utensils. Ensure the drip pan is in place. 2 Using a match extension rod, carefully light a match and hold up against the base of the flash tube as shown. 3 Turn the control dial counter-clockwise to HI. Hold for 10 seconds.
LEAK TESTING A complete gas tightness check must be performed at the installation site. Periodically check the whole system for leaks, or immediately if the smell of gas is present. When using a LP gas cylinder ensure it is installed in a vertical position to provide the required vapor withdrawal. Removing the valve panel 1 Remove all dials by pulling outwards. 2 Remove the 2 screws securing the valve panel to the unit using a Phillips screwdriver.
LEAK TESTING Testing for leaks Prepare soap solution by combining one part liquid detergent and one part water. Pour into a spray bottle. Ensure all control valves are in the OFF position before turning the gas supply ON. 1 leak points leak points NG: 2 leak points Check all connections from the supply line or LP cylinder by applying the solution around the connection, tubing and end of the manifold. Soap bubbles will appear where a leak is present.
GRIDDLE PLATE Excessive weight Hazard Two or more persons are required to handle the griddle plate. The griddle plate will need to be removed to access the burners for routine cleaning, to adjust the flame height or before moving the product. Removing the griddle plate Remove the vent assembly by pulling up gently from the product, and set aside on a protected surface. 1 front of griddle rear of griddle 2 Grip the griddle plate from under the brackets at the front and rear of the product as shown.
GRIDDLE PLATE Replacing the griddle plate 1 Grip the front and rear of the plate. Lower the plate to slot back in place onto the product ensuring it is centered. 2 Replace the vent assembly by slotting the flash tubes back gently into the support brackets and lowering.
BURNER ADJUSTMENT Flames should be blue and stable with no yellow tips, excessive noise or lifting (Note: LP units may have some yellow tipping). If any of these conditions exist, check the air shutter and burner ports are clear. If cleaning these does not improve performance, the air shutter can be adjusted as per the instructions below. Ensure the griddle is OFF and cool. 1 To access the air shutters, remove the griddle plate. Refer to page 12 for guidance.
CARE AND CLEANING Regulator and hose replacement The pressure regulator and hose assembly supplied with the unit must be used. If replacements are needed, contact customer care at dcsappliances.com. Resetting the flow control Failure to follow the steps in the order shown may cause the Flow Limiting Device to activate resulting in extremely low gas flow and irregular operation. 1 All dials must be in the OFF position.
TROUBLESHOOTING PROBLEM POSSIBLE CAUSES WHAT TO DO The griddle won't light when the ignition is pushed There is no gas flowing to the unit. Check gas supply and connections. Ensure no air is trapped in line. There is a something blocking the air or gas flow. Check all openings for blockages. Check that the unit is connected to a live AC power source. Check GFI outlet, reset if tripped. Burner flame is yellow or orange in conjunction with the odor of gas. Dirt or dust may be present in the area.
WARRANTY AND SERVICE Before you call for service or assistance Refer to the installation instructions and your user guide and check that: z z z z z z Your product is correctly installed. You are familiar with its normal operation. Model number (can be found on the inside, right side panel behind the drip pan handle. Serial number (can be found on the inside, right side panel behind the drip pan handle. Code (can be found on the inside, right side panel behind the drip pan handle.
DCSAPPLIANCES.COM © Fisher & Paykel Appliances 2019. All rights reserved. The product specifications in this document apply to the specific products and models described at the date of issue. Under our policy of continuous product improvement, these specifications may change at any time. You should therefore check with your Dealer to ensure this booklet correctly describes the product currently available. US CA 592067 11.