
Installation guide


8
INSTALLATION
ANTI-TIP INSTALLATION INSTRUCTIONS
WALL MOUNT
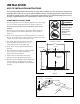
1. Remove the bracket from its original shipping position on the
back of the unit (Fig. 08 and 09).
2. Reattach the bracket to the back of the unit using the existing
screws from the unit’s back panel (Fig 10).
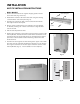
3. Push the unit against the wall so the bracket is flush with the
wall adjacent to the back panel.
4. Using a pencil and the bracket as a template, trace the bracket
on the wall, making sure 2 of the screw holes are aligned with a
stud in the wall.
5. Pull the unit away from the wall.
6. Remove the screws that connect the upper and lower sections of the
Anti-Tip Bracket. Mount the lower section of the bracket that is not
attached to the unit to the wall where you had marked and drilled
pilot holes in the wall/wall stud for mounting. Attach the lower
bracket to wall.
7. Push the unit back against the wall and align the upper section with
the lower section of the Anti-Tip Bracket such that you can refasten
the original screws that secure the upper and lower sections of the
Anti-Tip Bracket (Fig. 11). Your installation is now complete.
To
Drawer Refrigerator
To Wall
ADJACENT WALL
DRAWER REFRIGERATOR
Fig. 08
Fig. 09
Fig. 11
Fig. 10
SIDE VIEW