
Installation guide


INSTALLATION – ESSENTIAL REQUIREMENTS
POWER
■ The appliance must be installed so the power plug is accessible.
■ To ensure that the appliance is not accidentally switched off, connect your refrigerated drawer to its
o
wn power point. Do not plug in any other appliance at this power point or use extension cords, or double
adapters, as the combined weight of both power cords can pull the double adapter from a wall outlet socket.
■ For power requirements, refer to the information on the serial plate located at the upper left side, inner wall
when the door is open.
■ It is essential that the appliance be properly grounded (earthed) with a three prong receptacle. Never cut or
br
eak off the grounding prong to fit a two-prong outlet.
SELECT LOCATION
■ The proper location will ensure peak performance of your appliance. Choose a location where the unit will be out
of direct sunlight, away from heat sources and moisture.
■ Units with fan cooled condensers can be built into an under counter cabinet or freestanding.
■ Your refrigerated drawer should be operated in a properly ventilated area with ambient temperatures not to
exceed below 40 degrees and above 100 degrees Fahrenheit.
■ Installation should be such that the unit can be moved for servicing if necessary.
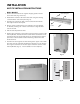
CABINET CLEARANCE
■ Ventilation is required from the bottom front section of the unit. Keep this area open and
clear of any obstructions.
■ The adjacent cabinets and counter top can be built around the unit as long as no top trim
or c
ounter top is installed lower than the top of the upper drawer.
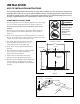
STABILITY
■ It is important that all four corners of the refrigerated drawer base are supported firmly on
a solid level surface to eliminate any cabinet movement.
■ Installing the appliance on a soft or uneven or unlevel floor may result in twisting of the cabinet and poor
sealing of the doors. If the doors do not seal properly, warm air will enter the food storage areas causing the
temperature to increase, resulting in food spoilage and food loss.
■ Position your refrigerated drawer. Turn front leveling legs clockwise (Fig. 01) to lower the front leveling leg. Raise
the front of the appliance until it is stable and level.
■ The front leveling legs should take the majority of the weight of the cabinet and the cabinet should be stable,
i.e. cabinet should not rock or wobble.
WARNING
A free standing refrigerated drawer must have an anti-tip device installed for safety.
■ See anti- tip bracket installations (page 7 and 8).
BEFORE PLACING FOOD IN THE FRESH FOOD COMPARTMENTS
■ Remove all packaging. Ensure that all transit tape is removed from the refrigerated drawer.
■ Clean the inside of the appliance with warm water and a little liquid detergent to remove manufacturing and
transportation dust.
■ Allow the refrigerated drawer to run empty for 2 - 3 hours to allow each compartment to cool to the
appr
opriate temperature.
■ The appliance may have an odor on its initial operation, but this will go away when the refrigerated drawers have
c
ooled sufficiently.
Fig. 01 Leveling Leg
4