Dear Customer, You have just acquired a DE DIETRICH dishwasher and we would like to thank you. Our research teams have created this new generation of appliances for you. Their quality, design, features and technological advances make them exceptional products, and reveal our unique know-how. Your new DE DIETRICH dishwasher will blend harmoniously into your kitchen and will perfectly combine washing and drying performance and ease of use. We wanted to offer you a product of excellence.
EN 34
EN CONTENTS 1/ FOR THE USER’S ATTENTION • Safety instructions ______________________________________ • Environmental protection ________________________________ • Economical, environmentally friendly washing ________________ 2/ DESCRIPTION OF YOUR APPLIANCE • General presentation of the dishwasher ____________________ • Presentation of the control panel __________________________ 3/ INFORMATION ______________________________________________ 4/ WHAT TO DO BEFORE FIRST USING THE MACHINE • Measure the water
EN 1/ FOR THE USER’S ATTENTION • Children’s safety Important : — This appliance is not intended for use by young children or infirm persons unless they have been adequately supervised by a responsible person to ensure that they can use the appliance safely. — This appliance must only be used by adults. Ensure that children do not touch it and do not use it as a toy. Ensure that they do not operate the appliance’s controls. — Keep young children away from the appliance when it is operating.
EN 1/ FOR THE USER’S ATTENTION — Only use products specially designed for your dishwasher (water softening salt, detergent and rinsing products). — As far as possible, avoid opening the dishwasher’s door when it is operating, and in particular during the heating phases, because scalding steam may escape or you may be splashed with hot water. The machine is fitted with a safety system that immediately blocks the dishwasher’s operation if the door is opened.
EN 2/ DESCRIPTION OF YOUR APPLIANCE • GENERAL PRESENTATION OF THE DISHWASHER K B C D E F G H I J Fig. 01 A A Upper basket F Waste filter B Washing products dispenser G Main filter C Anti-blocking gauge wire H Rinsing product dispenser D Lower sprinkler arm I Description plate (After-Sales Ref) E Regenerating salt tank K Internal-lighting bulb (according to model) Advice: This user’s guide is applicable to several models.
EN 2/ DESCRIPTION OF YOUR APPLIANCE • PRESENTATION OF THE CONTROL PANEL C Fig. 02 B A D G E F If you make an error, to cancel a selection or cancel a programme while it is running, hold down this button for 3 seconds. A On/Off: Press this button to start your dishwasher. B Choosing a programme: briefly press one button or the other in succession to select your programme.
EN 3/ INFORMATION Important: Important: Never use normal washing-up liquid. To obtain impeccable washing and drying results from your dishwasher without any marks, you must set it carefully using the water softening system, which utilises regenerating salt. For ease of use and in certain water hardness conditions only (< 25°F), multi-purpose products can make the use of regenerating salt and rinsing liquid unnecessary.
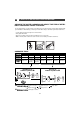
EN 4/ WHAT TO DO BEFORE FIRST USING THE MACHINE • MEASURE THE WATER HARDNESS AND SELECT THE TYPE OF DETERGENT: TRADITIONAL OR MULTI-PURPOSE In one simple action, you can test the your water’s lime content using the testing strip supplied with your dishwasher. Alternatively, contact your local water utility to ascertain your water’s hardness. — Let the water run from the tap for a few moments. — Fill a glass with water. — Take the test strip from its holder and immerse it for 3 seconds.
EN 5/ DETERGENT PRODUCTS AND ADJUSTING THE WATER SOFTENER • FOR TRADITIONAL PRODUCTS • Your machine must be specially adjusted to use traditional products. • Proceed as follows to adjust the water softener on the control panel: — Access the settings menu by holding down the “SET” button. Then briefly press three times to adjust the softener. — This is then displayed on the screen from H 0 to H 6 . The softener factory setting is H4.
EN 5/ DETERGENT PRODUCTS AND ADJUSTING THE WATER SOFTENER • FOR MULTI-PURPOSE PRODUCTS (Water hardness < at 25°F) • Your appliance automatically adapts to using multipurpose products when the water hardness is < 25°F. • Proceed to set the water softener — This feature is adjusted using the “SET” ; button; hold down this button to access the menu. Then press 3 to set the softener level. — The softener level is then shown on the screen from H0 to H6 . The default level is H4 .
EN 6/ LOADING OF REGENERATING SALT • Loading of regenerating salt (Fig 06) Important : Only use special dishwasher regenerating salt. Do not use table salt or any type of cooking salt, this could damage your appliance’s water softener. A A Unscrew and remove the stopper on the salt tank. SSEalt L B Fill the tank with regenerating salt specially designed for dishwashers. C Use the funnel supplied with your dishwasher. The first time, top up with water up to the rim of the tank.
EN 7/ LOADING OF RINSING PRODUCT • Loading of rinsing product (Fig. 07) Important : Only use a rinsing product designed for dishwashers. The rinsing product ensures your items shine and are well dried. A B When first putting the machine into service, fill the tank until the level is flush with the top of the adjustment lever. Pour in at least all the rinsing product provided. A The original setting is 2..
EN 8/ YOUR DISHWASHER’S EQUIPMENT Very important Items not suitable for washing in a dishwasher: - Wooden cutting boards - Stainless steel utensils or plastic utensils that are not heat-resistant - Copper or pewter items - Glued crockery and cutlery - Cutlery with wooden, horn or mother-of-pearl handles - Antique or hand-painted porcelain When purchasing crockery, glasses or cutlery, ensure that it is dishwasher-safe • THE LOWER BASKET Arrange your items so that the water can circulate freely and spray
EN 8/ YOUR DISHWASHER’S EQUIPMENT • THE UPPER BASKET This basket is particularly designed to take glasses, cups, ramekins, small salad bowls, bowls and saucers. Arrange your items methodically to save on space (arranging glasses, cups or bowls together). You can also arrange cups, ladles, etc. on the folding cup racks (Fig. 10) Advice: Position the cavities of glasses, cups or bowls facing downwards. Cutlery basket Fig.
EN 8/ YOUR DISHWASHER’S EQUIPMENT • THE CUTLERY BASKET The cutlery basket slides to allow flexible loading. It can be placed anywhere in the lower basket. You can therefore make a variety of loads depending on the items (Fig. 12). If your cutlery items or your dishes are too large, alter the height setting for the upper basket. Fig. 12 Movable grills are available for if you wish to load your cutlery in an orderly manner (Fig. 13).
EN 9/ SETTING THE PARAMETERS • SETTINGS POSSIBLE WITH “SET” AND SELECTOR BUTTONS: • Holding down the button gives access to the settings menu • Adjust the parameters using the programme selector buttons • Briefly pressing the “Set” button takes you to the next setting. Hold down “SET” Briefly press “SET” then press one of the selector buttons > Choice of language Press the “Set” button until the choice of language is displayed. Change, if necessary, by pressing one of the selector buttons.
EN 10/ WASHING PROGRAMMES • PROGRAMMES TABLE ITEM TYPE (porcelain, pans, cut lery, glasses) FOOD RESIDUE: Quantity, type and amount Resistant Mixed Mixed Very dirty Normally dirty Normally dirty A large amount of dried-on residue, baked-on stains, grease, residue from frying, cooked cheese, sauce, etc. A normal amount of dried-on and greasy residue on everyday items. Faster, but consumes more energy. A normal amount of dried-on, adhering residue on everyday items.
EN 10/ WASHING PROGRAMMES Mixed Glassware Mixed Mixed Normally dirty For delicate glasses and dishware. This Crystal + feature maintains the shine of your glasses longer by automatically adjusting the optimum softener level depending on the water hardness. Very short 30minute wash specially designed for a small amount of daily items with a limited amount of non-greasy residue, not dried on. Automatically detects the amount of washing up and the level of soiling.
EN 11/ PROGRAMMING C Fig. 02 B A D G E F • Immediate starting a programme • Delayed programme start A switches on your Pressing “On/Off” appliance. Select your programme by pressing any button B , or the “ICS” button C for the automatic programme. When a programme is selected the panel light comes on. The screen displays the forecast time of the end of the programme. Select the programme then programme end time, 15 minutes at a time, by pressing + or – until the desired time is displayed.
EN 12/ CLEANING YOUR APPLIANCE • CLEANING THE WASTE FILTERS ➀ The filtration system consists of several elements: A - The waste filter B - The large main filter B A C - The micro filter ➁ The filters are located in the centre of the tub and must be washed regularly to obtain optimum washing results. Actions : ➀ Before removing the filters, remove any waste on the large main filter B with a sponge so that the waste does not block the sprinkler arms. Rotate the spray D arm as shown in the drawing.
EN 12/ CLEANING YOUR APPLIANCE • Periodically : Every 3 or 4 months, in order to remove any deposits, run a special maintenance programme, without any items in the machine, using a commercially available special dishwasher cleaning product. Important : Keep this product out of children’s reach.. • Prolonged stoppage Clean your dishwasher completely and then unplug it from the electricity supply and close the water tap.
EN 13/ YOUR DISHWASHER’S SAFETY SYSTEMS • SAFETY SYSTEMS • Door poorly closed After confirming the programme (“Start” button), your dishwasher issues three short high-pitched beeps to indicate that the door is not closed and the light for the selected programme flashes. • Programme access lock Throughout the period the programme is running, or the full duration of the programme, the programme selector and the buttons are automatically protected from any kind of manipulation.
EN 14/ IF OPERATING ABNORMALITIES OCCUR • SUMMARY OF THE FAULTS Flashing LED(s) for models without a display Flashing LED(s) d01 : water supply fault (tap) d07 : overflow / anti-leak fault d02 : draining fault d08 : sprinkling distribution fault d03 : heating fault d11 : pressure sensor fault d04 : temperature fault d12 : filling fault (water inlet detection system) d05 : faulty motor d13 : faulty heating d06 : faulty motor d14 : pump filling fault or i
EN 14/ IF OPERATING ABNORMALITIES OCCUR • THE INDICATOR LIGHTS Problem The salt light does not go out Possible Causes What to do? - No salt or an insufficient quan- - Refill the tank and wait for the tity of salt in the tank to trigger cycle to end. If you have soft the float. water that requires no salt, the light is constantly lit. The lights all light up one after - Wrong programme.
EN 14/ IF OPERATING ABNORMALITIES OCCUR Problem Possible Causes What to do? The appliance will not restart - Door opened during a washing cycle. - Wait for the time delay to end (controlled internally by the appliance). The appliance does not drain (Cf. table fault d02). - The cover has not been remo- - Remove the cover. ved from the sink’s U-bend. - Check the drain hose line - Drain hose kinked. behind the machine is OK. - Remove and clean the filters - Filters totally blocked. and the drain.
EN 14/ IF OPERATING ABNORMALITIES OCCUR • POOR WASHING RESULTS... Problem White marks (identify what type) Possible Causes - Chalky film (removable with vinegar). - Traces of salt (items have a salty taste). White marks (identify what type) - Glass cloudy because water too soft (cannot be removed). Coloured marks (tea, wine, cof- - Items poorly arranged fee) - Detergent dose too low; inefficient detergent - Programme temperature too low. - If you use a multifunction product.
EN 14/ IF OPERATING ABNORMALITIES OCCUR • POOR OPERATION Problem Possible Causes What to do? Constant filling - Drain hole situated too low for - Drain wand has fallen on the the appliance (Cf. table fault floor. d012). A lot of waste on the large filter - The filters and drain outlets are - Remove and clean the filters blocked with too much and the bottom of the drain at the end of the cycle. residue. outlets. Remove large residue from the plates before putting them in the machine.
EN 14/ IF OPERATING ABNORMALITIES OCCUR • CHANGING THE BULB You can change the bulb (halogen type G412V-5W) located on the left under the top cover. To do this: Important : Unplug the power cable before changing the bulb. (depending on the model) — Remove the top cover by unscrewing the two screws under the top cover’s lip (Fig. 16 A ). — Remove the top cover by unclipping it from the back of the appliance and then pushing it a few centimetres (Fig. 16 B ). — Lift off your dishwasher’s top cover (Fig.
EN 15/ AFTER-SALES SERVICE • INTERVENTION WORK Any intervention work on your appliance must be performed by a qualified professional approved by the manufacturer. When you call, please mention the full reference for your appliance (model, type and serial number). This information is shown on the description plate (see Fig. 17) ORIGINAL PARTS When maintenance is being carried out, ask for only certified original spare parts to be used. Fig.
EN 15/ INDICATIONS FOR THE TESTING LABORATORIES • Details common to all models — Washing capacity - - - - - - - - - - - - - - - - - - - - - - - - - - - - - - - - - - - 12 standard place settings — Arrangement of the items - - - - - - - - - - - - - - - - - - - - - - - - - - - - Figs.
EN 15/ INDICATIONS FOR THE TESTING LABORATORIES A B 1 NOK NOK 2 3 4 OK 5 6 7 8 3 32 64 8 8 8 8 8 8 1 1 1 1 1 1 33 3333 2 33 3 222 1 8 8 8 6 6 8 8 8 5 444 3 4 4 4 44 4 11 C 7 2 2 2 2 2 111 22 444
EN NOTES 65
EN NOTES 66
EN NOTES 67
After Sales Service: NL De eventuele ingrepen in de machine moeten worden uitgevoerd : - of door uw vakhandelaar, - of door een andere gekwalificeerd technicus van dit merk. Tijdens het telefoneren, dient u de complete referentie op te geven van uw machine (model, type, serienummer). Deze informatie staat op het typeplaatje op de machine. Any maintenance on your equipment should be undertaken by: - either your dealer, - or another qualified mechanic who is an authorized agent for the brand appliances.